


Endpoint Insights
Import Custom SCCM Data in ServiceNow
Topics: Endpoint Insights
This is the fourth post in a five-post blog set. This one will focus on how to import custom SCCM data. Originally, I created a blog post set around ServiceNow and SCCM in order to help our customer’s import Warranty Information Reporting (WIR) and Enhansoft Reporting (ER) details into the ServiceNow Configuration Management Database (CMDB). This blog post will cover steps 12 through 15 in the list below.
Steps to Integrate SCCM Data with ServiceNow
The sequence of activities, at a high level, that I took to set up a development environment in order to integrate SCCM with ServiceNow are as follows:
1. Create an Account with ServiceNow.
2. Request a ServiceNow Developer Instance.
3. Logon to the ServiceNow Instance.
4. Activate the SCCM Plugin.
5. Create the User Account for the ServiceNow MID Server.
6. Install a ServiceNow MID Server in Your Organization.
7. Validate Communication Between the ServiceNow MID Server and ServiceNow.
8. Create a SQL Server Account for the ServiceNow Data Source.
9. Use the Integration SCCM 2016 Plugin to Import Data to the ServiceNow CMDB.
10. Schedule the Import of SCCM Data.
11. Clean Out the Default “Sample” Data.
12. Create the Data Source to Import Custom SCCM Data.
13. Import Custom SCCM Data.
14. Confirm the Custom SCCM Data in ServiceNow.
15. View Imported Data from SCCM.
16. Create a Transform for Warranty Information Reporting’s Data.
17. Run the Transform.
18. Confirm Computers Are Linked to Their Warranty Data.
19. Edit the Form Layout.
As I stated earlier, How to Import Custom SCCM Data into ServiceNow, will demonstrate steps 12 through 15. I’ll start off by showing you how to create a data source in ServiceNow. This will allow the importation of WIR warranty data which is stored in SCCM’s database. Next, I will show you how to import custom SCCM data, confirm that the records were imported successfully, and then I’ll show how to view a computer record.
In my fifth and last post, I will show you how to customize and test the imports by using transforms and then how to display the WIR warranty data within the computer object in ServiceNow.
In order to review steps eight through eleven, please see the post, How to Integrate SCCM Data with ServiceNow, for steps five through seven, please see, How to Setup a ServiceNow MID Server for Use with SCCM, and for steps one through four, please see the post, How to Request a ServiceNow Developer Instance to Integrate with SCCM.
SCCM Integration Plugin Data Sources
The SCCM integration plugin includes out-of-the-box data sources that will bring common SCCM data into the ServiceNow CMDB. However, I want to bring in some “uncommon” or what I’ll call, “custom,” data (WIR computer warranty details) into the CMCB, so in the next steps, I’ll show you how to extend the functionality of the plugin.
In order to get the WIR warranty data from the SCCM database into the ServiceNow CMDB, we first need to create a data source.
Create the Data Source to Import Custom SCCM Data
Start by logging into your ServiceNow Instance and locating the SCCM integration plugin section.

In the Filter navigator type SCCM. Press Enter. Under Integration – Microsoft SCCM 2016, click on Data Sources. Click on the New button.

Populate the Name and Import set table label fields. Click on the Type field’s drop-down and select JDBC. Click on the search button in the Use MID Server field.

Select the appropriate MID Server.

In the Format field, click on the drop-down and select SQLServer. In the Database name field type the name of the database with the SCCM data you want to import. Update the Instance name and/or the Database port fields if the instance name or ports are not the default ones.
In the Username field type the User ID of the SQL Server account you created (see the previous blog post for more information) in order to access the SCCM SQL Server database. Type the password in the Password field.
Enter the name (either NetBIOS or FQDN) of the SCCM SQL Server in the Server field. In the Query field click on the drop-down and select Specific-SQL.
Note: In order to import Enhansoft’s WIR warranty data the following SQL Server query was used.
SELECT groupID,
timestamp as TimeStamp,
revisionID,
resourceID,
[CheckedDate0],
[Description0],
[HWDeliverables0],
[HWEndDateTime0],
[HWServiceLevel0],
[HWServiceType0],
[HWStartDateTime0],
[Line0],
[Manufacture0],
[Model0],
[Serial_Number0]
FROM dbo.v_GS_Enhansoft_Warranty30
In the SQL statement paste the query. Select the checkbox for Use last run datetime.

In the Last run database field type timestamp and then click on either the Submit or the Update button. The data source is created!
Import Custom SCCM Data
Now that the data source is created, I’ll show you how I imported WIR’s warranty data from the SCCM database. Regardless of what custom data you import from the SCCM database, you can basically follow the same steps.

I started off by clicking on Enhansoft Warranty Info.

Directly beneath Related Links, I clicked on Test Load 20 Records.

Next, I ensured that the Completion code said Success.

Going back to Data Sources, I clicked on the data source that I created (Enhansoft Warranty Info) in the last section.

Under Related Links, I clicked on Load All Records.

After confirming that the Completion code said Success, I knew that WIR’s warranty data was loaded (imported) into ServiceNow. If you like, you can click on Loaded data in order to review the imported data.
Confirming the Custom SCCM Data in ServiceNow

In order to confirm that your data was successfully imported, click on the first import set. In my case the first set on the list is SET0010479.

Under Related Links, select the Import Set Rows tab. Click on the first record under Created.

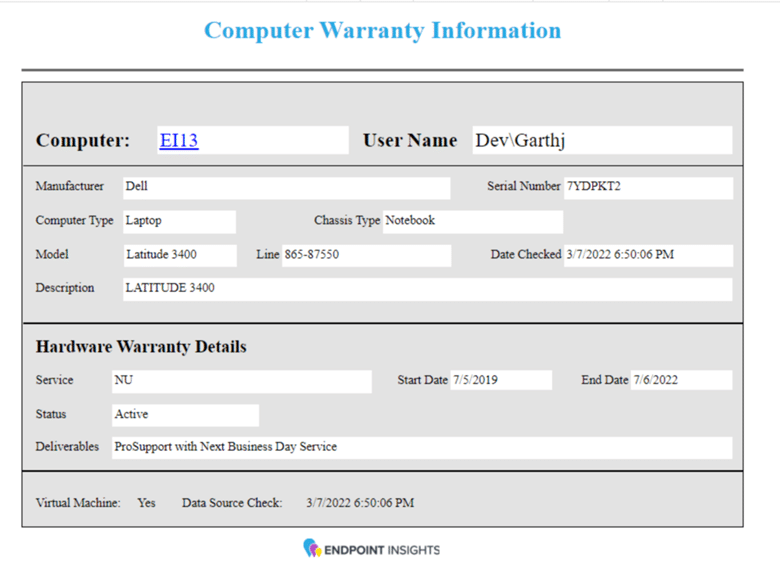
Confirm that the data you imported appears correctly. In my case, these are the warranty details for an HP Notebook.
Note: Taking this extra step, I’m satisfied that Enhansoft’s Warranty Information Reporting (WIR) SCCM data is in the ServiceNow CMDB.
Viewing Imported Data from SCCM
As I mentioned earlier, the SCCM integration plugin includes out-of-the-box data sources that will bring common SCCM data into the ServiceNow CMDB. Let’s take a look at what’s there now.

Under Integration – Microsoft SCCM 2016 expand Import Set Data. Select Computer Identity. Beside the Go to field, click on the drop-down and select Name. Search for one of your computers and press Enter. When you find the computer, select the Set link beside the computer’s name. In this example, I searched for caott* (CAOTTANT-LEN is my workstation).

Click on the Import Set Rows tab.

In this example, under Target record, I’ll click on Computer: CAOTTANT-LEN.

Notice that there are no warranty details listed here, so the custom SCCM data that I imported earlier isn’t being displayed.

Click on the Additional actions button beside Import Set. Select Export->XML (This Record).

Click on the Open button to view the XML file.
At the very bottom of the XML file, I can see that the <warranty_expiration/> attribute has no warranty details listed.

I can deduce from the XML file that the warranty expiration field (<warranty_expiration/>) is included in the default computer CI, but there is no connection between the existing imported WIR warranty data and the <warranty_expiration/> attribute within the computer CI.
At this point, I was able to conclude:
1. Enhansoft’s Warranty Information Reporting (WIR) SCCM data records were brought into the ServiceNow CMDB.
2. In the computer CI, there were warranty information fields, but they weren’t populated with data.
There’s still work to do, so in my last blog post I’ll show you how to create and run a transform for the warranty data, how to make sure that this data is applied to computer objects, and finally, how to modify the way ServiceNow displays this data (Steps #16-19).
If you have any questions about how to import custom SCCM data into ServiceNow, please feel free to contact me at @GarthMJ.