




A graphical interface can make an administrative task much easier. It can also make it easier to make the wrong change.
That was always in the back of my mind while building the Recast Management Server Role Manager. If the tool was going to add permissions, remove assignments, or update several users at once, it needed more than just a nice interface. It needed guardrails.
Some of those guardrails came from normal application design. Others came from learning how the RMS API behaves in the real world.
Do not delete what you do not understand
One of the first big questions came up while editing an existing role. What happens if RMS returns a permission that is not in my local map?
That can happen for several reasons. A newer release may introduce an action. Someone may have assigned a permission manually. Or I may simply not have added that feature to the utility yet.
The dangerous approach would be to assume that anything missing from my map should be removed. I did the opposite.
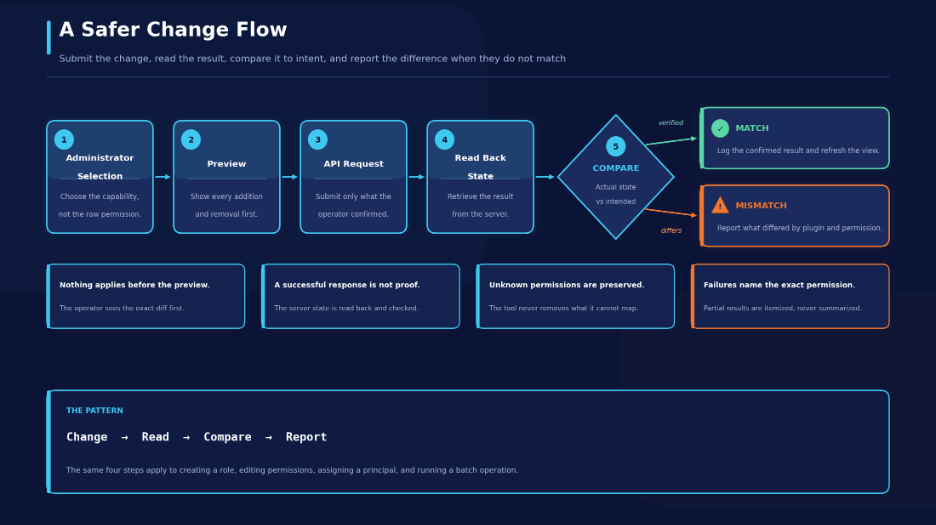
If the Role Manager does not recognize a permission, it treats that permission as unmanaged and leaves it alone. The tool removes only permissions it recognizes and can connect to a choice the administrator explicitly changed.
Before an edit, the utility also exports a CSV snapshot of the current role. If something unexpected happens, there is a record of where things started.
Simple rule: Incomplete local knowledge should never become a destructive decision.
Registering a principal is not the same as assigning a role
Another lesson came from adding new users and groups.
RMS first needs to know about the principal. After that, the principal can be assigned a role. Those steps are related, but they are not the same result.
A successful registration only tells me that RMS now recognizes the account. It does not tell me that access was granted.
So the workflow became:
- Find the user or group.
- Register the principal with RMS.
- Confirm that the principal appears in the registered list.
- Assign the selected role.
- Reload the assignments and confirm the result.
That extra verification prevents a message such as “user added to role” when only the registration step worked.
Watch out for full replacement operations
Some APIs let you add or remove one record. Other APIs expect the complete final list every time. Role-assignment updates fall into that second category.
If a principal already has several roles and I want to add one more, I cannot send only the new role. I need to retrieve the existing assignments, add the new one, and send the complete desired set back to RMS.
Leaving an existing assignment out of that payload can remove it. That is definitely not the kind of surprise you want from an administrative tool.
Preserving assignment filters
Role assignments can also include filters that limit access by service connection, domain, organizational unit, collection, or other criteria.
When the utility changes one assignment, it carries the existing role records and their filters forward. It changes only the role records the administrator selected.
New assignments currently receive the default unrestricted filter. I made that limitation visible because automation should not quietly broaden access. If a new role needs scoping, the assignment should be reviewed in RMS until the utility includes a way to select a limiting rule directly.
Batch operations are not always all or nothing
The GUI supports several batch actions. You can assign multiple roles, revoke several roles, or remove several principals. On the screen, that looks like one operation.
Behind the scenes, the API may process those items one at a time. Three removals can work, and the fourth can fail.
Because of that, the Role Manager does not stop at a generic success message. It tracks each item and reports what succeeded, what failed, and what was skipped.
Convenient multi-select should not imply transaction behavior that the API does not provide.
A few API lessons I learned along the way
Do not assume the HTTP method
Some retrieval operations use GET requests with query-string parameters. Most changes use POST requests with JSON payloads. Browser developer tools were extremely helpful for checking the method, path, and payload used by the web interface.
Keep unwrapping the response
A few responses contain several layers of Result objects. Some even wrap each item again. If the parser stops at the first layer, the script can report zero records even though the data is sitting farther down in the response.
No error does not always mean success
If the response does not include a clear success flag, I do not want the utility to guess. The safer option is to read the configuration again and confirm that the expected state is actually there.
Names and capitalization matter
Plugin and action names need to be sent exactly the way RMS represents them. The friendly labels belong in the interface. The API payload needs the real identifiers, including any inconsistent capitalization.
Isolate internal endpoints
Some user and group search calls use internal API paths. Those calls are useful, but internal paths may change. I kept them in dedicated functions so they are easier to replace if the server implementation changes.
Use the Audit Log as a confirmation source
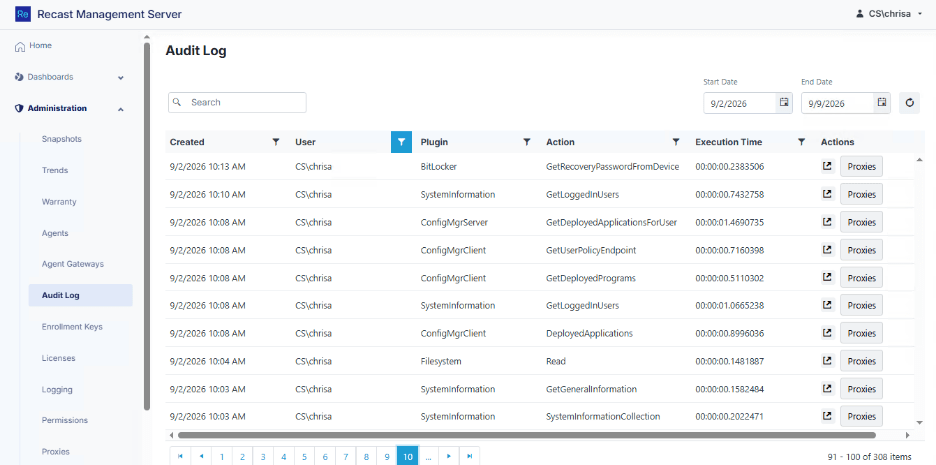
The Recast Management Server audit log became another useful place to validate what the utility was doing. After running a change through the GUI, I could review the audit entries to confirm the result from the server side instead of relying only on the local script output.
It was also helpful for finding the exact plugin and action names RMS recorded for permission changes. The labels shown in the interface are useful for administrators, but the API needs the identifiers RMS expects. When I was unsure about a name, capitalization, or grouping, the audit log gave me a practical way to compare what the web console submitted with what my permission map needed to send.
That made the audit log more than a troubleshooting artifact. It became a reference point for building safer automation: Make a known change, review the server-side record, capture the real plugin and action names, then update the script only after verifying the identifiers.
My preferred pattern: change, read, compare
The more I worked with the API, the clearer the safest pattern became:
- Submit the change.
- Read the resulting configuration.
- Compare the actual state with the intended state.
- Report the difference if they do not match.
That pattern works almost everywhere. Create a role and retrieve it. Edit permissions and compare them. Register a user and verify the user appears. Update assignments and reload the role set. Run a batch operation and check every item.
It takes a little more work than trusting the first response, but it produces much better feedback when something goes wrong.
Final thoughts
There you have it. What started as a role-creation helper became a much larger lesson in RBAC, WPF, API behavior, and safe administration.
The interface matters because it makes the work approachable. The permission map matters because it translates administrator intent into the actions RMS evaluates. But the safeguards matter just as much. Unknown permissions need to be preserved. Replacement payloads need the complete desired state. Multi-step workflows need separate verification. Batch changes need itemized results.
PowerShell made it possible to build and change the utility quickly. WPF made it easier for an administrator to use. The RMS API made me think carefully about what “success” really means.
Most importantly, the tool now helps administrators make practical RBAC decisions without hiding the permissions or the risk behind those decisions.