Windows Autopilot Device Preparation, commonly called Autopilot v2, has been around long enough now that most Intune admins have at least heard of it. But there’s still a lot of confusion out there: Is it a replacement for classic Autopilot? Why does the ESP keep showing up instead of the Device Preparation page? Why are all the apps showing “Skipped”?
This is as close to covering everything as one post can get. It includes admin setup end to end, the OOBE flow from the user’s perspective, registry keys for troubleshooting, OOBE suppression workarounds, and a full troubleshooting reference table. If you’re already comfortable with Intune and have touched classic Autopilot before, this is the post you want.
Quick terminology note: A few terms that come up throughout this post:
- ESP (Enrollment Status Page): The classic Autopilot v1 provisioning UI that blocks the desktop while apps and policies install.
- Device Preparation page: The v2 equivalent of ESP. Same idea, different mechanism and trigger.
- OOBE (Out-of-Box Experience): The Windows setup wizard a device goes through on first boot.
- Enrollment Time Grouping: The v2 mechanism that automatically adds a newly enrolled device to a target Entra ID security group at the exact moment of OOBE enrollment.
What is Autopilot Device Preparation (v2)?
Windows Autopilot Device Preparation is Microsoft’s newer, more streamlined approach to provisioning Windows 11 devices. It is not a direct upgrade or replacement for classic Autopilot (v1). Both aim at zero-touch provisioning, but they use fundamentally different architectures. That distinction has real, practical consequences for how you set things up and what you can expect during deployment.
The single biggest architectural shift: Classic Autopilot downloads its deployment profile before the user logs in, based on a pre-registered hardware hash. Autopilot Device Preparation receives its profile after the user authenticates with Entra ID credentials during OOBE.
That one difference changes everything, the provisioning flow, what can be configured natively, and what workarounds are required.
v1 vs v2 – Architecture, key differences & the Settings join myth
Area | Classic Autopilot (v1) | Device Preparation (v2) |
Profile trigger | Hardware hash pre-registered; profile downloaded at boot | User Entra ID sign-in during OOBE |
Device pre-registration | Required – hardware hash upload | Not required |
Join type | Entra Join or Hybrid Join | Entra Join ONLY |
OS support | Windows 10 & 11 | Windows 11 only |
OOBE suppression | Native toggles in deployment profile | Script workaround required (native controls coming) |
Device group population | Manual or dynamic query | Auto-populated via Enrollment Time Grouping |
App/script tracking | ESP tracks apps | Device Prep page tracks apps (max 25) + scripts (max 10) |
ESP used | Yes | No – uses Device Preparation page instead |
Hybrid Join | Yes | Not supported |
Pre-provisioning / White glove | Yes | Not yet supported |
Device naming template | Supported in deployment profile | Not supported natively – requires a script |
When to use which
Use v1 when you need Hybrid Join, self-deploying mode, pre-provisioning (white glove), device naming templates, large app payloads during ESP, or Windows 10 support.
Use v2 when your fleet is running Windows 11 exclusively, will be Entra-joined only, cloud-first, and you can keep your OOBE payload to 25 or fewer essential apps and 10 scripts. The reduced setup overhead (no hardware hash registration) and the improved real-time reporting are genuine wins here.
The Settings join myth – Why v1 and v2 behave differently
This is worth covering because it trips up a lot of admins who have tested or deployed classic Autopilot before.
In classic Autopilot v1, a common technique was: deliver a device with a local account, go to Settings > Accounts > Access work or school > “Join this device to Azure Active Directory”, log off the local account, sign in with Entra ID credentials, the ESP would fire, and Autopilot would complete.
That worked in v1 because:
- The hardware hash was already registered, and an Autopilot profile was cached in the cloud before the device was ever powered on.
- On first Entra user sign-in, the User ESP phase triggered and picked up from where the Device ESP left off.
- The profile was already fetched at boot time, so the profile was never “missed”.
The exact same method fails completely in v2 because:
- There is no hardware hash registration, so there is no cloud profile waiting at boot time.
- The OOBE corporate credential sign-in is the trigger. There is no alternative.
- Doing a Settings join gives you a regular Entra-joined, MDM-enrolled device. Policies will eventually flow, but the Device Preparation policy never fires.
- The device group is never auto-populated because the OOBE enrollment event (the only event that triggers Enrollment Time Grouping) never occurred.
- The Device Preparation page never appears, so there is no tracked provisioning, no real-time status, and no deployment report entry.
Workplace join vs Entra join
Settings > Access work or school > Connect (not “Join”) is even worse. That performs a Workplace Join (Entra registered state only), not a full Entra Join. This gives minimal MDM and is a known source of device trust-type conflicts that are painful to clean up.
Bottom line: The OOBE corporate sign-in moment is the only valid trigger for Autopilot Device Preparation. There is no shortcut.
Prerequisites
Requirement | Details |
Operating System | Windows 11 only. 22H2: requires KB5035942 or later (April 2024 media or later). 23H2: requires KB5035942 or later. 24H2 or later. |
Licensing | Entra ID P1 or P2 + Microsoft Intune. Covered by: Microsoft 365 Business Premium, Microsoft 365 F1 or F3, Microsoft 365 Academic A1, A3, or A5, Microsoft 365 Enterprise E3 or E5, Enterprise Mobility + Security E3 or E5 |
Join Type | Microsoft Entra Join ONLY. Hybrid Azure AD Join is NOT supported. |
MDM Auto-Enrollment | Must be configured in Entra ID: Entra ID > Mobility > Microsoft Intune > MDM user scope = All or targeted group. |
Device State | Device must NOT already be registered as a classic Autopilot (v1) device. If registered in v1, the v1 profile ALWAYS takes precedence. |
Device Security Group | A dedicated Entra ID Assigned Security group with Intune Provisioning Client as Owner. Left empty, Intune auto-populates at enrollment time. |
User Security Group | A Security group containing all users who will enroll devices via AP-DP. |
Network | Device must have internet access (port 80, 443, 123/UDP). See the requirements for the full URL allow list. |
v1 Takes Precedence Over v2 – Always
If a device is assigned both a classic Autopilot deployment profile AND an Autopilot Device Preparation policy, the v1 profile always wins. You must deregister the device from classic Autopilot first. This is also why you’ll see the ESP appearing instead of the Device Preparation page. It’s almost always because the device is still registered in v1.
When this is required
This only applies when enrollment restrictions are in place blocking personal Windows devices. If your tenant allows personal device enrollment, corporate identifiers are not strictly required, but they could also be utilized to ensure correct device ownership classification.
Step 1 – Get the identifier from your device:
Step 2 – Save as a .csv file with no header row. Just the data line(s).
Step 3 – Upload in Intune Admin Center:
Corporate identifiers vs hardware hash
Unlike classic Autopilot hardware hash import, corporate identifiers do not lock a device to your tenant. They only flag the device as corporate-owned for the enrollment restriction evaluation. This makes them far more flexible for lab testing and re-enrollment scenarios. The identifier must be uploaded before the device attempts enrollment.

Entra ID security groups
The magic in Windows Autopilot device preparation is enrollment time grouping.
Enrollment time grouping is a key feature in Autopilot v2 that significantly speeds up app and policy provisioning during device enrollment. Instead of relying on dynamic device groups that can cause delays, this feature automatically adds the device to a pre-defined static Microsoft Entra security group at enrollment time the moment the user authenticates during OOBE.
Once the device becomes a member of this “just-in-time” group, any required apps, scripts, or policies assigned directly to that group are delivered immediately. This eliminates post-enrollment latency, provides faster and more predictable setup, and improves time to productivity for end users. To use it, admins create an Entra security group, add the Intune Provisioning Client as an owner, and configure the group in the Autopilot device preparation profile.
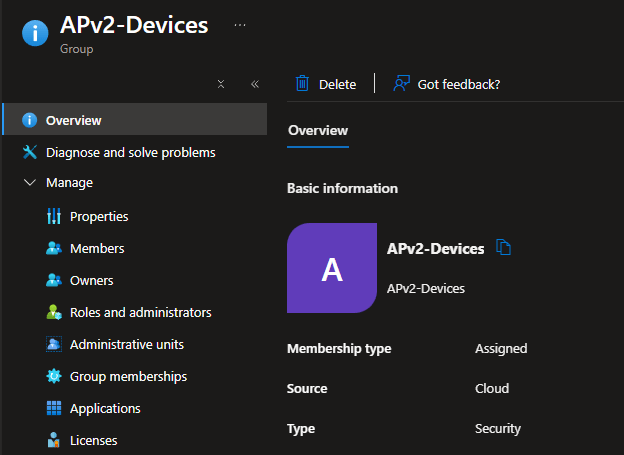
You need exactly two dedicated Entra ID security groups:
Group Role | Type | Members at Creation | Purpose |
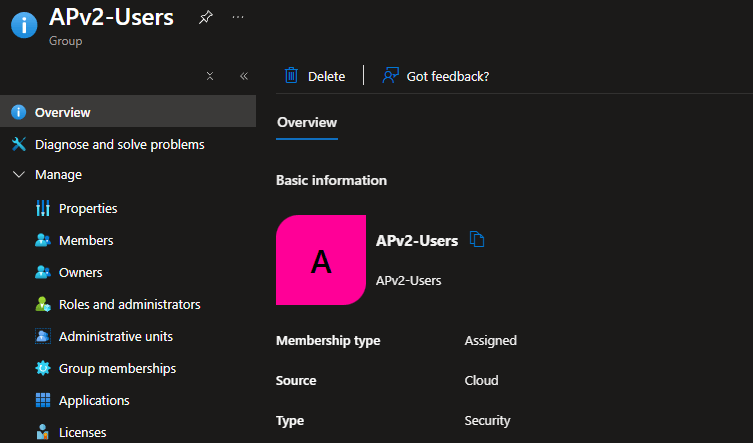
User Group (e.g. APv2-Users) | Security, Assigned | Add all users who will enroll devices using Autopilot V2 | Assigned to the Device Preparation policy – controls who gets the AP-DP flow |
Device Group (e.g. APv2-Devices) | Security, Assigned | Leave EMPTY – Intune auto-populates during enrollment | Target for app/script assignments. Owned by Intune Provisioning Client. |
Critical group settings
For the Device Group: Set “Microsoft Entra roles can be assigned to the group” = No. Role-assignable groups have additional restrictions that break the auto-membership mechanism. Do not convert the group from Static to Dynamic after configuring it. This is a documented known issue that causes failures.
Intune provisioning Client as Group Owner
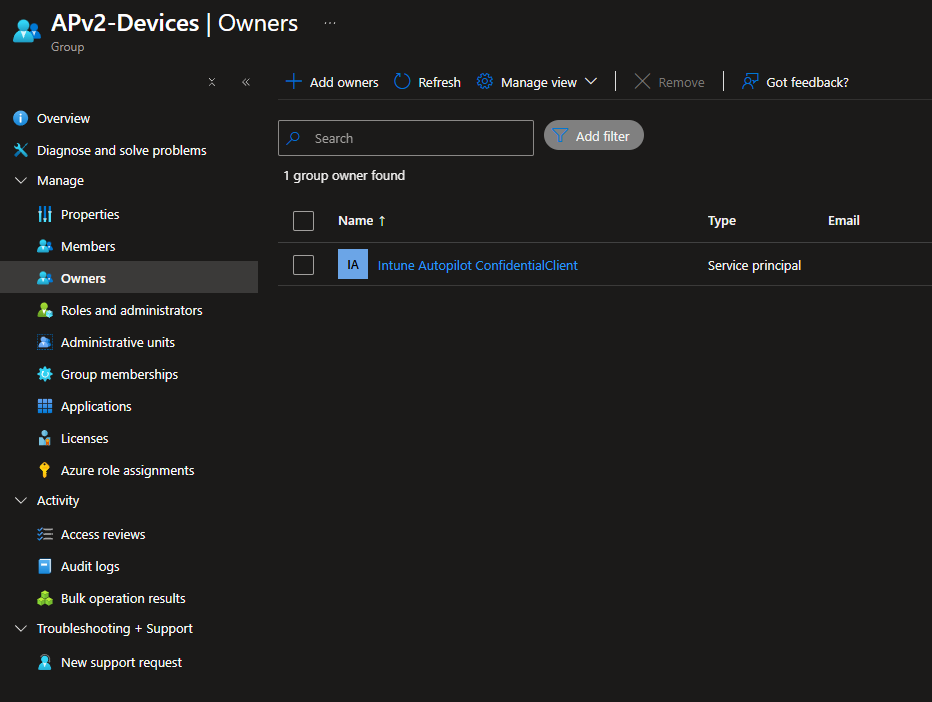
The device group must have a specific Entra ID service principal set as its Owner. This is the mechanism behind Enrollment Time Grouping. As mentioned above, it allows Intune to automatically add a newly enrolled device into the group at the exact moment of OOBE enrollment, before any apps or scripts are deployed. Without this owner, the device group stays empty, and nothing deploys during provisioning.
Property | Value |
Display Name (most tenants) | Intune Provisioning Client |
Display Name (some tenants) | Intune Autopilot ConfidentialClient |
App ID (definitive identifier) | f1346770-5b25-470b-88bd-d5744ab7952c |
Use for identification | Always use the App ID – display name varies by tenant |
Both Names Are Documented by Microsoft
The display name variation (Intune Provisioning Client vs Intune Autopilot ConfidentialClient) is a known tenant-level difference. Both refer to the same service principal. The App ID is always the definitive identifier.
Do not remove the service principal owner
If the Intune Provisioning Client service principal is later removed as owner of the group, Enrollment Time Grouping will silently stop working and future deployments will fail. This is documented as a known issue in the AP-DP Known Issues article.
Apps & platform scripts
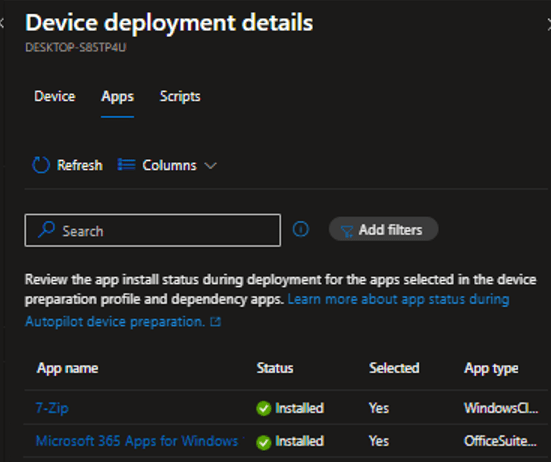
The Device Preparation policy supports a maximum of 25 applications and 10 Platform Scripts to be tracked and deployed during OOBE provisioning.
Supported application types:
App Type | Supported | Notes |
Win32 (.intunewin) | Yes | Recommended – most reliable |
Line-of-Business (LOB) | Yes | MSI-based, supported |
Microsoft Store (WinGet-based) | Yes | Only Store apps that support WinGet |
Microsoft 365 Apps | Yes | Supported |
Enterprise App Catalog | Yes | Added in Intune 2506 release |
Proactive Remediations / Health Scripts | No | NOT tracked by DP policy – different mechanism |
Critical requirements – read these carefully:
- Apps are not automatically deployed just by listing them in the DP policy. You must also assign each app as Required to the APv2-Devices device group separately.
- Only Platform Scripts (Devices > Scripts and remediations > Platform scripts) are supported. Remediations scripts are not. You must also assign each script to the APv2-Devices device group separately.
- All apps and scripts must be configured to run in System context (not user context). During OOBE there is no logged-in user. User context will skip silently.
- Scripts must have “Run this script using the logged on credentials” = No and “Run script in 64-bit PowerShell” = Yes.
Most common cause of “Skipped” status
If apps or scripts show as “Skipped” in the deployment report, check these three things in order: (1) Are they assigned to APv2-Devices as Required? (2) Are they set to System context? (3) Is the Intune Provisioning Client set as the group owner? These are the top three causes documented in the official troubleshooting FAQ.
Device preparation policy configuration
Navigate to:
Click Create > User Driven and configure as follows:
There is also an Autopilot device preparation Automatic mode, which prepares Windows 365 Cloud PCs with essential apps and scripts before the user ever signs in. This ensures the virtual desktop is fully ready for use without relying on custom images. But since it is currently a preview feature, we will not analyze it further in this post.
Tab | Setting | Recommended Value/Notes |
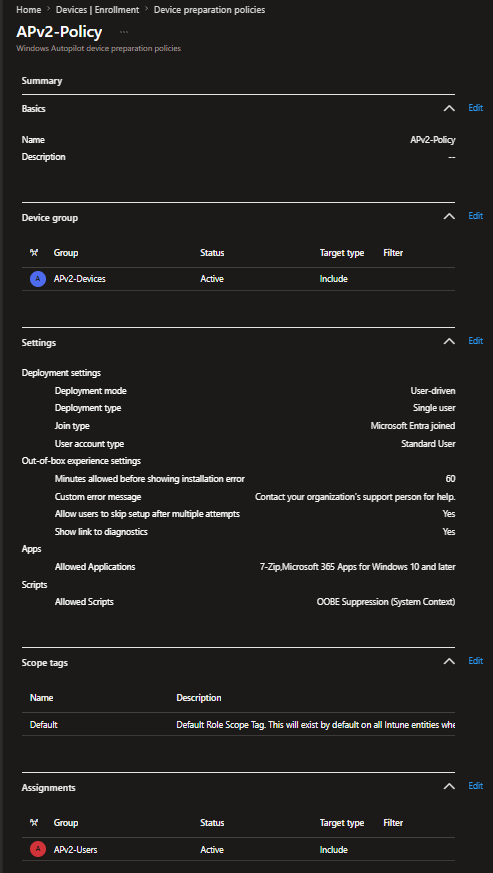
Basics | Name | e.g., APv2-Policy |
Basics | Description | Optional but recommended |
Device group | Device group | Select APv2-Devices (NOT the user group) |
Configuration | Deployment mode | User driven |
Configuration | Deployment type | Single user |
Configuration | Join type | Microsoft Entra joined |
Configuration | User account type | Standard User recommended (use EPM for elevation if needed). By default, Entra join adds the user to local Admins. This setting removes them. Note: There is a known issue, when User account type = Standard User and the Entra ID “Registering user is added as local administrator on the device during Microsoft Entra join” setting is set to Selected or None, provisioning silently skips and users land on the desktop without apps installed. Still active as of the last update date. Check here for workarounds. |
Configuration | Minutes allowed before showing installation error | Integer between 15–720. Applies to the entire deployment, not per-app. |
Configuration | Custom error message | Optional – shown to user on deployment failure |
Configuration | Allow users to skip setup after multiple attempts + Show link to diagnostics | Yes or No depending on policy |
Configuration | Apps (max 25) | Select essential apps to track during OOBE |
Configuration | Scripts (max 10) | Select Platform Scripts to run during OOBE (Note: If you chose apps in the previous step, the Scripts option may sometimes be hidden. Try zooming out in the browser to reveal it.) |
Scope tags | Assign Scope tags | If your organization uses scope tags, you can assign them to the Autopilot Device Preparation profile here. |
Assignments | Assign to | APv2-Users security group |
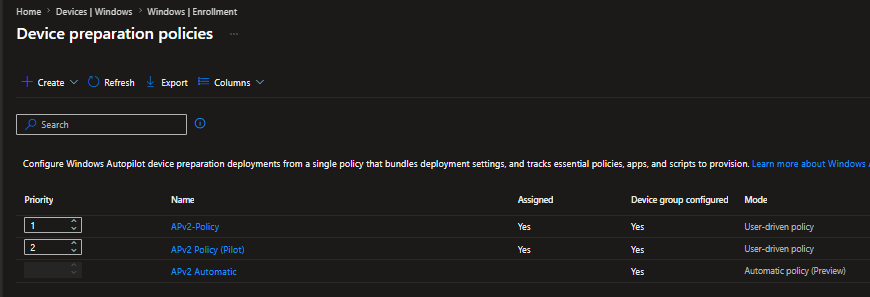
Policy Priority
If multiple Device Preparation policies are deployed to overlapping user groups, only one policy applies per user: the one with the highest priority (lowest priority number).
Priority Number | Meaning | How to Change |
1 (smallest number) | Highest priority – wins if multiple policies match the user | Drag the policy to the top of the list |
2, 3, 4… | Lower priority – only applies if no higher-priority policy matches | Drag lower in the list |
N/A (Automatic mode) | Automatic mode policies do NOT use priority – assigned directly within Cloud PC provisioning policies | N/A |
OOBE privacy & settings suppression
Classic Autopilot v1 had native profile toggles to hide privacy settings, the EULA, and other OOBE prompts. Autopilot Device Preparation (v2) does not currently have these native controls. The profile is only received after OOBE sign-in, so there is no mechanism at the pre-authentication stage to suppress screens at the policy level.
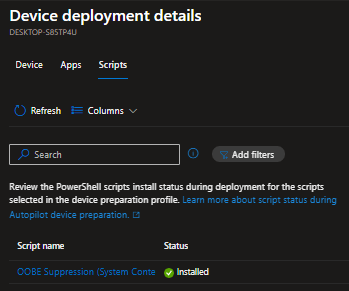
The current workaround is a Platform Script that writes registry values during provisioning. This script should be added to your Device Preparation policy (counting toward your 10-script limit) and assigned to APv2-Devices as Required. Check Chapter 4.4 for the Script settings.
Use the correct registry path
The Group Policy registry path (HKLM:\SOFTWARE\Policies\Microsoft\Windows\OOBE) is different from the direct registry path used by the script below. Use the direct path (HKLM:\SOFTWARE\Microsoft\Windows\CurrentVersion\OOBE), not the Policies path.
Verified registry reference
Setting | Registry Path | Value Name | Data |
Disable Privacy Experience | HKLM\SOFTWARE\Policies\Microsoft\Windows\OOBE | DisablePrivacyExperience | 1 (DWORD) |
Privacy Consent accepted | HKLM\SOFTWARE\Microsoft\Windows\CurrentVersion\OOBE | PrivacyConsentStatus | 1 (DWORD) |
Express settings, skip privacy questions | HKLM\SOFTWARE\Microsoft\Windows\CurrentVersion\OOBE | ProtectYourPC | 3 (DWORD) |
Disable first logon animation | HKLM\Software\Microsoft\Windows\CurrentVersion\Policies\System | EnableFirstLogonAnimation | 0 (DWORD) |
Disable Advertising ID | HKLM\SOFTWARE\Policies\Microsoft\Windows\AdvertisingInfo | DisabledByGroupPolicy | 1 (DWORD) |
Telemetry minimum | HKLM\SOFTWARE\Policies\Microsoft\Windows\DataCollection | AllowTelemetry | 0 (DWORD) |
Platform Script – OOBE Suppression (System Context)
Script + Settings Catalog – use both
Recommended approach: Use both this Platform Script (for OOBE-time enforcement) AND a Settings Catalog policy targeting the device group (for persistent post-enrollment enforcement). Settings Catalog policies assigned to the device group are NOT tracked during AP-DP provisioning. They may apply during or after the deployment completes.
User experience – OOBE flow step by step
Below is the Windows Autopilot device preparation user-driven Entra join workflow overview.
Step | What Happens | Notes |
1. Power on | Standard Windows 11 OOBE begins | Device must be clean |
2. Region & Keyboard | Region and keyboard layout | User selects desired region and keyboard layout |
3. Network | Connect to Wi-Fi or Ethernet | Required – device needs internet to contact Autopilot and Intune services |
4. Windows Checks | Windows Updates Check and License Agreement | User accepts and waits for the next step |
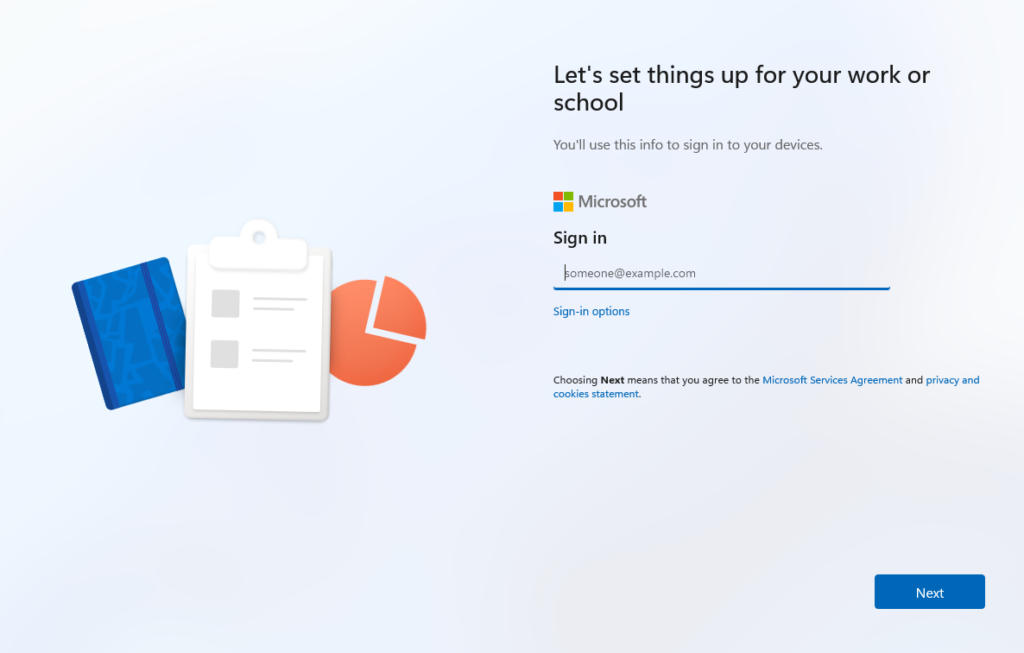
5. Setup type | “How would you like to set up?” screen or directly set up screen for work or school | User selects “Set up for work or school” |
6. Sign in | User enters Entra ID credentials + MFA | No org branding/logo appears here – profile loads POST sign-in(by design in v2) |
7. Device joins Entra + enrolls in Intune | Happens automatically after credential entry | User is added to local Admins group at this point – removed again if Standard User is configured in the policy |
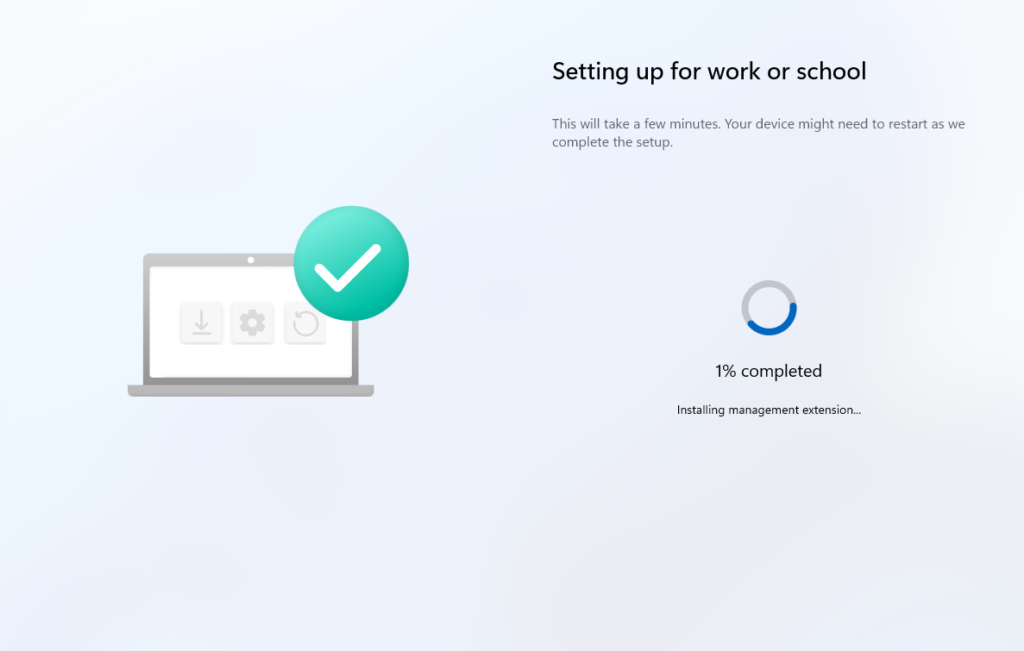
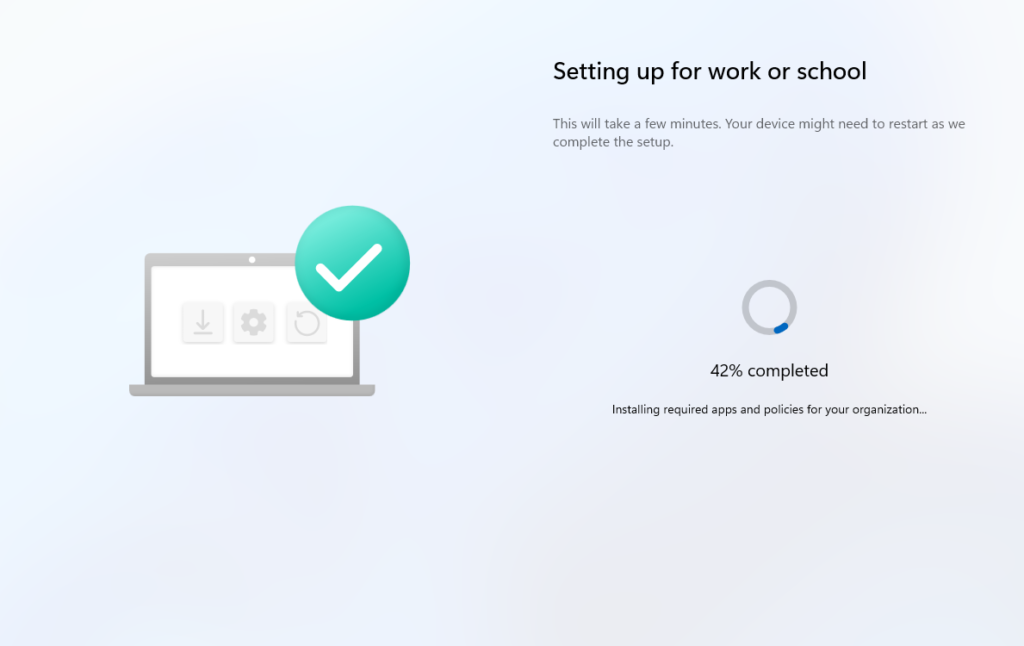
8. Device Preparation page appears | “Setting up for work or school” with % progress bar | This is the AP-DP page. NOT the classic ESP. |
9. IME installs | “Installing management extension…” at 1% | Intune Management Extension is always installed first, as it drives all subsequent app/script installs |
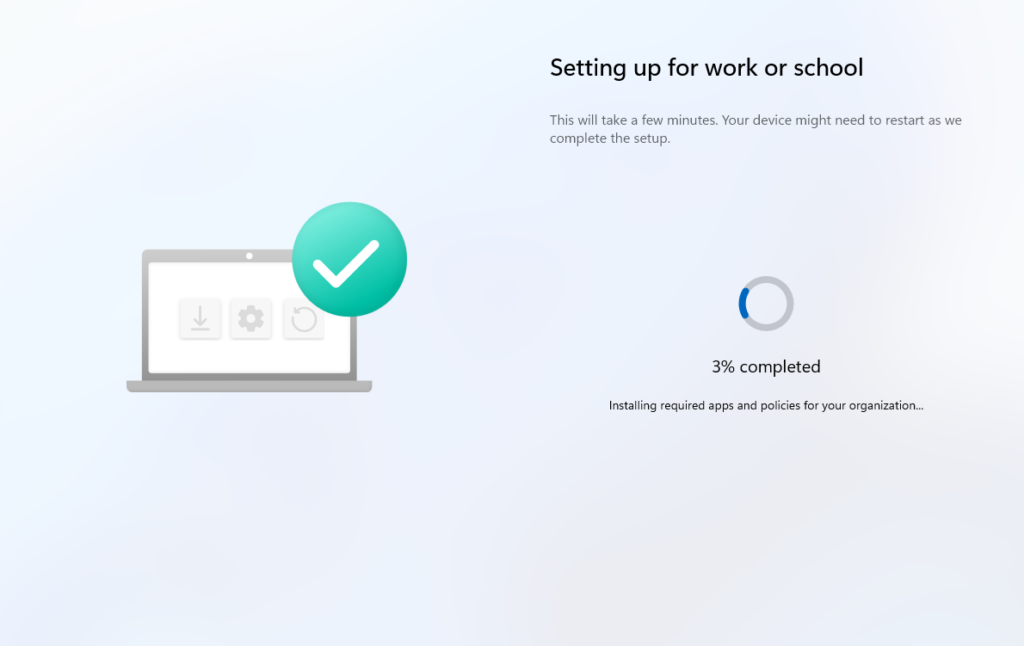
10. Policy sync | MDM policies synced – not individually tracked on the UI | Policies assigned to the device group sync here, but AP-DP does not report per-policy status |
11. Scripts run | Platform scripts execute in sequence | Up to 10 tracked. System context only. |
12. Apps install | Apps install in sequence | Up to 25 tracked. Failure of one stops the deployment. |
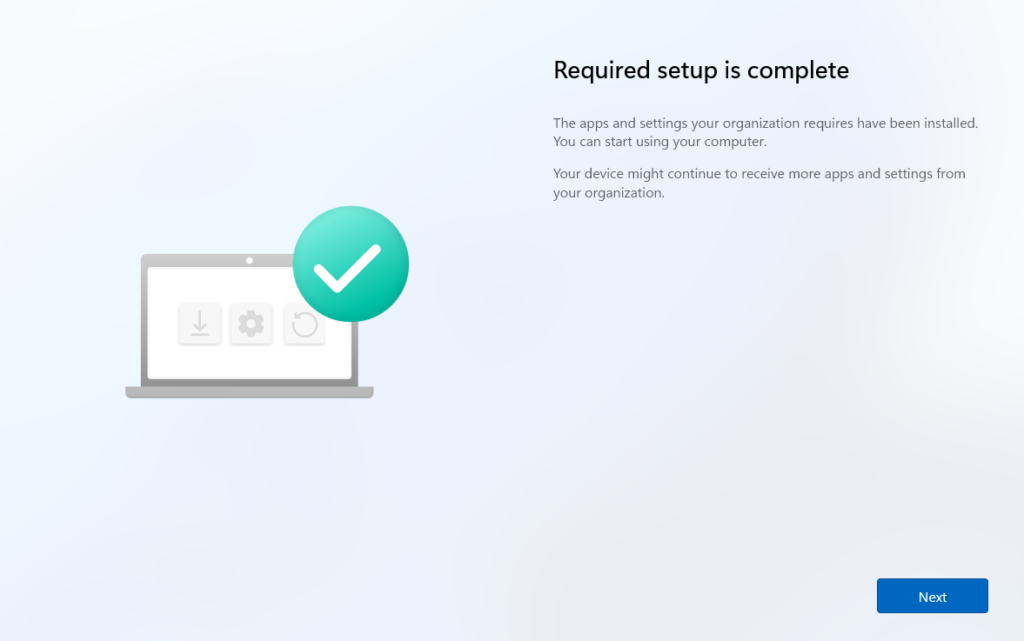
13. “Required setup complete” | Completion page shown to user | Additional background installations may still be running, as these are not tracked by AP-DP |
14. Desktop | User automatically signed in, desktop shown | Another MDM sync triggers at this point to deliver remaining configurations |
Regarding steps 9-12 during device preparation, Intune processes things in a strict sequence based on what you selected in the policy:
- It first syncs with MDM, pulls all policies, and checks whether LOB and Microsoft 365 apps are selected. If any of these apps fail to install, the whole deployment fails at this stage.
- Next, it checks for PowerShell scripts in the policy and runs them. If any script fails, the deployment fails here.
- Finally, it processes Win32, Microsoft Store, and Enterprise App Catalog apps. Again, if any of these app types fail to install, the deployment is marked as failed at this point.
No branding before login – expected in v2
No organization logo or branding appears before sign-in, which is unlike classic Autopilot v1 that showed branding on the sign-in screen. This is expected behavior in v2. The device only receives its policy/profile after the user authenticates, so there is nothing to display before that point. This is not a misconfiguration.
Indicates whether the DevicePrepPage (DPP) agent provisioning succeeded or failed. This is the first place to check when AP-DP doesn’t start or complete.
Step-by-step provisioning tracker (TSM – BootstrapperAgent)
Value Name | Description |
StateType | Current state of the device preparation step being processed |
(Step entries) | Each value represents a specific provisioning step. If AP-DP is stuck, examine these entries to identify which step is failing. |
Provisioning workload progress (JSON format)
Holds current workload progress as a JSON blob, updated as each phase completes. Check OrchestrationContext and PreviousProgress for phase details.
Live troubleshooting commands during OOBE
Press Shift+F10 to open a command prompt, then:
Monitoring, reporting, & troubleshooting – Intune Portal
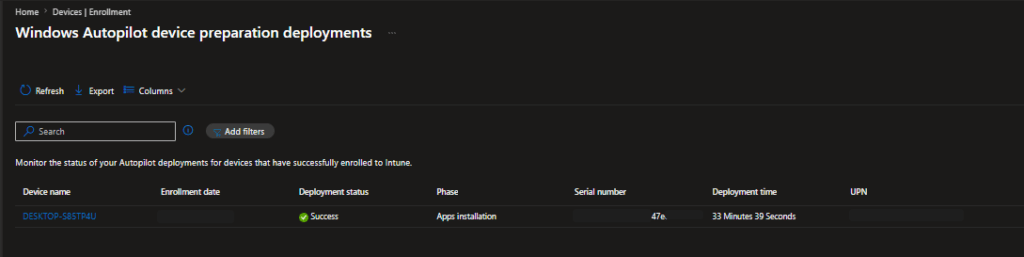
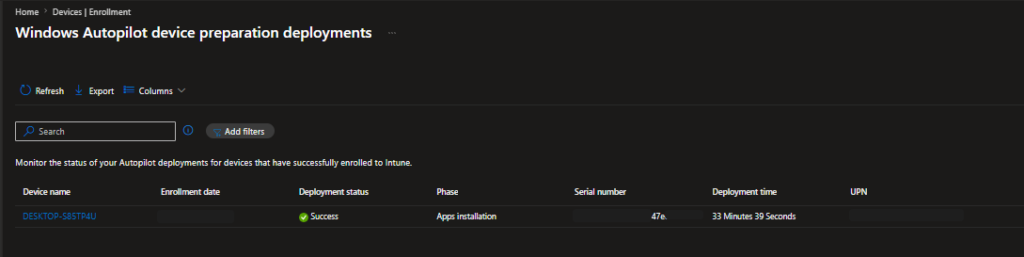
The report shows per-deployment:
Field | Description |
Device name | Name assigned during deployment. Click to open deployment details. |
Enrollment date | Date and time the device enrolled |
Phase | Last reported phase |
Serial number | Hardware serial number of the device |
Deployment time | Duration of the OOBE provisioning. Shows “In progress” if still running. |
UPN | User who signed in during OOBE and had the AP-DP policy assigned |
Apps status | Per-app: Installed / In progress / Skipped / Failed |
Scripts status | Per-script: Completed / In progress / Skipped / Failed |
Policy version | Version of the DP policy received. Increments each time the policy is saved |
OS version | Windows version installed on the device at time of deployment |
Auto-Collected Diagnostic Logs on Failure
Diagnostic logs for failed deployments can be downloaded directly from the deployment report. Select the failed device > Device deployment details > Download logs. Logs are automatically collected when an error occurs during deployment. No manual MDM diagnostic collection required.
Common errors & troubleshooting quick reference
Error / Symptom | Root Cause | Fix |
Error 80180014 at enrollment | Enrollment restriction blocks personal devices; no corporate identifier uploaded | Upload Manufacturer/Model/Serial CSV to Intune before enrollment. Must be done PRIOR to the device attempting enrollment. |
ESP appears instead of Device Prep page | Device is still registered as classic Autopilot v1 – v1 always wins | Deregister device from classic Autopilot. Verify no v1 profile is assigned. |
Apps/scripts show “Skipped” | App or script not assigned to APv2-Devices as Required, OR running in user context | (1) Assign to device group as Required. (2) Set System context. Both required. |
Device group stays empty after enrollment | Intune Provisioning Client not set as owner of device group | Re-check group Owner – must be the service principal with AppID f1346770-5b25-470b-88bd-d5744ab7952c |
No org branding before login | By design in v2 – profile loads post-login | Not a bug or misconfiguration. Normal v2 behavior. |
Static group converted to dynamic | Known issue: changing group type after AP-DP configuration causes failures | Do not convert the device group type. Re-create if necessary. |
References