


That annoying Rosetta warning when launching Intune-deployed apps — sound familiar?
If you manage Macs with Intune and have ever seen the Rosetta prompt appear when you start an app, trust me—you’re not alone. It’s one of those frustrating moments where everything should just work… but doesn’t.
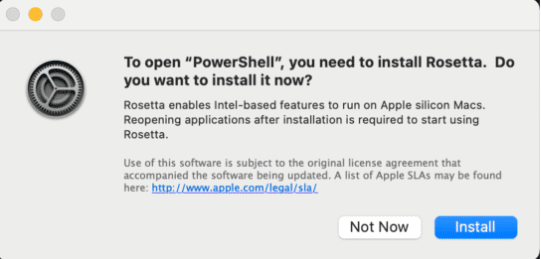
Let me be clear: this isn’t Intune’s fault. Intune does its job. But the reality is still annoying, especially because your users suddenly face an extra step, manually installing Rosetta 2 before they can even open the app they need. That’s not a great user experience. And let’s be honest, we all know what happens next: the support desk starts lighting up with phone calls.
So… Why Is Rosetta 2 Even Needed?
Rosetta 2 is Apple’s clever translation layer that allows Intel-based (x64) apps to run on Apple Silicon Macs, like my own MacBook Pro with the M3 Max chip inside. Without it, those apps simply won’t launch.
The kicker? Rosetta 2 isn’t installed by default and is required to run x64 (Intel) versions of apps on Apple Silicon Macs. So, if you deploy an x64 app using Intune, and Rosetta isn’t already present, macOS throws up that infamous warning.
The good news: you can avoid all this. In this post, I’ll walk you through how to install Rosetta 2 automatically with a shell script in Intune. Your users never have to see that warning again. Just smooth, seamless app launches. Just the way it should be.
Rosetta 2 Check: Installed or Missing?
If you’re wondering whether Rosetta 2 is already installed on a Mac, there’s a simple terminal command you can run:
lsbom -f /Library/Apple/System/Library/Receipts/com.apple.pkg.RosettaUpdateAuto.bom
If it returns at least three files, as shown in the screenshot below, Rosetta 2 is already installed.

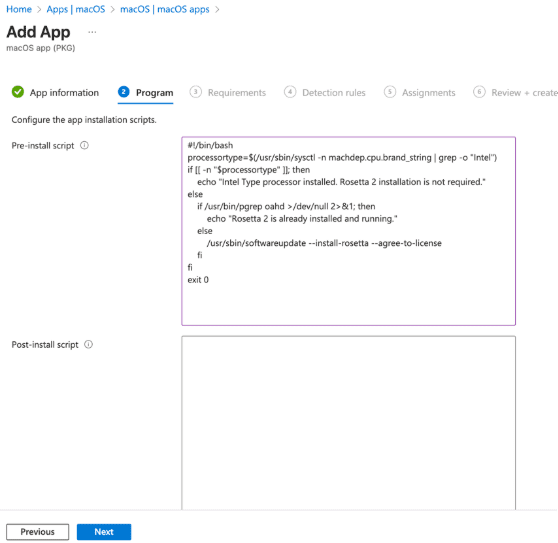
Inside the Script
I use this shell script as a pre-install script for a macOS app, ensuring Rosetta 2 is in place before the app installs. In short, this guarantees that Rosetta 2 is already available.
#!/bin/bash

processortype=$(/usr/sbin/sysctl -n machdep.cpu.brand_string | grep -o "Intel")

if [[ -n "$processortype" ]]; then

    echo "Intel Type processor installed. Rosetta 2 installation is not required."

else

    if /usr/bin/pgrep oahd >/dev/null 2>&1; then

        echo "Rosetta 2 is already installed and running."

    else

        /usr/sbin/softwareupdate --install-rosetta --agree-to-license

    fi

fi

exit 0
What does this bash script do?
- First, it checks if the Mac has an Apple Silicon processor.
- If so, it then checks whether Rosetta 2 is already installed.
- If Rosetta 2 isn’t already present, the script installs it automatically.
Intune Boost: Add PowerShell & Rosetta Pre-Install
Now for the fun part—adding the script to Intune as a pre-install step for your macOS app. This is the moment we send our script into the wilds of Intune.
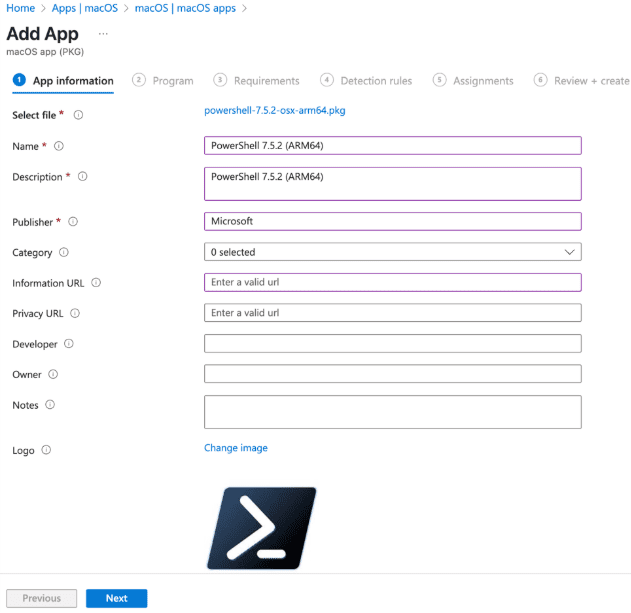
For this walkthrough, I’ll package PowerShell 7.5.2—an app that needs Rosetta 2 on Apple Silicon Macs. You can download it from here!
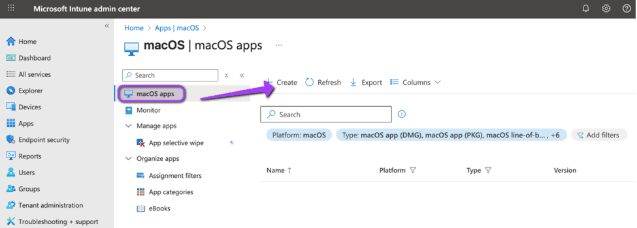
1. Go to Microsoft Intune admin center > Apps > macOS (under Platforms). Select Create.
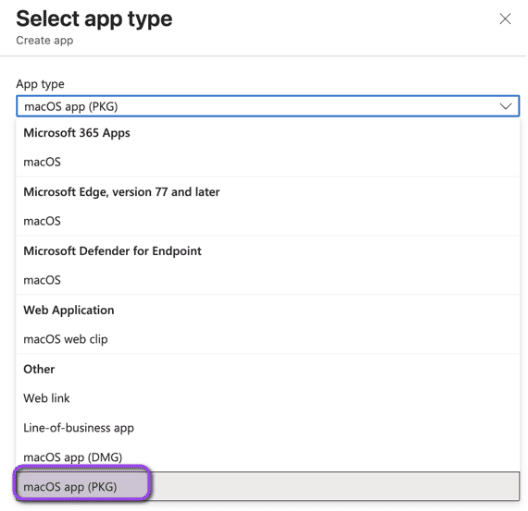
2. Choose macOS app (PKG). Select Next.
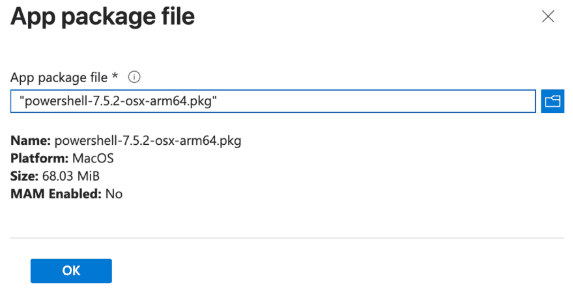
3. Select App package file. Browse to powershell-7.5.2-osx-arm64.pkg and upload it. Select OK.
4. On the App information page, most of the fields will already be filled in for you. I made a few tweaks to make things a bit more user-friendly, such as changing the name, updating the description, setting the correct publisher, and uploading a custom logo to give it a more polished look.
5. Select Next to open Program. Under Pre-install script, upload your Rosetta script. Select Next.
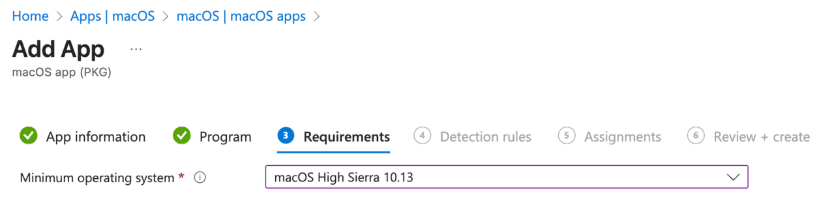
6. On the Requirements page, enter the minimum macOS version required. Select Next.
7. In Detection rules, leave the defaults in place and select Next.
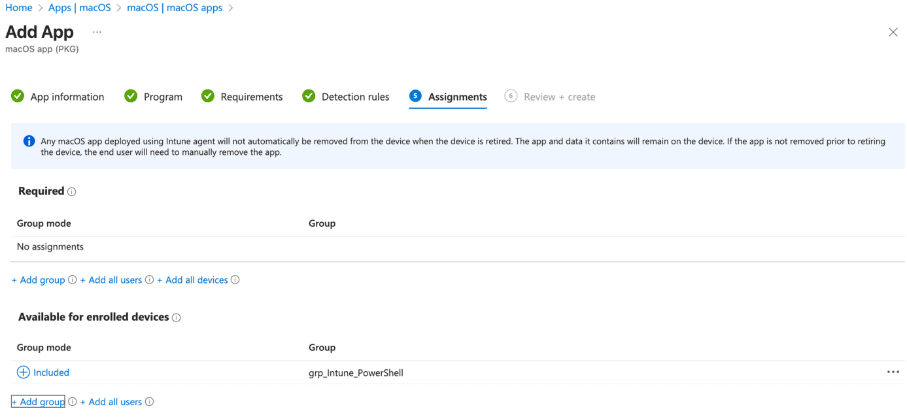
8. In Assignments, select Add groups under Available for enrolled devices. This is where you choose which groups should have access to the app. This makes sure that the app will show up in the Intune Company Portal! When done, click Next to move on.
9. In Review + Create, verify that all settings are correct. Select Create.
And that’s that! The script is now successfully added to Intune as a pre-install script for a macOS app and ready to roll. Of course, if you’re anything like me, you’ll want to give it a quick test run first because seeing is believing, right?
Check out the short demo video below to watch it in action.
Conclusion
By adding a simple pre-install script to your Intune workflow, you’ve eliminated one of the most common (and annoying) roadblocks for MacBook users with Apple Silicon processors. No more confusing Rosetta prompts—and no more frustrated users wondering why their app won’t launch. It’s a small tweak with a big impact!
