Today, we’ll explore Microsoft Cloud PKI—a cloud-based certificate management solution built into Microsoft Intune. In this guide, I’ll walk you through the benefits, requirements, and step-by-step process to set up your own cloud-based PKI infrastructure and deploy certificates to managed devices.
Key Benefits of Using Microsoft Cloud PKI
Why use Cloud PKI? If you’ve ever managed an on-premises PKI environment, you know the complexity involved: setting up a two-tier CA hierarchy, configuring NDES servers, installing and maintaining the Intune Certificate Connector, and ensuring network connectivity for SCEP requests. It’s a lot to handle.
Microsoft Cloud PKI eliminates this complexity by providing a fully managed, cloud-based PKI service. Here’s what makes it compelling:
No On-Premises Infrastructure Required
Gone are the days of maintaining dedicated servers for your root CA, issuing CA, and NDES. Microsoft hosts and manages everything in the cloud, reducing your operational overhead significantly.
Rapid Deployment
What traditionally took weeks of planning, hardware procurement, and configuration can now be accomplished in minutes. You can have a fully functional two-tier PKI hierarchy up and running the same day, you start.
Automated Certificate Lifecycle Management
Cloud PKI handles certificate issuance, renewal, and revocation automatically. No more manual certificate renewals or emergency fixes when certificates expire unexpectedly.
Simplified Security Posture
Certificate-based authentication is more secure than password-based methods. Cloud PKI makes it easier to implement this enhanced security for scenarios like Wi-Fi (802.1x), VPN, and email encryption.
From an IT pro’s perspective, not having to manage complex on-premises PKI infrastructure is a game-changer. It frees you up to focus on other priorities instead of troubleshooting certificate enrollment failures or maintaining aging CA servers.
What about existing PKI investments?
Microsoft provides a Bring Your Own CA (BYOCA) option that lets you anchor your cloud-based issuing CA to your existing on-premises root CA. This provides flexibility for organizations that want to leverage Cloud PKI while maintaining their current trust hierarchy.
What is the cost?
Cloud PKI is available as part of the Microsoft Intune Suite or very soon also as part of the E5 license.
Requirements
- Microsoft Intune Plan 1 subscription (required base)
- Microsoft Intune Suite license OR Microsoft Cloud PKI standalone add-on license OR soon E5
- Intune Administrator role or custom role with Cloud PKI permissions
- Devices enrolled in Microsoft Intune
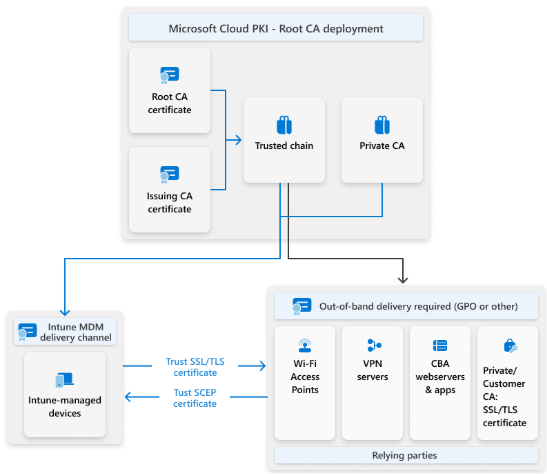
Understanding the Architecture
Before diving into the setup, let’s briefly understand how Cloud PKI works. The architecture follows PKI best practices with a two-tier hierarchy:
Root CA – The trust anchor for your entire PKI. This CA is created first and signs the issuing CA certificate. The root CA should be offline in traditional setups, and Cloud PKI handles this automatically.
Issuing CA – The CA that actually issues certificates to your devices. It’s subordinate to the root CA and handles all certificate requests through SCEP.
SCEP Service – Cloud PKI includes a built-in SCEP (Simple Certificate Enrollment Protocol) service that acts as the certificate registration authority. This eliminates the need for on-premises NDES servers.
The flow is straightforward: devices receive a SCEP profile from Intune, request a certificate from the Cloud PKI service, and the issuing CA fulfills the request. All of this happens without any on-premises infrastructure.
Step-by-Step Deployment Guide
Step 1: Create the Root CA
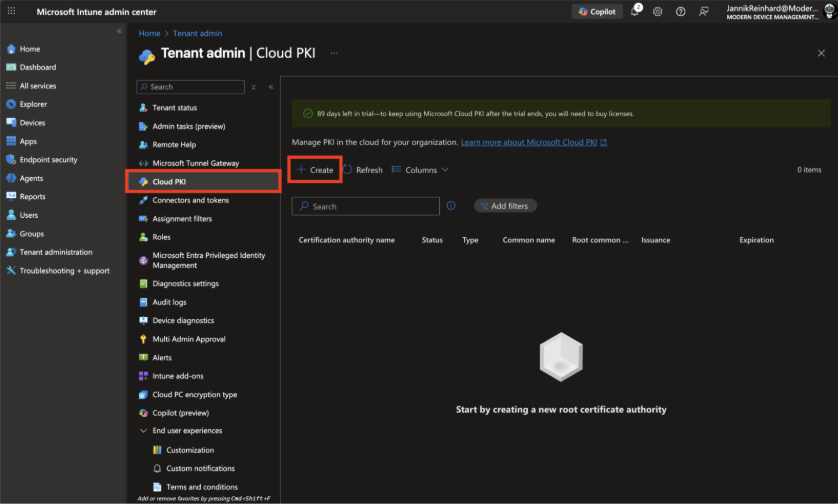
First, navigate to Microsoft Intune admin center > Tenant administration > Cloud PKI.
On the Cloud PKI page, click Create to start the CA creation wizard.
For the basics, enter a Name for your root CA. Use something descriptive that you can easily identify later, such as “Jannik Cloud PKI Root CA”. Optionally add a Description explaining the purpose of this CA.
Click Next to continue to Configuration settings.
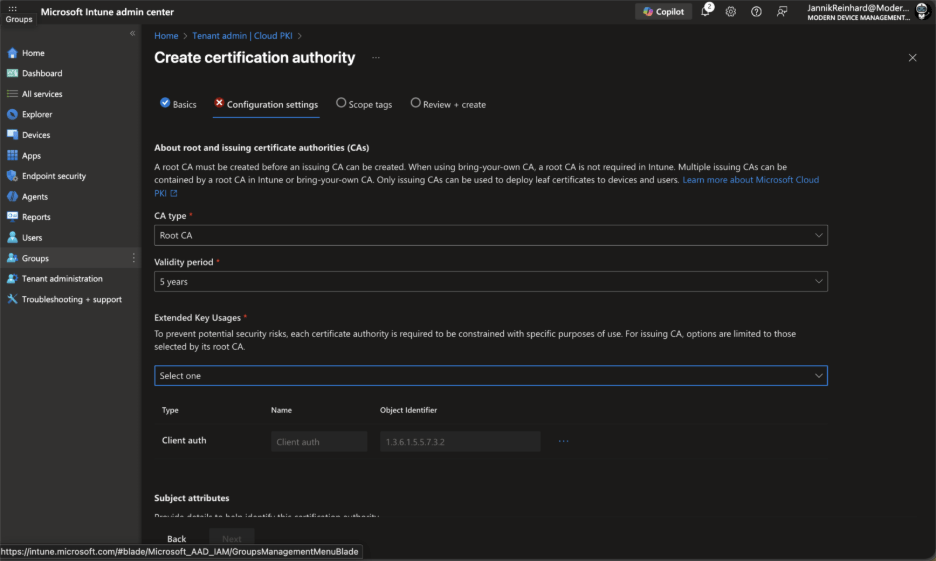
On the Configuration settings page, configure the following:
- CA type: Select Root CA
- Validity period: Set the validity period for the root CA certificate (default is 10 years)
- Extended Key Usage: Select the appropriate EKUs for your use case. For device authentication scenarios, you’ll typically want “Client Authentication”
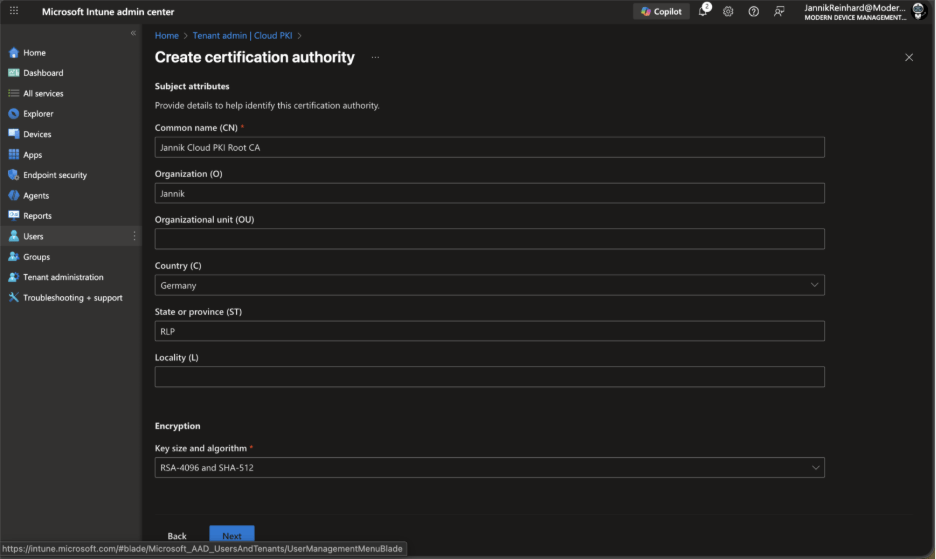
- Under Subject attributes, configure your certificate subject:
- Common Name (CN): Enter a descriptive name (e.g., “Jannik Cloud PKI Root CA”)
- Organization (O): Your organization name
- Country/Region (C): Two-letter country code (e.g., “DE” for Germany, “US” for United States)
- Under Encryption, select your key size and algorithm. For most organizations, RSA 4096-bit with SHA-256 provides a good balance of security and compatibility. Keep in mind that 1024-bit key sizes and SHA-1 are not supported.
Click Next to continue through Scope tags (optional) and then Review + create.
Review all settings carefully—you won’t be able to edit these properties after the CA is created. When satisfied, click Create.
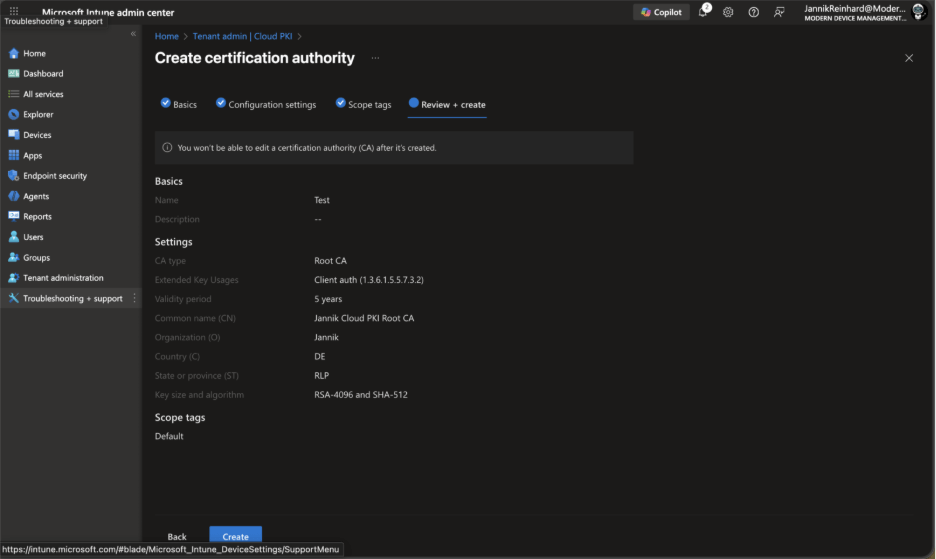
The root CA will be created within seconds. Refresh the Cloud PKI list to see your new CA with an “Active” status.
Step 2: Create the Issuing CA
With the root CA in place, we can now create an issuing CA that will actually issue certificates to devices.
Return to Tenant administration > Cloud PKI and click Create again.
Enter a Name for your issuing CA (e.g., “Jannik Cloud PKI Issuing CA”) and an optional Description.
Click Next to continue to Configuration settings.
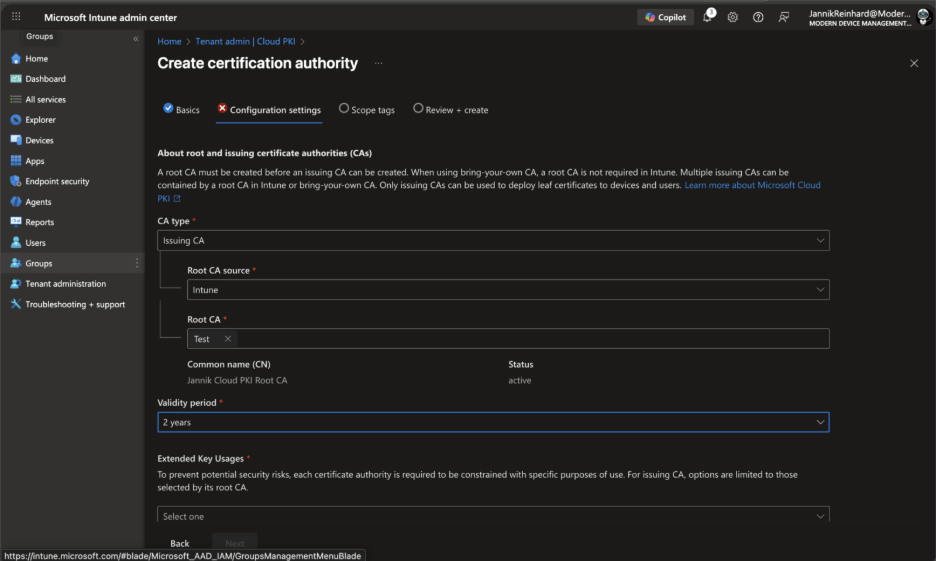
Configure the following settings:
- CA type: Select Issuing CA
- Root CA source: Select Intune (this anchors the issuing CA to the root CA you just created)
- Root CA: Select the root CA you created in Step 1
- Validity period: Set the validity period (should be less than the root CA)
Configure the Subject attributes similar to the root CA, but with a distinct Common Name (e.g., “Jannik Cloud PKI Issuing CA”).
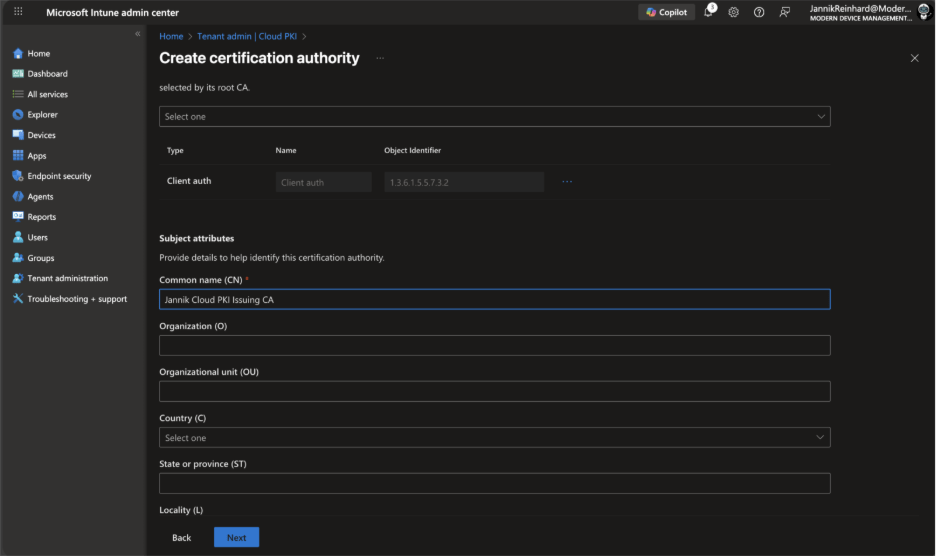
Under Encryption, configure key size and algorithm. The issuing CA key size can be the same as or smaller than the root CA.
Review all settings and click Create.
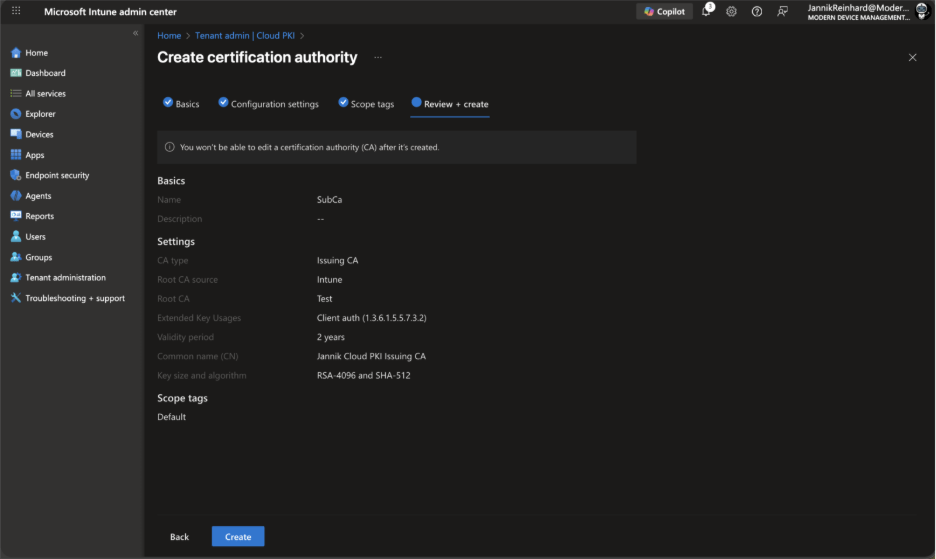
Your issuing CA is now active and ready to issue certificates.
Step 3: Create Trusted Certificate Profiles
Before devices can trust certificates issued by your Cloud PKI, they need the root and issuing CA certificates installed. We’ll create trusted certificate profiles for this purpose.
Navigate to Devices > Configuration > Create > New policy.
Select your platform (e.g., Windows 10 and later) and profile type Templates > Trusted certificate.
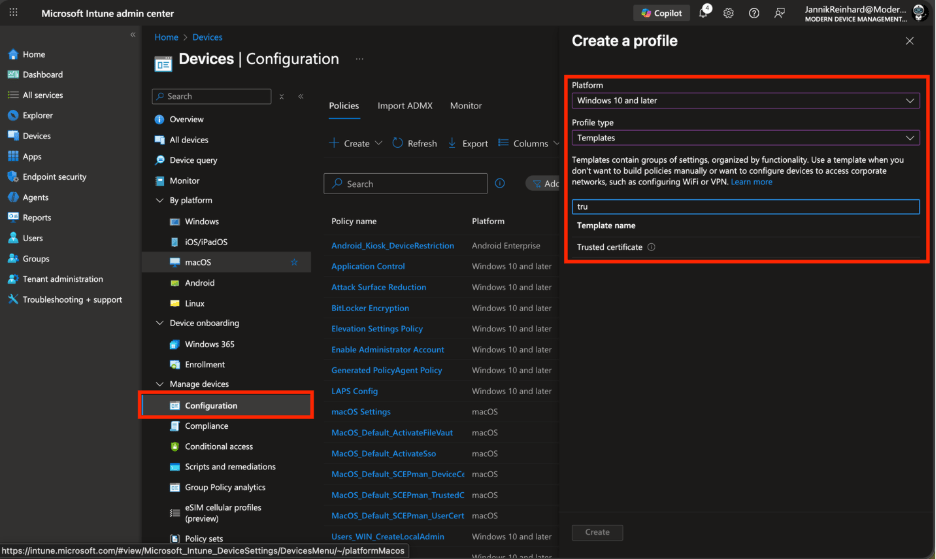
Enter a Name (e.g., “Cloud PKI Root CA Trust”) and click Next.
Open an new Tab and on the Configuration settings page:
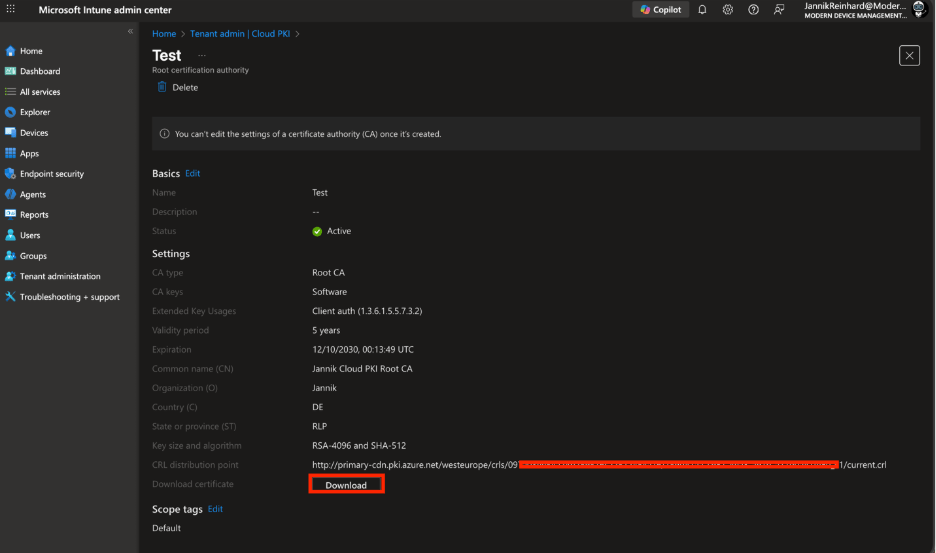
- Go back to Tenant administration > Cloud PKI
- Select your Root CA
- Click Download to download the root CA certificate
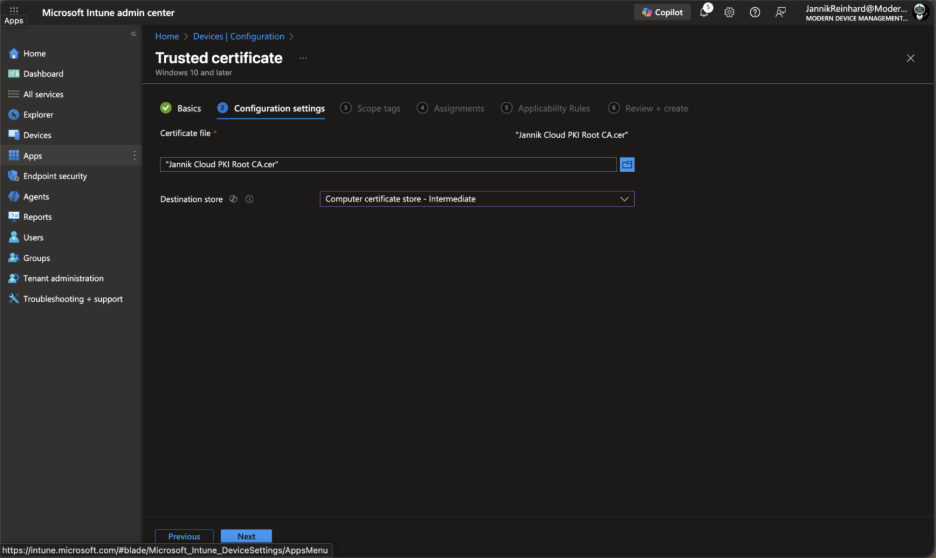
Return to your trusted certificate profile and upload the downloaded certificate
For Destination store, select Computer certificate store – Root
Click Next, configure assignments (I recommend starting with a pilot group), and complete the profile creation.
Repeat this process for the Issuing CA certificate, but select Computer certificate store – Intermediate as the destination store.
Step 4: Create a SCEP Certificate Profile
Now we’ll create the profile that actually requests and installs certificates on devices.
Navigate to Devices > Configuration > Create > New policy.
Select your platform and profile type Templates > SCEP certificate.
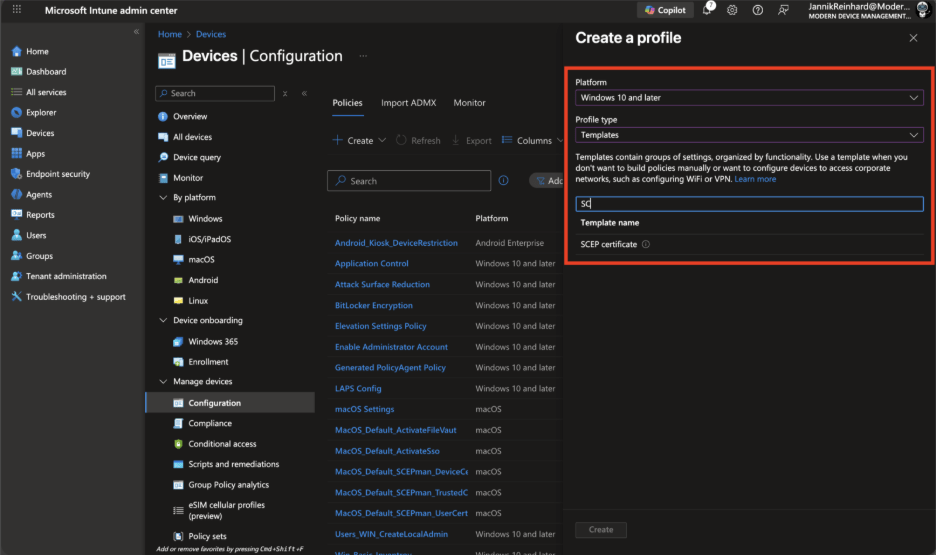
Enter a Name (e.g., “Cloud PKI Device Certificate”) and click Next.
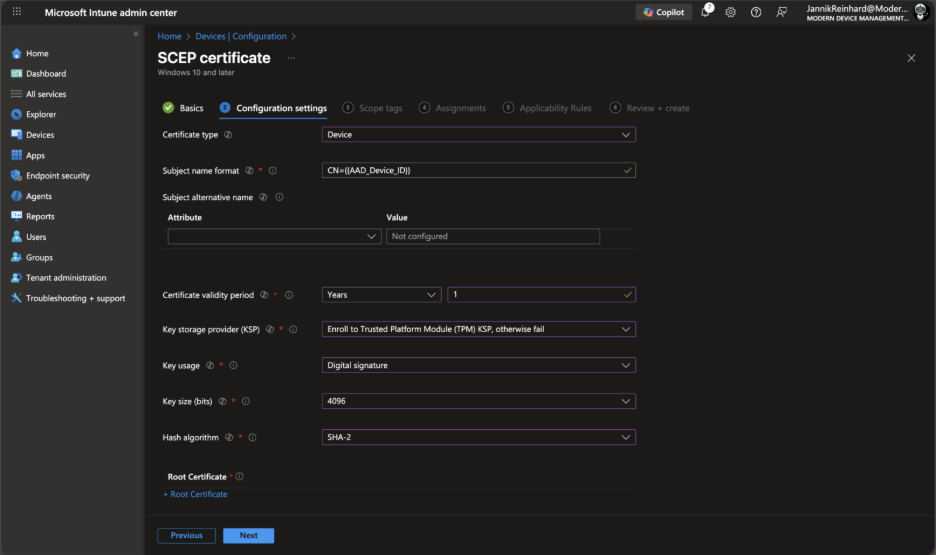
Configure the following settings:
Certificate type: Select Device (for device authentication) or User (for user authentication)
- Subject name format: Configure based on your requirements. Common formats include:
- CN={{DeviceName}} for device certificates
- CN={{UserName}},E={{EmailAddress}} for user certificates
- Subject alternative name: Add SANs as needed (e.g., DNS name, UPN)
- Certificate validity period: Set based on your security requirements (e.g., 1 year)
- Key storage provider: Select based on platform capabilities
- Key usage: Select Digital signature and Key encipherment
- Key size: Select up to the maximum configured on your issuing CA
- Hash algorithm: Select SHA-256 or higher
Under Root Certificate, select the trusted certificate profile you created for the root CA.
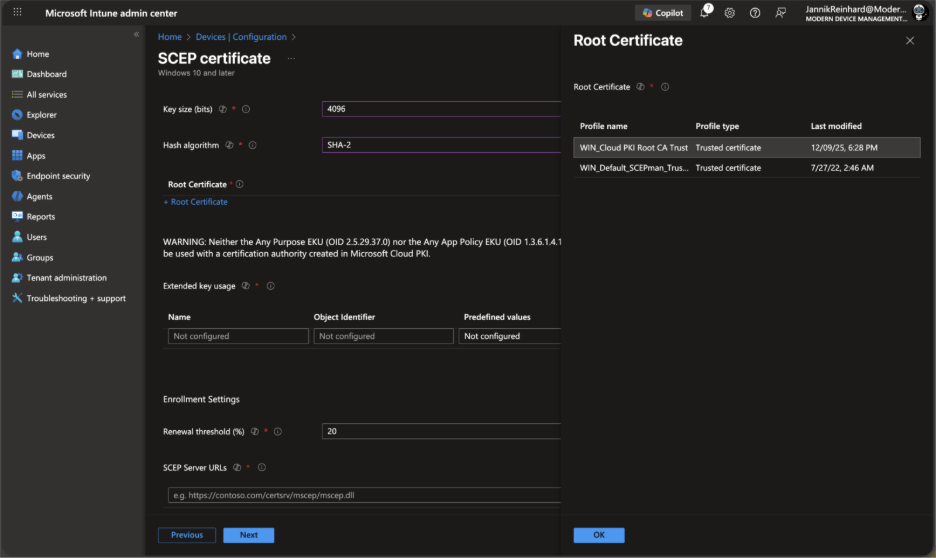
Under SCEP Server URLs, Cloud PKI automatically provides the SCEP endpoint. You’ll see the URL populated automatically when you select a Cloud PKI issuing CA.
Under Extended key usage, add the appropriate EKUs:
Client Authentication (OID: 1.3.6.1.5.5.7.3.2) for most scenarios
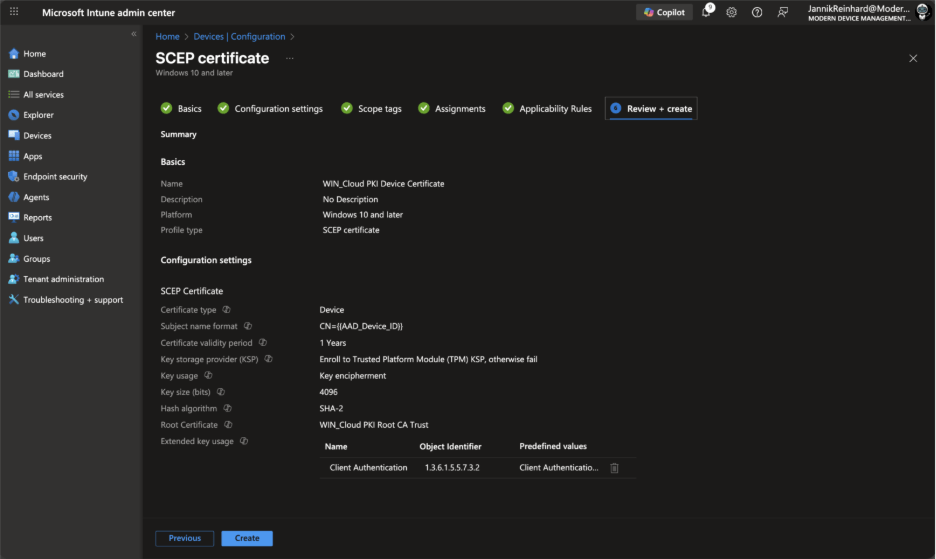
Click Next, configure assignments (start with a pilot group), and create the profile.
Using Certificates for Wi-Fi Authentication
A common use case for Cloud PKI is certificate-based Wi-Fi authentication (802.1x). Here’s a quick overview of what’s needed:
RADIUS Server: You’ll need a RADIUS server that supports certificate authentication. Options include Microsoft NPS, cloud-based solutions like RADIUSaaS, or your existing RADIUS infrastructure.
RADIUS Server Certificate: Deploy a trusted certificate profile for your RADIUS server’s certificate to devices so they can validate the server during authentication.
Wi-Fi Profile: Create a Wi-Fi profile in Intune that references:
- Your SCEP certificate profile for client authentication
- The trusted root for your RADIUS server
- Server validation settings (server names, trusted roots)
Network Infrastructure: Configure your wireless access points to use WPA2/WPA3-Enterprise and point to your RADIUS server.
The beauty of Cloud PKI is that the certificate deployment piece—traditionally the most complex part—is now significantly simplified.
Managing Certificates
Monitoring
Cloud PKI provides built-in monitoring and reporting. Navigate to Tenant administration > Cloud PKI and select your issuing CA to view:
- Total certificates issued
- Certificates expiring soon
- Revoked certificates
- Certificate issuance failures
Revoking Certificates
If a device is compromised or a certificate needs to be revoked:
- Go to Tenant administration > Cloud PKI
- Select your issuing CA
- Click View all certificates
- Select the certificate to revoke
- Click Revoke
The certificate is added to the Certificate Revocation List (CRL), and relying parties that check CRL/OCSP will reject the certificate.
Certificate Renewal
Cloud PKI handles certificate renewal automatically based on the renewal threshold configured in your SCEP profile. By default, devices request a new certificate when the existing one is within 20% of its validity period from expiration.
Bring Your Own CA (BYOCA)
If you have an existing on-premises PKI that you want to leverage, Cloud PKI supports a BYOCA model. With this approach:
- Create an issuing CA in Cloud PKI
- Download the Certificate Signing Request (CSR)
- Sign the CSR with your on-premises root or issuing CA
- Upload the signed certificate back to Cloud PKI
This allows you to maintain your existing trust hierarchy while gaining the operational benefits of Cloud PKI for certificate issuance to Intune-managed devices.
Known Limitations
While Cloud PKI simplifies many scenarios, there are some limitations to be aware of:
- Intune-managed devices only: Cloud PKI can only issue certificates to devices enrolled in Intune. On-premises servers and non-managed devices cannot receive certificates directly from Cloud PKI.
- Trial limitations: During the free trial, CAs are created with software-backed keys instead of HSM-backed keys. This may not meet certain compliance requirements.
- CA modifications: You cannot edit CA properties after creation. If you need to change EKUs or other settings, you must create a new CA.
- Platform support: While most Intune-supported platforms are supported, verify your specific platform’s compatibility in Microsoft’s documentation.
Conclusion: Simplified PKI for Modern Device Management
Microsoft Cloud PKI represents a significant step forward in simplifying certificate management for Intune-managed devices. By eliminating the need for on-premises NDES servers, certificate connectors, and complex CA infrastructure, it allows IT teams to implement certificate-based authentication scenarios in minutes rather than weeks.
The key takeaways:
- Rapid setup: Create a complete two-tier PKI hierarchy in minutes
- Zero on-premises infrastructure: No servers, connectors, or hardware to maintain
- Automatic lifecycle management: Certificate issuance, renewal, and revocation handled automatically
- Flexibility: BYOCA option available for organizations with existing PKI investments
- Cost-effective: Available standalone or as part of the Intune Suite
If you’re looking to implement certificate-based Wi-Fi, VPN, or other authentication scenarios for your Intune-managed devices, Cloud PKI is worth exploring. The 90-day free trial gives you plenty of time to test the solution in your environment before committing.
For organizations with more complex requirements or devices not managed by Intune, you may still need a traditional on-premises PKI or hybrid approach. But for cloud-native device management scenarios, Cloud PKI hits the sweet spot of simplicity and security.
Recast: The Intune Companion
Microsoft offers powerful tools for IT admins through Intune Suite, and Recast is the ideal companion to help organizations maximize those capabilities. Recast builds on what Microsoft provides by delivering additional options for enhanced security and advanced device and application management.
There are scenarios where IT teams need expanded functionality, such as managing custom applications, handling third-party app patching on servers, or applying highly specific update requirements. Recast complements Intune by handling these specialized tasks, working alongside the Microsoft ecosystem to streamline operations.
We’re excited about where Microsoft is headed and how Intune continues to empower IT admins. Recast is proud to stand alongside Intune as a companion solution, helping teams do even more with the tools they already rely on.
If you don’t already have our free Right Click Tools for Intune, you can download them here.