


With the exciting licensing updates Microsoft announced in December 2025, I imagine many of you will want to know more about the extra Intune Suite functionality you will soon be getting if you’re leveraging E5 licenses in your environment. This blog is part of a series looking at the incremental benefits of Intune and complements the excellent cloud PKI guide from Jannik Reinhard.
In this post, I will be looking at Endpoint Privilege Management (EPM) which is included in your E5 licenses.
Let’s start with examining what it is and what problem it solves. Imagine that pesky application which checks for updates on launch but then requires admin rights to install or remote users to change network settings on the fly to do their jobs. Traditionally, you had two choices here: Make them log a support ticket each time (time-consuming for them and you), or give them admin rights either on their account, a separate account, or LAPS (a security nightmare).
What if there was a third option? This is where EPM comes into play. You can specify files which users can elevate themselves, either automatically or via approval, depending on your requirements.
Sounds ideal, doesn’t it? Let’s get started.
How to Enable Endpoint Privilege Management
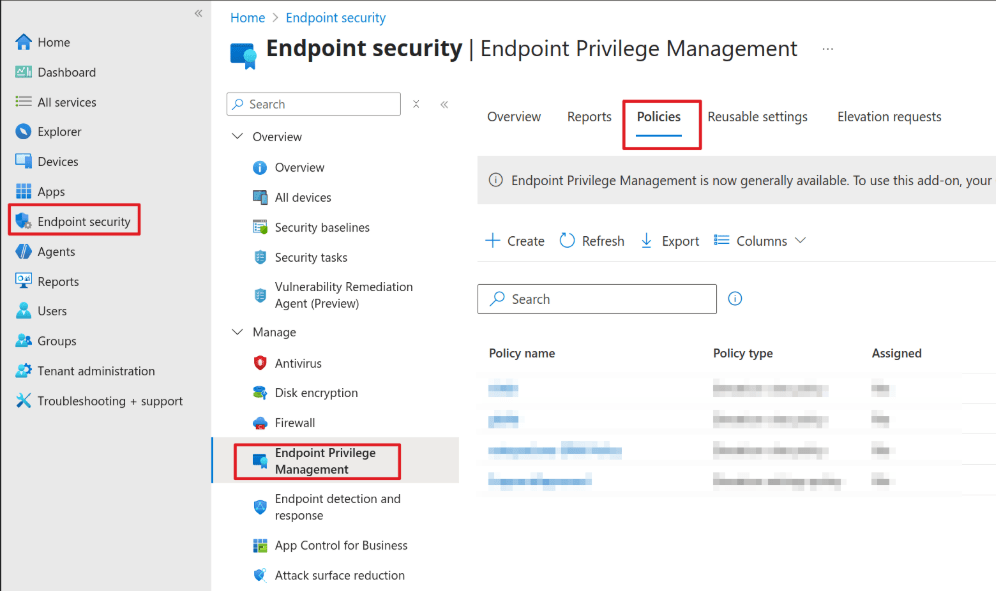
Go to Microsoft Intune admin center > Endpoint Security > Endpoint Privilege Management > select the Policies tab > and then Create Policy.
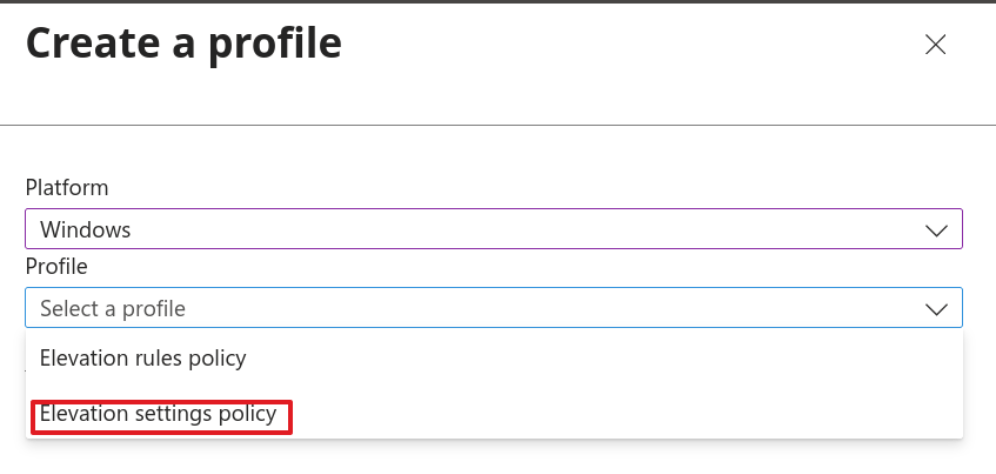
Set the platform to Windows, then set Profile to Elevation settings policy.
Give your policy a name and optionally a description. (These are helpful for future reference. Just because you know what it does now doesn’t mean you’ll remember down the road.)
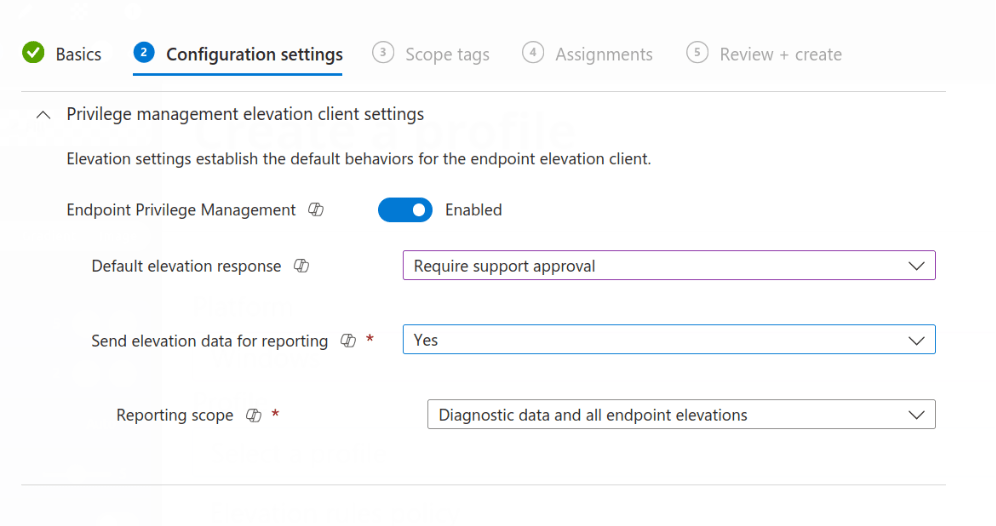
There aren’t a lot of settings to configure in this policy, but we need to adjust them for EPM to work.
We need to enable EPM, the default setting, so we can leave that blank.
Next, we need to set the default response. This is for anything not configured in a policy, so I would avoid “Require User Confirmation” as that just prompts the user to say why they need it.
My personal preference is “Require Support Approval” as EPM has functionality where you can log into the portal and see outstanding requests. Not only can you approve/deny, but you also can create rules based off these requests. This is so much easier than having to dig around to find the file hash or certificate when manually creating a rule.
Sending elevation data is a personal preference. In this case, I’m leaving it on. However, feel free to turn it off as there won’t be any adverse effects.
Finally, assign and create the policy as you would with anything else.
Although we are using Support Approved to catch most rules, let’s run through a quick rule to allow Notepad to run with elevated privileges just to see how things work.
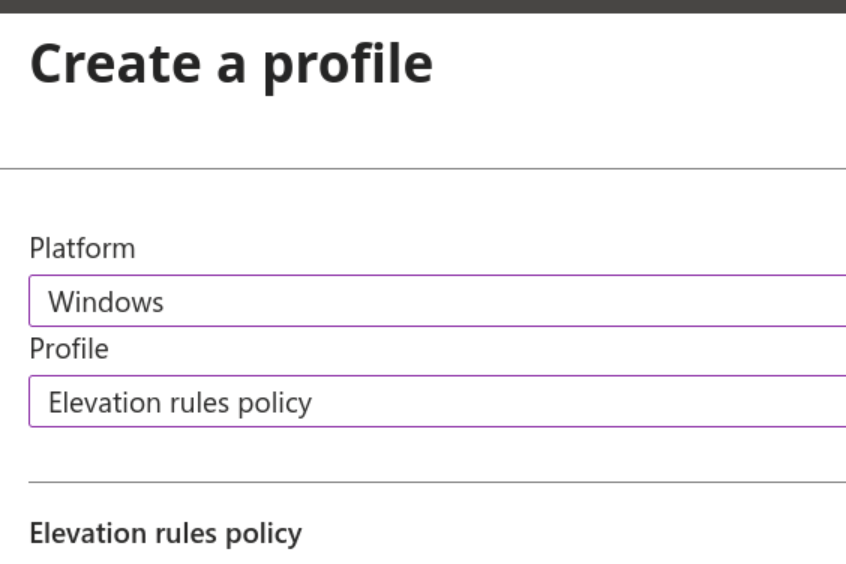
Create a new policy, but this time select Elevation Rules Policy.
Give the policy a name and description, then click Next.
On the next screen, it can be confusing at first glance, don’t add a new row. Instead click Edit Instance.
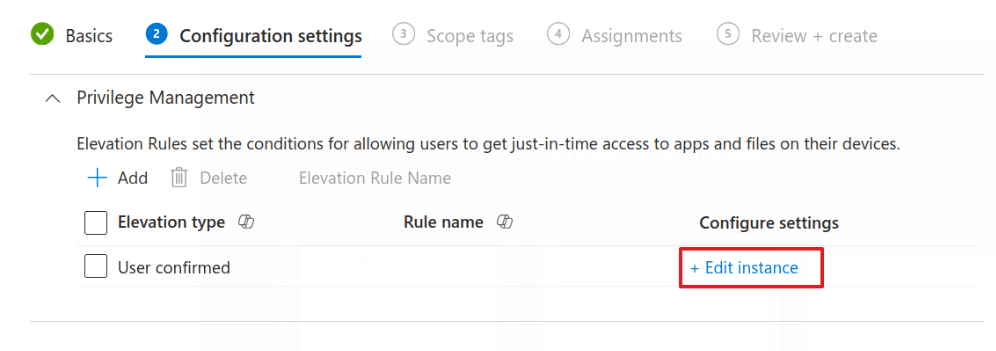
The minute you click that; it will complain about the rule name. Don’t worry. We set that in the fly-out.
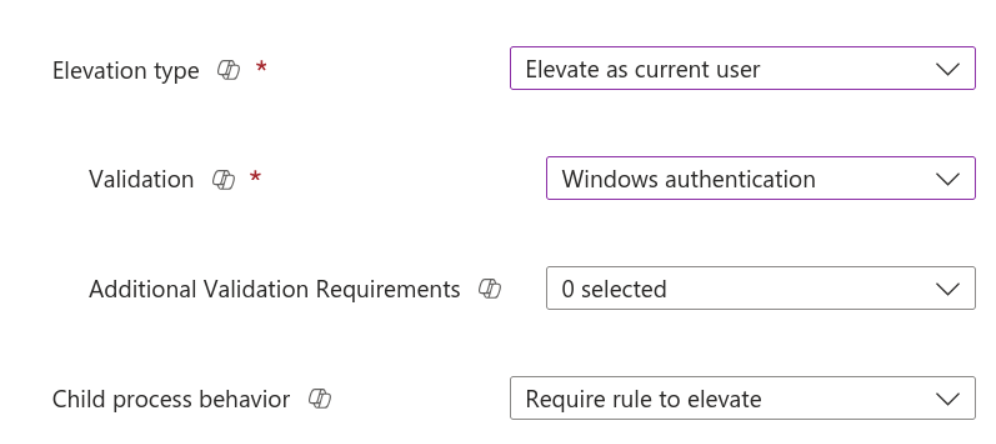
Add a name and description and then look at the Elevation Type. A relatively new addition is “Elevate as current user.” Previously it used a separate account for elevation, which meant you could not interact with the user’s profile. This new option elevates using the logged-in account.
Select whichever option works for your needs, I’m using Elevate as Current User for this one, but this is just an example.
In Validation, select Windows Authentication. This adds an extra layer of security, so the user needs to authenticate before elevating. You can also require a business justification here if needed.
Child process behavior is an important one. Please never allow it to elevate without checking. You could do this from within an elevated Notepad. Click File – Open, browse to System32, and launch command prompt or PowerShell. If you let child apps elevate, that’s it. They’re in with admin rights.
I would usually suggest you either deny or Require a Rule (for those apps with multiple parts).
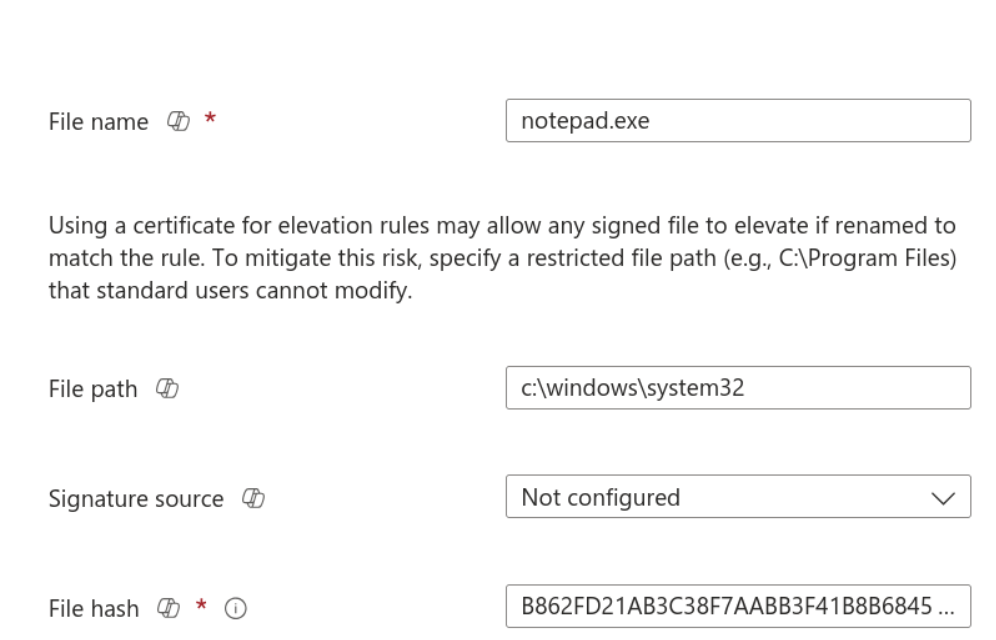
Now, we need to specify the file information. There are several options available. For this example, I am using a File Hash, but you can read about the other options for defining rules here.
To get the file hash, launch PowerShell and type get-filehash PATH. So in this case, get-filehash c:\windows\system32\notepad.exe
It will then return the hash which you can populate into the profile.
Now, simply assign as required.
I also have a script which you can point to a file, and it will grab the hash and create the profile for you:
https://github.com/andrew-s-taylor/public/blob/main/Powershell%20Scripts/Intune/add-epmfilerule.ps1
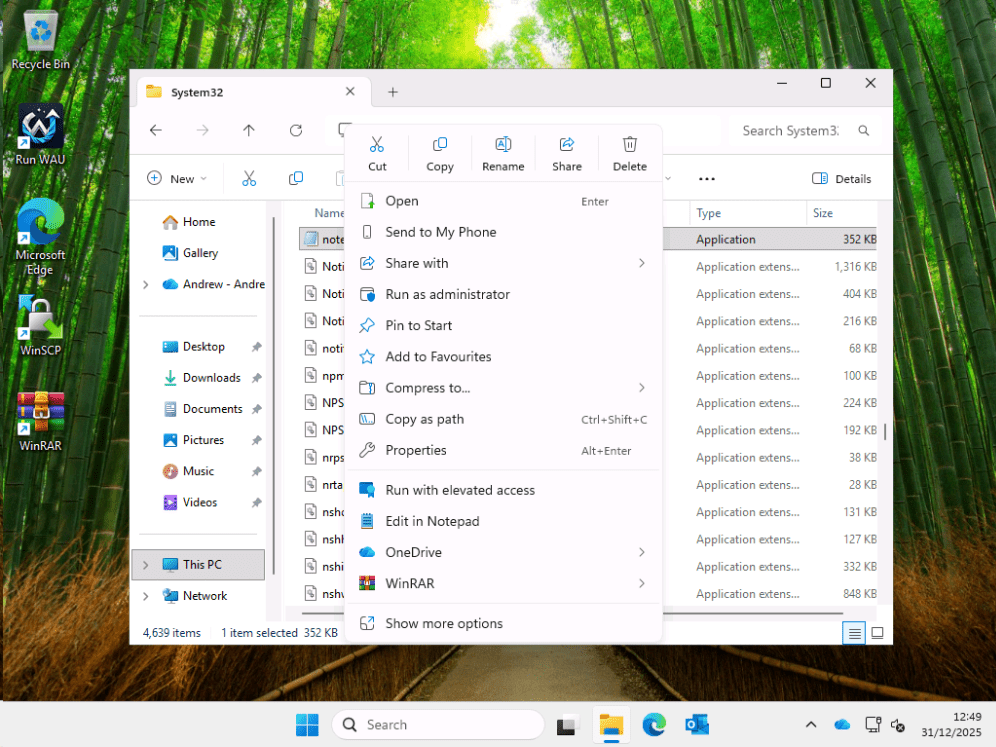
Let’s see it in action now, first with Notepad:
Right click on the file, and you can see “Run with elevated access.” This confirms EPM is configured and deployed to the device.
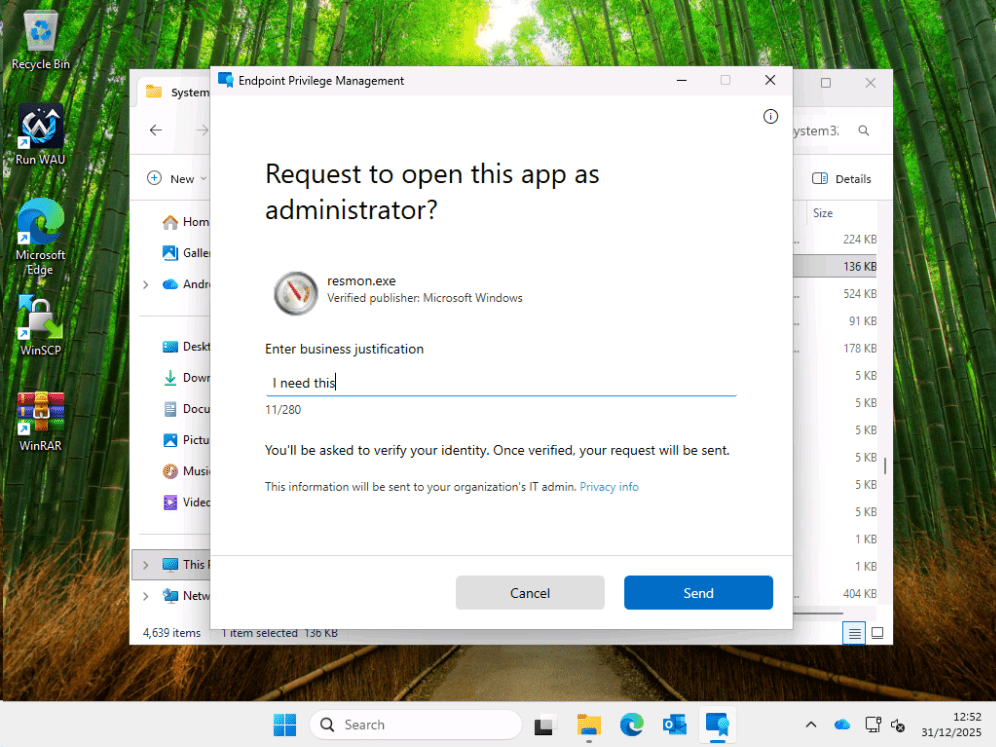
Add our reason.

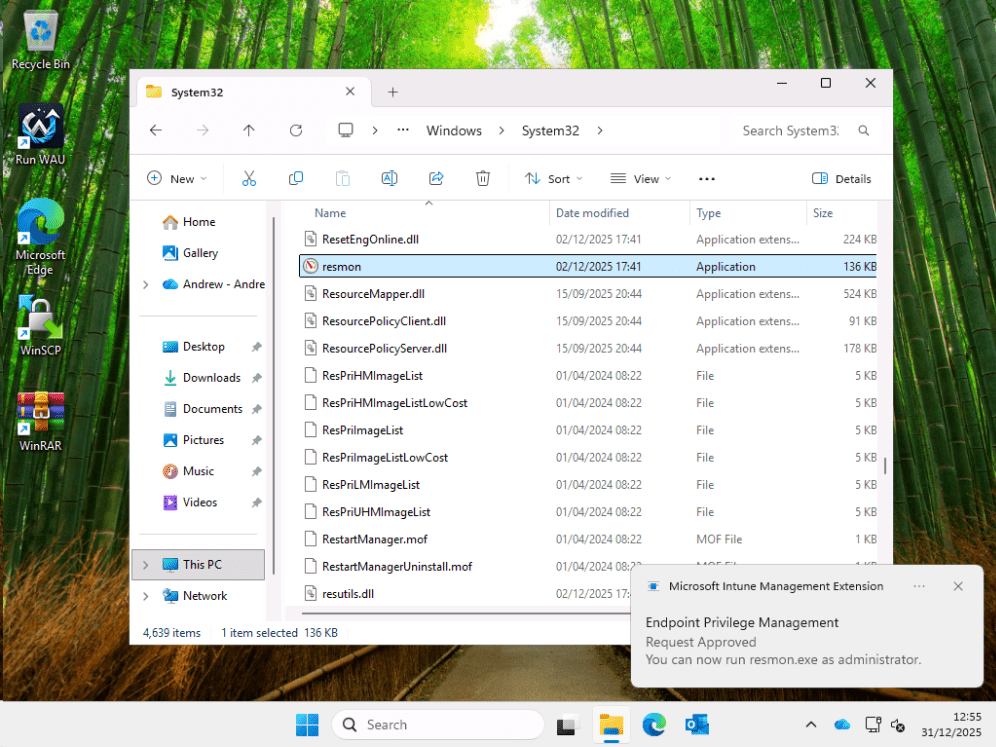
After approval (because that’s how I configured it), I can launch as an admin.

For an app without a rule, I’ll use resmon, because I’m in system32 anyway.
We are prompted for our reason.
Back in the Intune portal, we click Elevation Requests, and we can see it there.
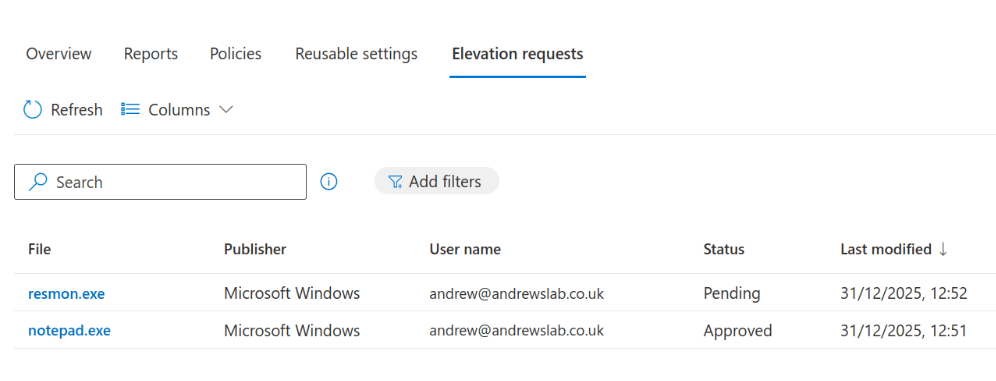
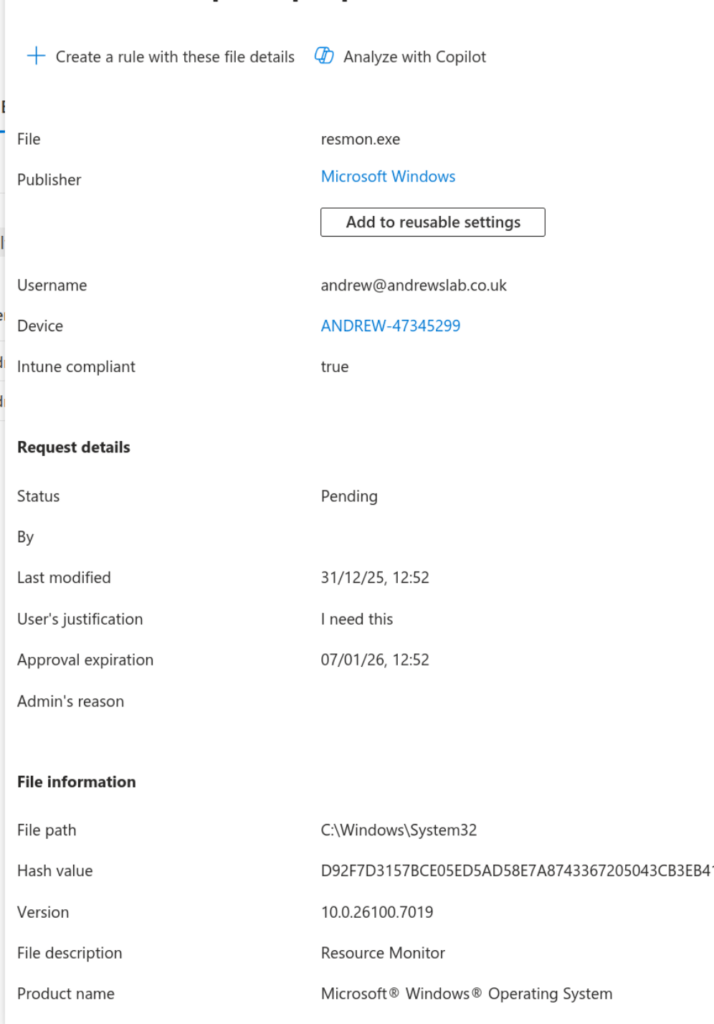
Clicking on it, we can see all the file details, and we can either create a policy for it.
Or simply approve it as a one-off.

The user is then notified and can elevate.
There we go, EPM in a nutshell. It’s worth checking out.
Come back soon for the next post in this series, where we’ll look at Remote Help.
Recast: The Intune Companion
Microsoft offers powerful tools for IT admins through Intune Suite, and Recast is the ideal companion to help organizations maximize those capabilities. Recast builds on what Microsoft provides by delivering additional options for enhanced security and advanced device and application management.
There are scenarios where IT teams need expanded functionality, such as managing custom applications, handling third-party app patching on servers, or applying highly specific update requirements. Recast complements Intune by handling these specialized tasks, working alongside the Microsoft ecosystem to streamline operations.
We’re excited about where Microsoft is headed and how Intune continues to empower IT admins. Recast is proud to stand alongside Intune as a companion solution, helping teams do even more with the tools they already rely on.
If you don’t already have our free Right Click Tools for Intune, you can download them here.