


About three weeks ago, there was some really exciting news from the Microsoft world, especially for Mac users like myself. The Microsoft 365 Copilot app is now officially available on macOS!
The Microsoft 365 Copilot app is the AI-powered productivity tool for both work and home. You can chat with your AI assistant, create and edit content, quickly find files, and access all your favorite Microsoft 365 apps. In short, you get more done without having to do more. Who doesn’t like that?
Here’s what makes it extra special for Mac users:
- Built with a native Mac experience
- Full Copilot functionality, no browser needed
- Launch it straight from your Dock
At Recast, we’re big fans of Microsoft Intune and that’s no secret. Naturally, I want to make Microsoft 365 Copilot available to our users through Intune. I also wanted to take it one step further.
While deploying the app through Intune, I thought: why not make sure it’s immediately pinned to the Dock? This way, it’s super easy to find and launch right from the get-go.
In this post, I’ll walk you through deploying Microsoft 365 Copilot with Intune and adding one thoughtful extra: auto-pinning the app to the Dock. A smoother experience always starts with thoughtful details.
Dockutil Overview
The dockutil tool was created by Ken Crawford and is a command-line utility designed to manage macOS Dock items efficiently, especially in enterprise or scripted deployment environments. It allows administrators to programmatically add, remove, and rearrange Dock icons for users, making it a powerful tool for customizing the user experience on managed Macs.
Key Features of dockutil:
- Add, List, Move, Find, Remove Dock Items
- Supports Applications, Folders, Stacks, URLs.
- Can act on a specific dock plist or every dock plist in a folder of home directories
- Can be deployed via tools like Intune and Jamf
- Support for multiple actions in a single command, enabling efficient scripting
I’ll use dockutil to pin Microsoft 365 Copilot to the Dock, making the app easy to find and launch.
Shell Scripts Explained
When deploying the Microsoft 365 Copilot app via Intune, I’m using both a pre-install and post-install script to make the process smooth and efficient for Mac users.
Pre-install Script
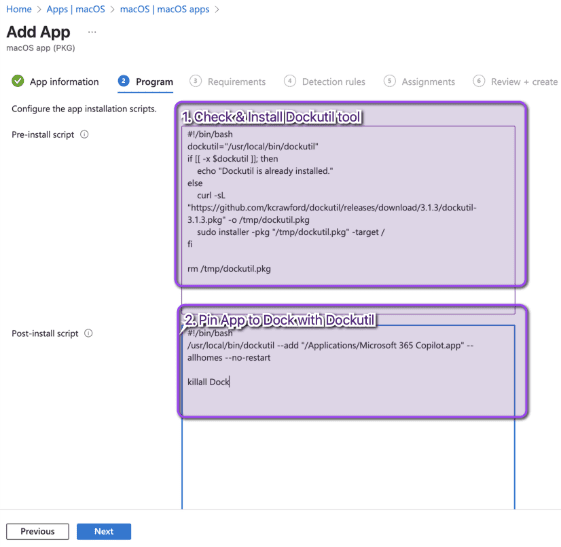
Before the app gets installed, this shell script checks whether dockutil is already installed on the device. If it isn’t, the script will take care of installing it first.
#!/bin/bash

dockutil="/usr/local/bin/dockutil"

if [[ -x $dockutil ]]; then

    echo "Dockutil is already installed."

else

    curl -sL "https://github.com/kcrawford/dockutil/releases/download/3.1.3/dockutil-3.1.3.pkg" -o /tmp/dockutil.pkg

    sudo installer -pkg "/tmp/dockutil.pkg" -target /

fi

rm /tmp/dockutil.pkg
Post-install Script
Once the Microsoft 365 Copilot app is successfully installed, the post-install script jumps in. Using dockutil, the script pins Copilot to the user’s Dock, making it immediately accessible. As a final step, the Dock is restarted so the change takes effect right away.
#!/bin/bash

/usr/local/bin/dockutil --add "/Applications/Microsoft 365 Copilot.app" --allhomes --no-restart

killall Dock
Step-by-Step: Deploy and Pin Copilot with Intune
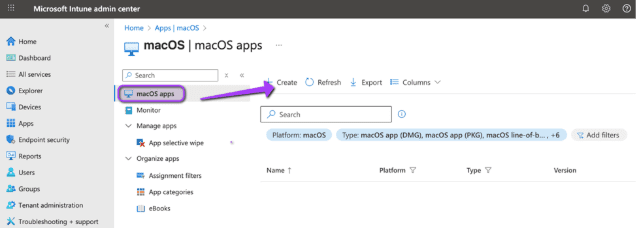
1. Navigate to Microsoft Intune admin center > Apps > macOS. Select Create.
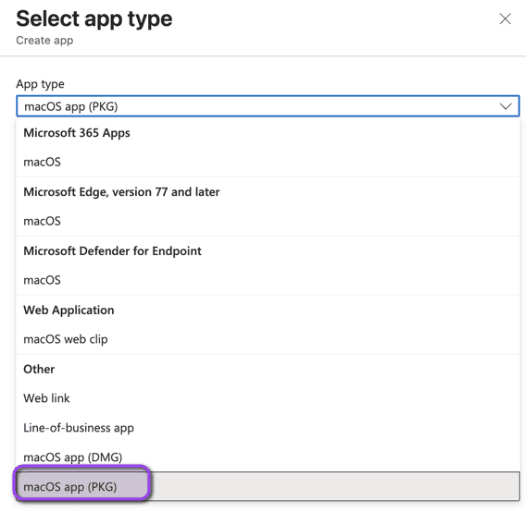
2. Choose macOS app (PKG) as the app type. Select Next.
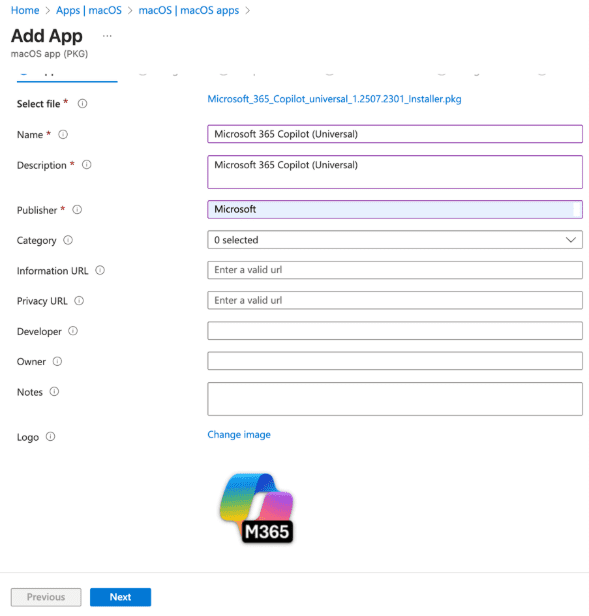
3. Select Select app package file. Browse to Microsoft_365_Copilot_universal_1.2507.2301_Installer.pkg and upload the file. Download the latest Microsoft 365 Copilot package from Microsoft’s release page.
Select OK to continue.

4. On the App information page, most of the fields will already be filled in for you. I made a few tweaks to make things a bit more user-friendly, such as changing the name, updating the description, setting the correct publisher, and uploading a custom logo to give it a more polished look.
5. Select Next to open Program. Add the pre-install and post-install scripts. Select Next.
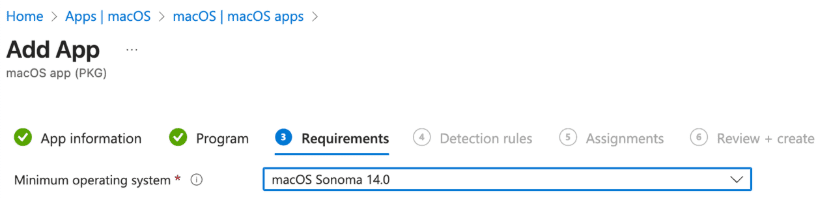
6. On the Requirements page, include the minimum macOS version (macOS Sonoma 14 or later). Click Next.
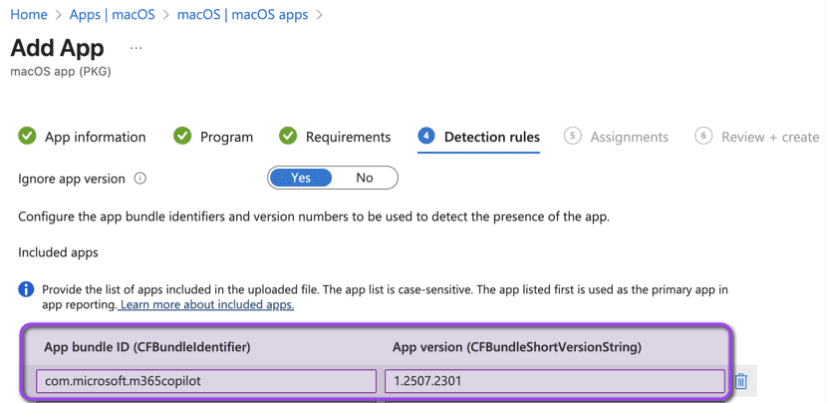
7. On the Detection Rules section, select “ignore app version” and set it to Yes. Then enter the App bundle ID and App version.
To retrieve the App bundle ID (CFBundleIdentifier) and App version (CFBundleShortVersionString), I always use a VM with macOS on it to first install the app in there, so I can get the information I need. I personally prefer using the Finder in macOS.
Navigate to Finder > Applications. Right-click Microsoft 365 Copilot and choose Get Info (or Show Package Contents > Contents > Info.plist).
App bundle ID (CFBundleIdentifier): com.microsoft.m365copilot
App version (CFBundleShortVersionString): 1.2507.2301
Note: Choose “Yes” if the app is automatically updated by the developer or if you only need to confirm the app’s bundle ID before installing.
Hit Next.
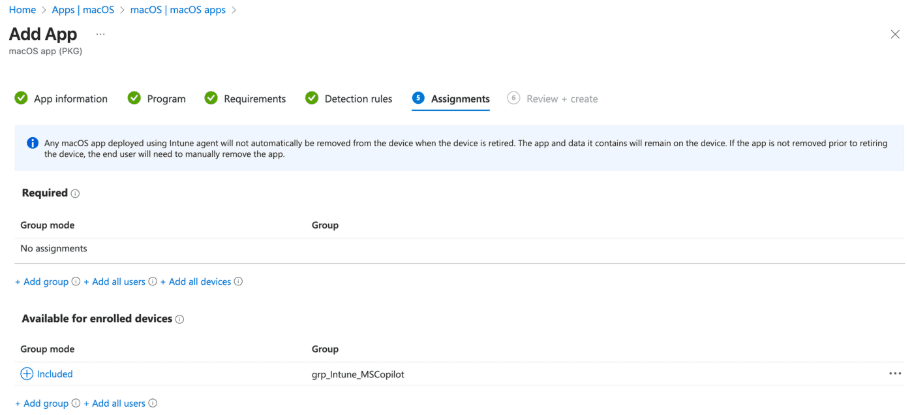
8. In Assignments, select Add groups under Available for enrolled devices. This is where you choose which groups should have access to the app. This step ensures the app appears in the Intune Company Portal. Click Next to move on.
9. In Review + Create, check in the summary whether all settings have been set correctly. Click Create.
Give the deployment a quick test run—the best proof is watching it work.
Check out the short demo video below to watch it in action.
Key Takeaways
Deploying Microsoft 365 Copilot with Intune—and pinning it to the Dock—may feel like a small detail, yet it shapes the user experience from day one. I really love seeing thoughtful integration like this come to life.
This setup isn’t just about installation—it’s about making the app feel native, intuitive, and ready the moment users log in. With dockutil and Intune, we can achieve it with just a few lines of script.