


This continues the previous post on deleting Intune apps with PowerShell. We showed that deleting an app with dependencies triggers an error. This occurs when the app depends on another app or is a dependency for another app. You must remove dependencies before you can delete the app from Intune.
Why Dependencies Block Deletion in Intune
When I tried to remove dependencies, I hit errors using several approaches. Turns out, as of now, there isn’t a way to interact with dependencies using the Microsoft.Graph PowerShell modules. I wish I’d known that before spending a few hours testing. Luckily the community has stepped up, and there’s a set of community PowerShell modules that can interact with dependencies. The module is IntuneWin32App (GitHub: MSEndpointMgr/IntuneWin32App). Install it from the PowerShell Gallery with:
Install-Module -Name "IntuneWin32App" -AcceptLicense Once the module is installed you can see the available functions with this command
get-command -Module IntuneWin32App Create an Entra ID App Registration (permissions & settings)
For the IntuneWin32App to run actions against Intune, you will also need to add an App Registration in Entra ID. You could potentially use one that already exists (like the one for the Recast Management Server, if you have that configured in your environment), or you can create a new one like this:
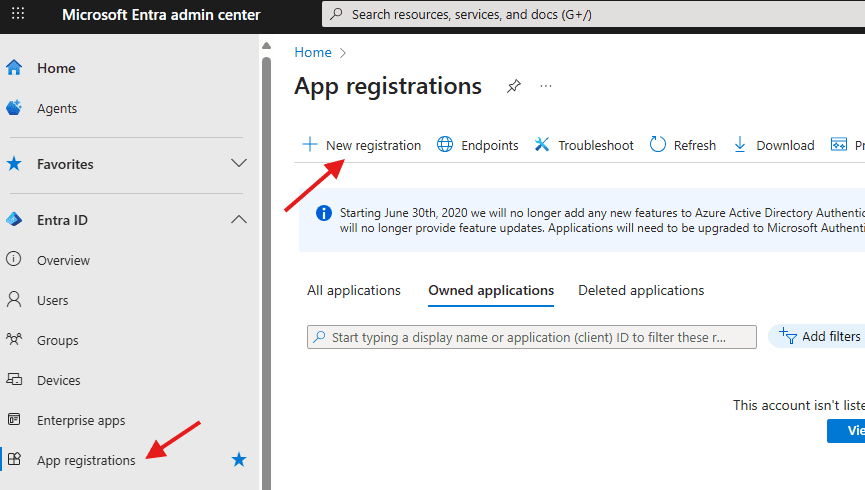
Go to the Entra ID admin center.
Navigate to App registrations > New registration.
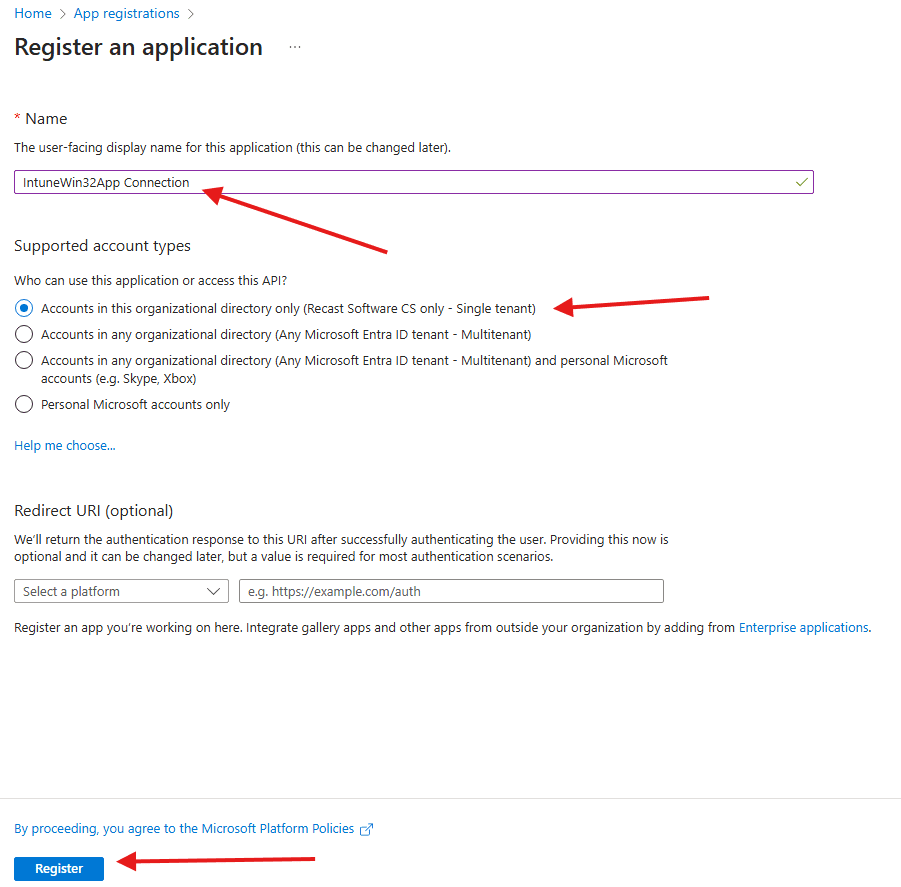
Enter a name (e.g., IntuneWin32App Connection).Choose Accounts in this organizational directory only. Select Register.
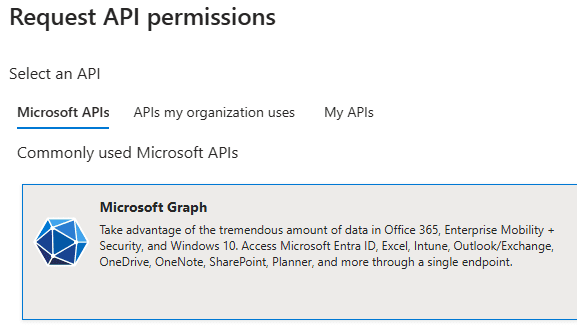
Go to API permissions > Add a permission.

In the next window, select Microsoft Graph.
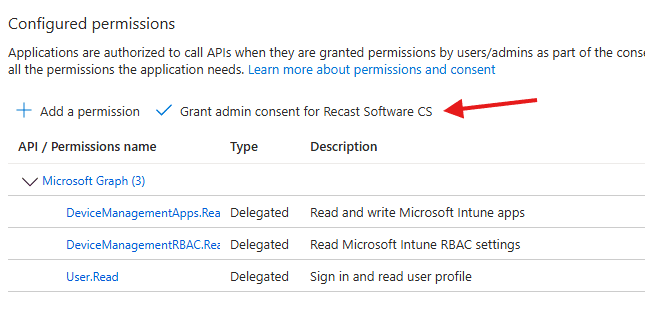
Choose Delegated permissions, then add:
- DeviceManagementApps.ReadWrite.All
- DeviceManagementRBAC.Read.All
- User.Read
After those have been added don’t forget to Grant admin consent.
You will also need to add something to authentication. Select Authentication -> Add Redirect URI: https://login.microsoftonline.com/common/oauth2/nativeclient. Then click Configure.
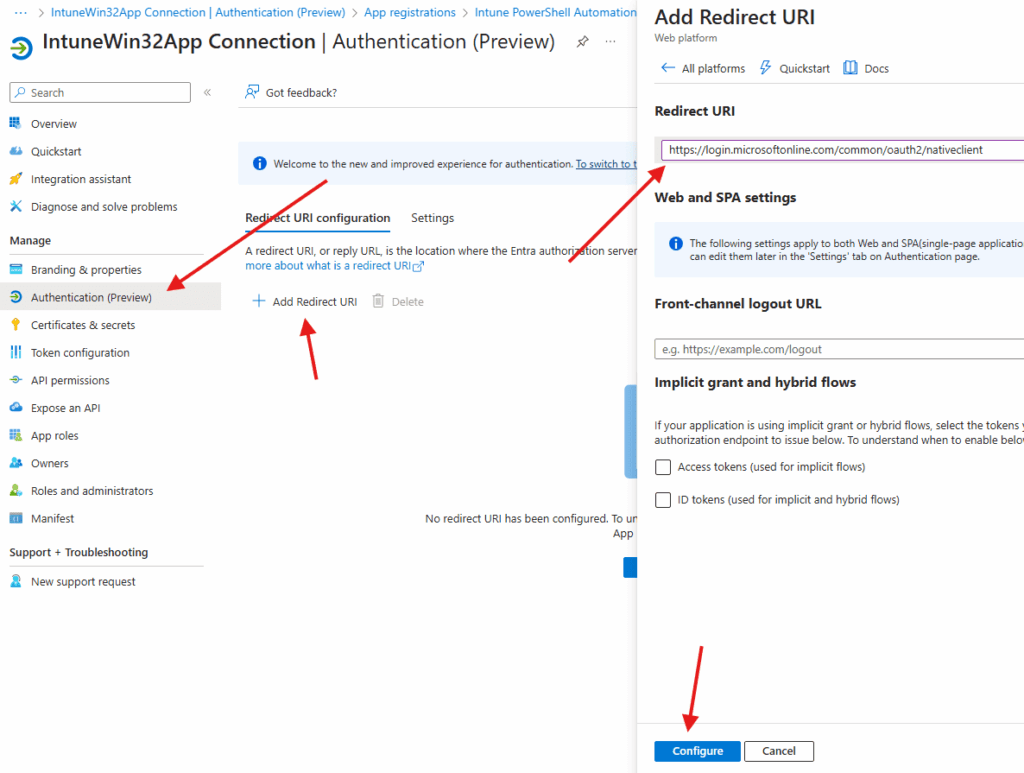
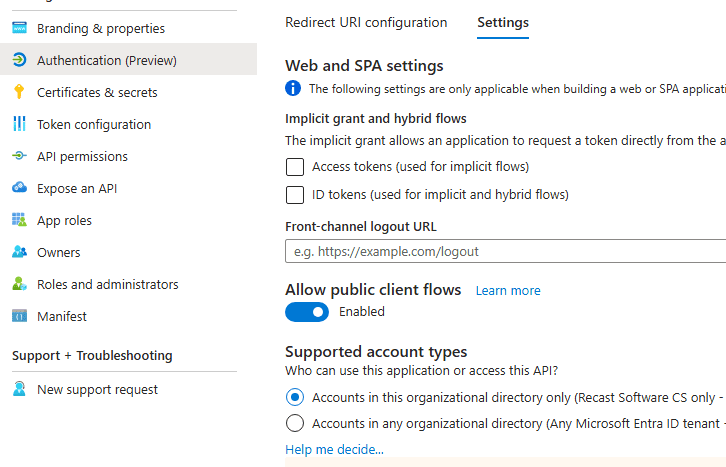
After your Authentication has been configured, click the Settings tab on the page to make sure Allow Public Client Flows is turned on. This will enable us to connect with PowerShell.
Once those have been added, return to the overview and retrieve some more important information. For the script you will need to note:
- Application (Client) ID
- Directory (Tenant) ID
Connect with Connect-MSIntuneGraph
Let’s check to make sure that we can connect successfully.
Let’s run this code in PowerShell:
Connect-MSIntuneGraph -TenantId "your_tenant_ID" -ClientId "<your_client_id>" The first run prompts you to sign in to Entra ID, then returns a connection result.
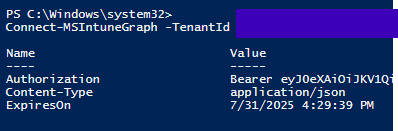
If you get this, you’re in! If it fails, read the error message—it usually points to the missing permission or setting.
Now that we are authenticated into Intune, let’s get the IntuneWin32App module installed: with this command
Install-Module -Name IntuneWin32App -Scope CurrentUser -Force -AcceptLicense Let’s make sure we can check the installed Win32 Applications. After you run this command, you will get a list of installed applications, as well as the display name and AppID.
Get-IntuneWin32App | Select-Object DisplayName, Id 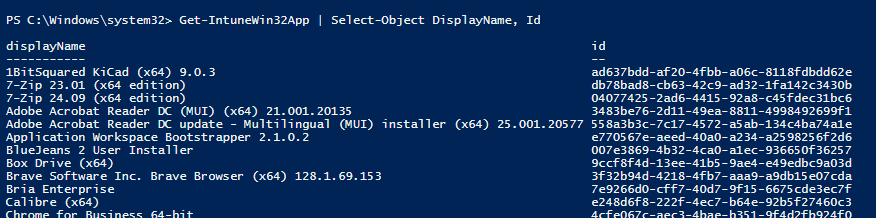
Remove all dependencies from a Win32 app with:
Remove-IntuneWin32AppDependency -ID "<AppID here>" Here’s a script that checks to make sure the IntuneWin32App is installed and then connects to the TenantID and ClientID you specify and will delete the dependencies off one or more copies of an application that you specify. It also has some basic error handling if something fails along the way.
Script: Remove Dependencies from Duplicate Apps
# === Ensure IntuneWin32App Module is Installed ===
if (-not (Get-Module -ListAvailable -Name IntuneWin32App)) {
    Write-Host "IntuneWin32App module not found. Installing..."
    try {
        Install-Module -Name IntuneWin32App -Scope CurrentUser -Force -AcceptLicense
        Write-Host "Module installed successfully."
    } catch {
        Write-Error "Failed to install IntuneWin32App module. Error: $_"
        exit 1
    }
} else {
    Write-Host "IntuneWin32App module is already installed."
}
# === Import the Module ===
Import-Module IntuneWin32App
# === Configuration ===
$clientId = "<Your_Client_ID>"     # Replace with your Azure AD App ID
$tenantId = "<Your_Tenant_ID>”     # Replace with your Azure AD Tenant ID
# === Authenticate ===
Connect-MSIntuneGraph -ClientId $clientId -TenantId $tenantId
# === Define App Names ===
$appName = "<App_Name_Here>"
# === Retrieve All Win32 Apps ===
Write-Host "`nRetrieving Win32 apps..."
$apps = Get-IntuneWin32App
# === Filter Target App ===
$targetApps = $apps | Where-Object { $_.DisplayName -eq $appName }
# === Remove Dependencies ===
foreach ($app in $targetApps) {
    try {
        Write-Host "`nRemoving all dependencies from app: $($app.DisplayName) (ID: $($app.id))"
        Remove-IntuneWin32AppDependency -ID $app.id
    } catch {
        Write-Warning "Failed to remove dependency from app ID $($app.id): $_"
    }
}
Clean up: Delete the Apps
Combine both steps.
After removing dependencies, delete the app using the steps from Part I. Or combine both actions in one script that removes dependencies and then deletes the app.
Conclusion
With the IntuneWin32App module and an Entra ID app registration, you can remove dependencies that block deletions—then script the full cleanup end to end. In most environments, that means fewer manual clicks in the Intune admin center and faster remediation when duplicate or stale Win32 apps pile up.