


What is LAPS?
“The Local Administrator Password Solution (LAPS) provides management of local account passwords of domain joined computers. Passwords are stored in Active Directory (AD) and protected by ACL, so only eligible users can read it or request its reset.” – Microsoft
The LAPS tool can help reduce the risk of having a default (backdoor perhaps) local administrator and default password on your machines by having each system use a different complex password for the account. Before the LAPS service, most organizations had a generic local administrator account (e.g. ORG_LocalAdmin) with the same password on each machine (e.g. ORG_P@ssword). However, if a machine was compromised using this model, the malware/hacker could move laterally among all your machines gathering more and more data to deepen the security breach. With LAPS software implemented, you remove that attack vector. Now if one machine is compromised, the ability to move and enter laterally to another machine is greatly reduced.
Introducing Windows LAPS
The Evolution of Local Administrator Password Management
As technology evolves, so do the tools that help us manage it. Enter Windows LAPS, an enhanced iteration of the well-established Microsoft LAPS. Unveiled in 2023, Windows LAPS pushes the boundaries of what was previously possible. Windows LAPS retains the foundational benefits of Microsoft LAPS, like randomized local Administrator account passwords, but takes it up several notches. It introduces features like encrypted password storage, Microsoft Entra ID (formerly Azure Active Directory) support, and a historical log of past passwords. Plus, accessibility has improved—you can now directly view these secure passwords within the computer information in Active Directory.
Learn more about Windows LAPS here. Now, back to Microsoft LAPS.
Microsoft LAPS Overview
In this overview of the Microsoft LAPS service, we’ll provide steps on how to:
- Download Microsoft LAPS
- Create Source Folders
- Create End Point Installer Application
- Deploy LAPS Application to Endpoints
- Infrastructure Setup
- Extend AD Schema (from Domain Controller)
- Setup LAPS AD Groups and Permissions
- Verify Permissions and Read / Reset Access
- Enable Group Policy
- Confirm Permissions
What’s Not Covered
- The “why’s” behind each step. Most of these details and the reasons why you must perform these steps are well documented in the Microsoft “LAPS_OperationGuide,” which is part of the download.
- Every deployment scenario. This is a generic, basic lab. While much of this is the same for any environment, each environment is different and each organization is set up uniquely.
What to Consider
- LAPS setup will probably require the involvement of multiple teams (AD / CM / Deployments / GPO)
- Active Directory structure (OUs with workstations)
- Who will have Rights to READ the LAPS Password?
- Who will have Rights to RESET the LAPS Password?
Download Microsoft LAPS
Client Deployment:
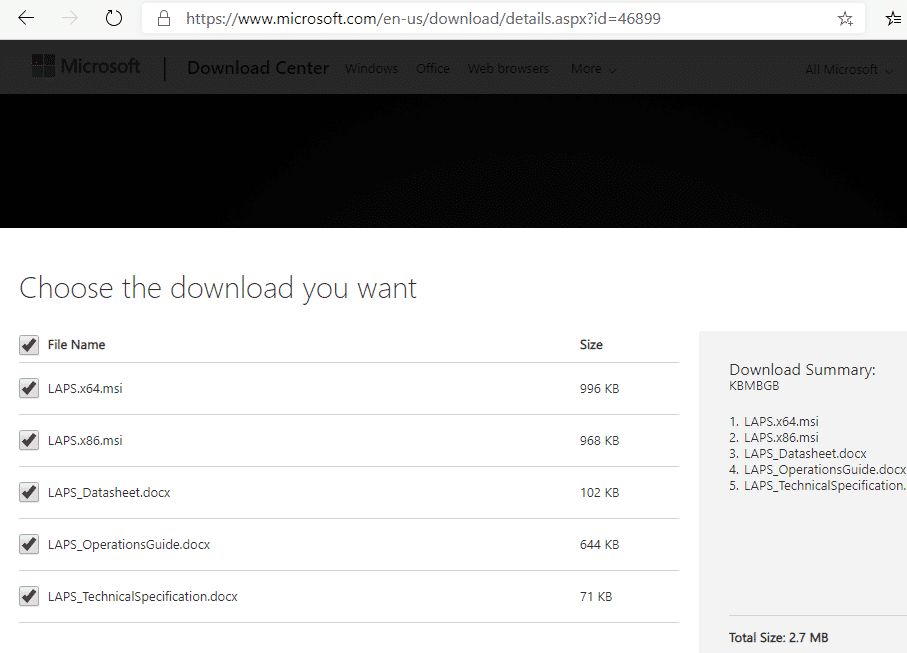
Are you ready to download the LAPS service? The LAPS download link (including client software and docs) can be found here https://www.microsoft.com/en-us/download/details.aspx?id=46899.
Create Source Folders
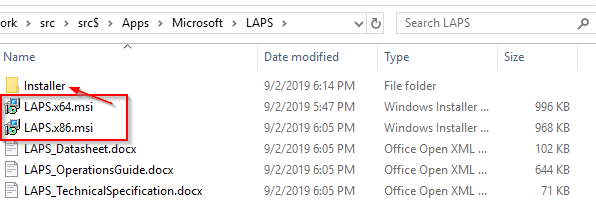
We downloaded all the files into a “LAPS” directory. Then we created a new folder to move the MSI files into.
Create Endpoint Installer Application
In the Configuration Manager (ConfigMgr) console, create a new application. Point it to the x64 version of the MSI.
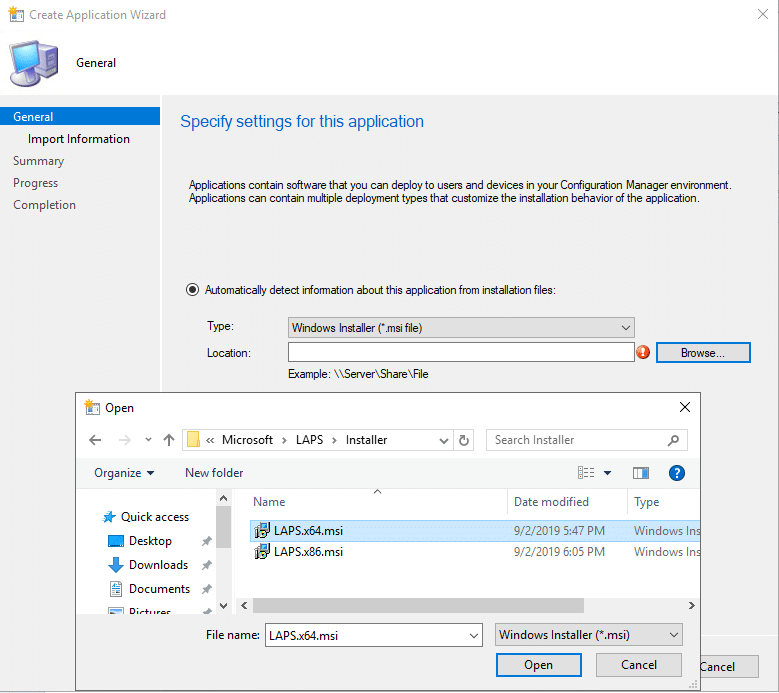
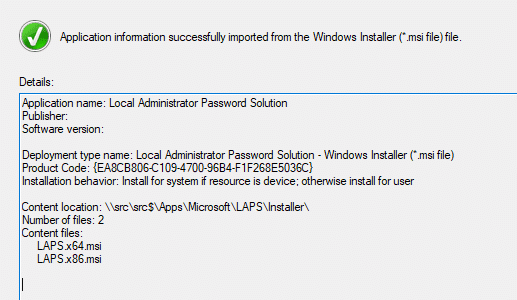
Once you choose the MSI, click on the Open button and then click on Next. The information needed for the application will be pulled from the MSI.
After you click on the Next button, you’ll come to General Information. Add “Microsoft” as the publisher and change /q to /qn.
Click on the Next button. We recommend leaving the defaults until the download process completes and then click Close.
The Local Administrator Password Solution application is now in your console. Only a couple tweaks are required for the program. In the Properties of the application, click on the Deployment Types tab. Choose the Deployment and click Edit. Go into Requirements and add the x64 for versions of Windows in your environment.
Deploying LAPS Application to Endpoints

At this point, we have the app, so let’s get it deployed to the workstations. Since we already added the logic into the app, we can safely deploy it to our workstations.
NOTE: This is where knowing your environment is crucial, so make sure you deploy the app to the appropriate collection. Perhaps you have a business reason to not deploy it to all workstations. Use best practices for deployments (maintenance windows, etc.).
The remainder of this example will be generic.
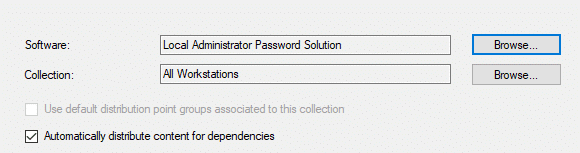

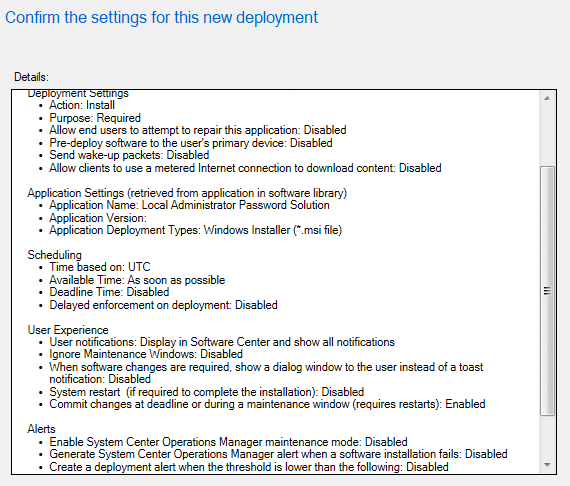
We left the settings for Scheduling, User Experience, and Alerts all set to the defaults (see the screenshot below).
Infrastructure Setup
Admin Client / LAPS Management Client
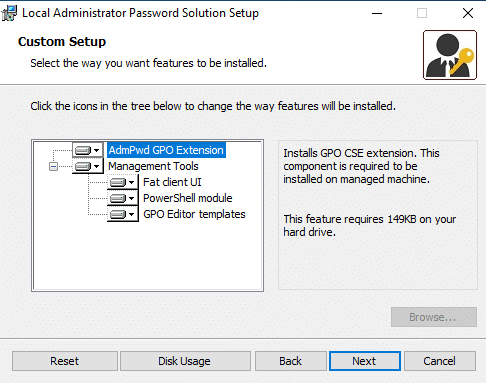
Now that the client is deployed, let’s setup the infrastructure. First, switch over to a client test machine or your typical admin workstation. We’ll install the LAPS client along with the Management Tools. Once you kick off the installer (double-click on the MSI) click through the first couple screens to get to the Custom Setup screen. Once here, enable all the options.
Next, go ahead and install it. You’ll need to grab some of the items it installs and then copy them back out to your source server for easy access.
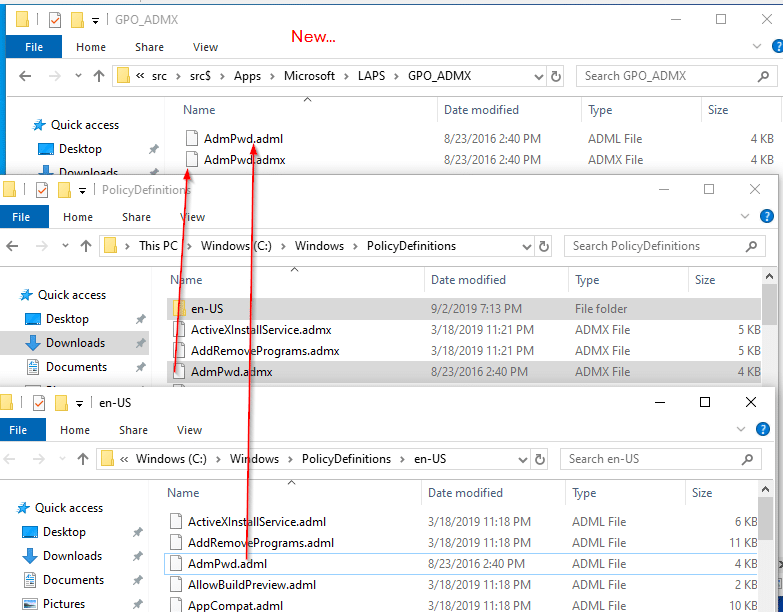
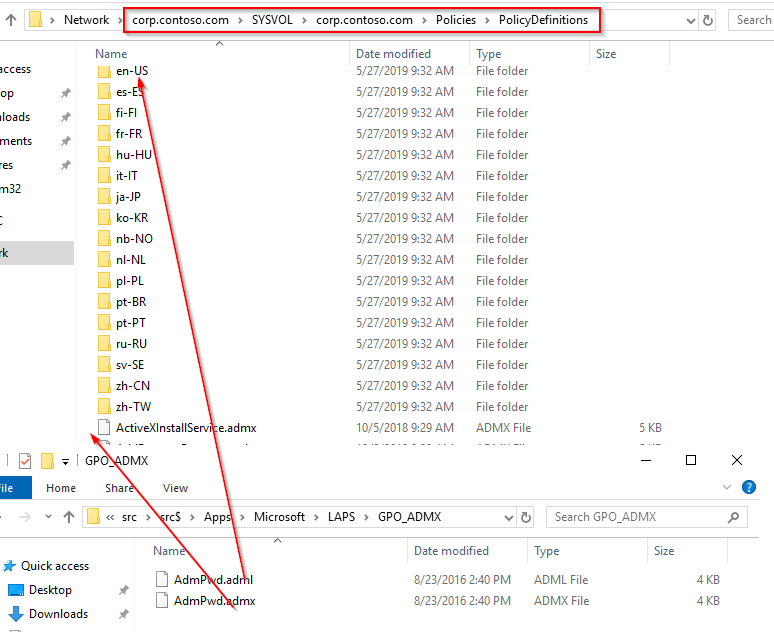
Go to C:WindowsPolicyDefinitions. Here you will grab the AdmPwd.admx file, and the AdmPwd.adml file from the en-US subfolder. We created a folder called GPO_ADMX in our source location to copy them to (see, “New…,” in the screenshot below).
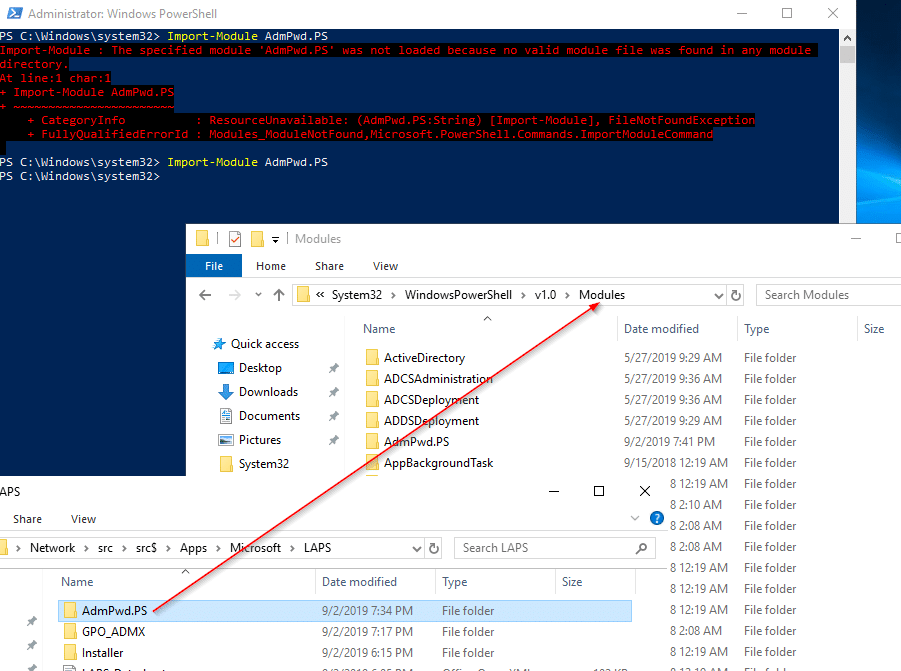
Also, copy the AdmPwd.PS folder from the PowerShell modules: C:WindowsSystem32WindowsPowerShellv1.0Modules
You’ll need all these files later.

Extend AD Schema (from Domain Controller)
Complete the following steps from your workstation. We did it from the actual domain controller (DC) to ensure we had the connection and rights. You’d typically do this from an admin machine with proper credentials. Your DC should be running Windows Server CORE and it should not have a desktop experience. You typically never want to actually log onto a DC. However, this is a lab and demo environment.
Modify the AD Schema
On the domain controller (DC), copy the AdmPwd.PS folder you uploaded to your source into the local module repository on your DC. Next, launch the admin PowerShell console. In the image below, you can see how we tried to Import-Module before copying the files onto the DC. After the copy, the command runs correctly.
Import-Module AdmPwd.PS
Next, run the command: Update-AdmPwdADSchema
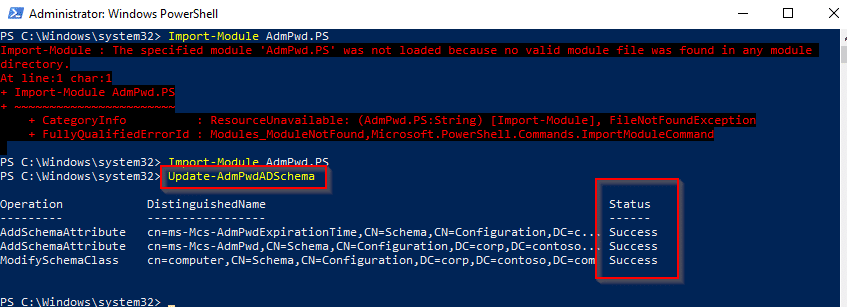
In this lab, you can see it successfully added two attributes and modified one class.
Setup LAPS AD Groups and Permissions
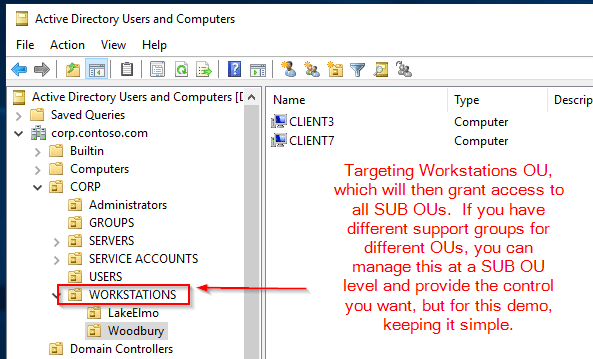
Hopefully you planned a few key details before starting this journey. For example, denote which OU the workstations are in that you want to apply LAPS group policy to, and plan which individuals should have permissions. For this lab, we have one “Master OU” setup for workstations, and all other workstations fall into sub-OUs of that master OU.
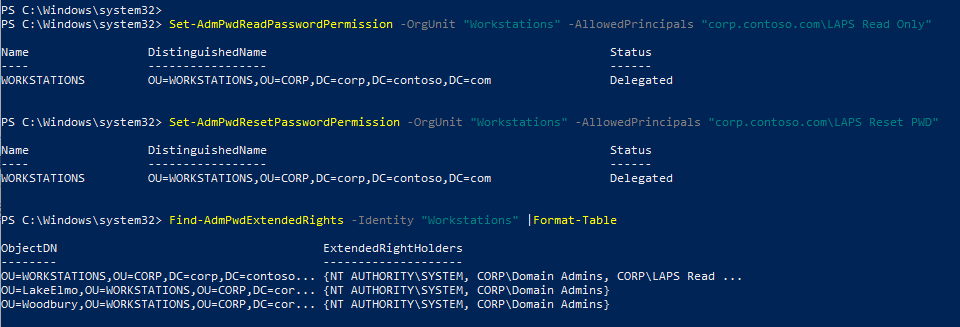
At this point, it’s nice to check and see who has rights to view that info in AD. In your PowerShell console, type: Find-AdmPwdExtendedrights -identity <OU Name> | Format-Table

As you can see, the rights in this lab are clean, and we’re ok with these folks having rights to LAPS.
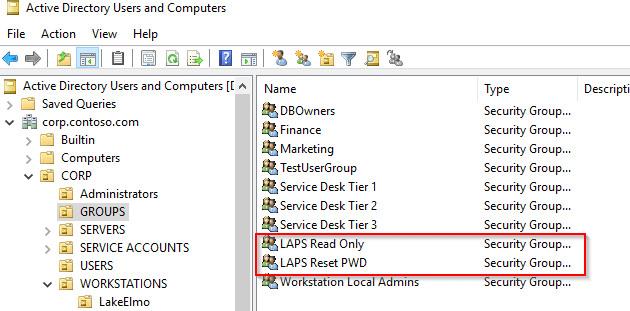
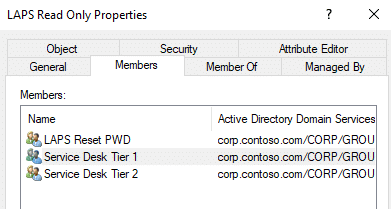
Now, in AD, let’s set up “Read” and “Reset” groups. This will grant these groups access to LAPS. In the screenshot below, you’ll see that we’ve created two groups: LAPS Read Only and LAPS Reset PWD.
Now we need to grant machines the ability to update their own passwords. We’re going to grant access to the “SELF built-in account” for all machines in the Workstation OU: (Workstations) Set-AdmPwdComputerSelfPermission -OrgUnit <OU Name>

Next, we need to grant users rights to look up that information. This is where we need the newly created groups. Here we’ll give the “LAPS Read Only” group rights to read LAPS passwords: Set-AdmPwdReadPasswordPermission -OrgUnit <OU Name> -AllowedPrincipals <FQDN Group Name>
We’re going to give the “LAPS Reset PWD” group rights to reset LAPS passwords: Set-AdmPwdResetPasswordPermission -OrgUnit <OU Name> -AllowedPrincipals <FQDN Group Name>
Verify Permissions and Read / Reset Access
Let’s confirm this worked by using the Find… command (see the screenshot below).
Now, back in AD, nest the groups you want to have access in your LAPS Security Groups.
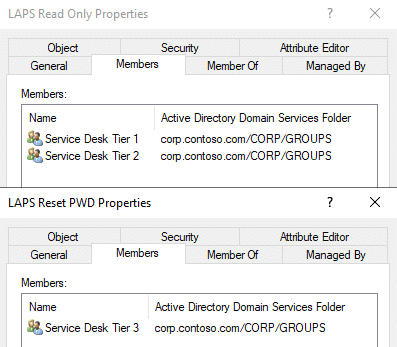
For this lab, we have Service Desk Tier 1 and 2 with read only rights, and Tier 3 can reset.
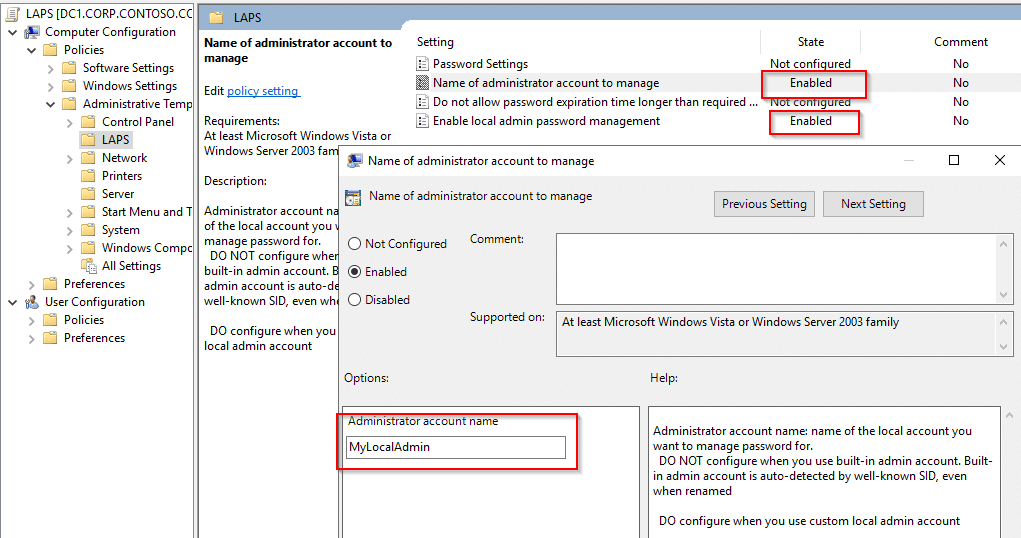
Enable Group Policy
Copy the ADMX and ADML files you copied to your source folder into your Group Policy Central Store, which can be located here: FQDNSYSVOLFQDNpolicies
Now we can launch Group Policy and create our LAPS policy. In this demo, we’ll create a new simple policy, but you can always add it into one that already exists. The new GPO is set to the defaults, except we disabled User Policies. We did this because our new policy is all machine-based, so there is no point in having it look for user policies.
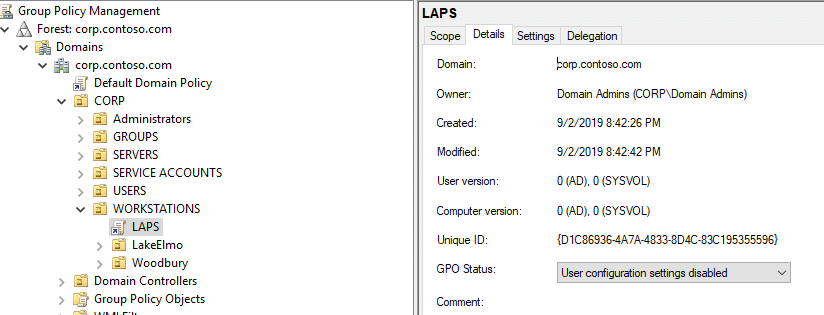
We used basic settings to get it working with this lab. In the lab, we have a local admin account on the computer, besides the disabled default, which is named “MyLocalAdmin.” This is the account we want LAPS to manage.
That’s it. Now it’s time to confirm we get the desired results.
Confirm Permissions
The permission tests we will perform:
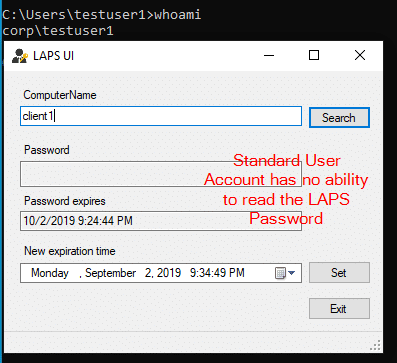
- Standard End Users (should have No Rights).
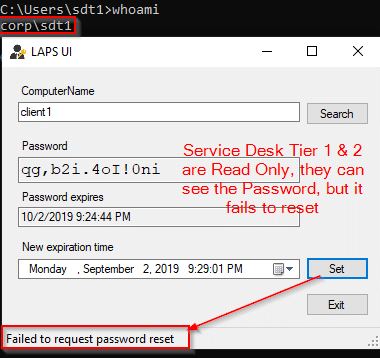
- Service Desk Tier 1 and Tier 2 (should have Read access).
- Service Desk Tier 3 (should have Read and Reset access).
Test 1: Standard User
Test 2: Tier 1 and Tier 2 Service Desk
Test 3: Tier 3 Service Desk
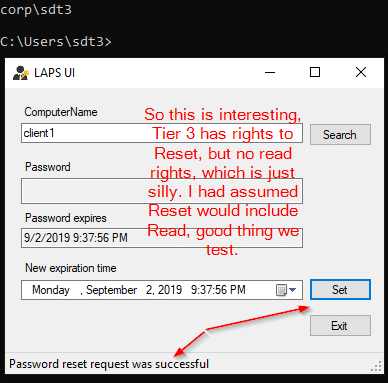
What did we learn from this test? Reset permissions do not include Read. Unless you have a need for a group to be able to reset this password and not read it, we’d recommend nesting the LAPS Reset PWD group inside of the LAPS Read Only group.
Test again.
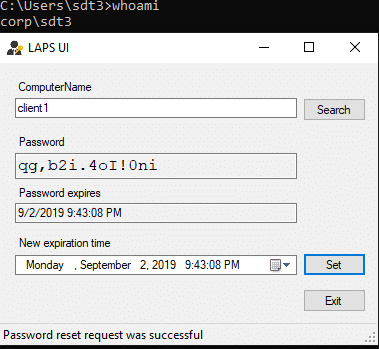
Now we get the desired results. Tier 3 Service Desk can both Read and Reset the LAPS password.
Additional LAPS Information
- Windows LAPS Overview
- How to configure Recast Management Server Users / Groups to view the LAPS Compliance Dashboard in the ConfigMgr console
Microsoft LAPS in Action
After you’ve downloaded and deployed LAPS, Recast Software created a helpful dashboard for you to monitor your LAPS health, bringing visibility to overlooked security necessities. This is included in the Enterprise version of the Right Click Tools.
The Right Click Tools LAPS dashboard keeps LAPS visible and front of mind. It only takes a few seconds to pull it up, check the current stats, and move on. If an anomaly is found, the team can quickly start looking into it. Learn more about the Right Click Tools LAPS Dashboard.
