


I was working with a customer today on a Proof of Concept (POC). They wanted to test the ability to leverage the Recast Agent on the machine to force a reinstall of the ConfigMgr client. If the ConfigMgr client’s connection to the Cloud Management Gateway (CMG) is broken, using a Recast Agent Gateway in the DMZ allows us to still force a client reinstall, re-establishing communication.
We already have actions available to uninstall the client and repair the client. However, what if you want to do a complete, fresh reinstall of the client? This post will cover how to leverage the Recast Builder to create and run the installer using the Recast Agent and Agent Gateway.
The first step is to create a PowerShell script block that will force the reinstall of the client:
The code below will force the reinstall of the ConfigMgr client; copy and paste into your code editor as we will need to make changes before adding it in as a Recast Builder Action.
<#
.SYNOPSIS
Force SCCM Client Reinstallation
.DESCRIPTION
This script will check to see if the device is on the local intranet or on the internet
to determine the best method of installing the client and then force out a reinstall of the client
You can see how to install the client through the CMG from this article:
https://learn.microsoft.com/en-us/mem/configmgr/core/clients/deploy/deploy-clients-cmg-azure
.LINK
#>

# Function to test to see if the device is on the Internet or Intranet
Function Get-CMGStatus {
    <#
    .SYNOPSIS
    Queries SCCM connection type to determine if the PC is connected to a CMG
    #>
    $ClientInfo = Get-WmiObject -namespace rootccm -Class ClientInfo
    If($ClientInfo.InInternet) {
        Return $True
    }
    Else {
        Return $False
    }
}

# Variable Declarations
$CloudMP = 'https://CONTOSO.CLOUDAPP.NET/CCM_Proxy_MutualAuth/72186325152220500' # Source Management Point
$CloudCCMHOSTNAME = 'CONTOSO.CLOUDAPP.NET/CCM_Proxy_MutualAuth/72186325152220500' # Internet Based Management Point
$SiteCode = 'ABC' # Site Code
$SMSMP = 'https://mp1.contoso.com' # Initial Management Point
$AADTenantID = 'daf4a1c2-3a0c-401b-966f-0b855d3abd1a' # Entra AD Tenant Identifier
$AADClientAppID = '7506ee10-f7ec-415a-b415-cd3d58790d97' # Entra AD Client App Identifier
$AADResourceURI = 'https://contososerver' # Entra ID Server App Identifier

# Perform installation depending on result from Get-CMGStatus
If ($(Get-CMGStatus)) {
    Start-Process -FilePath 'c:windowsccmsetupccmsetup.exe' -ArgumentList  "/nocrlcheck /forceinstall /mp:$CloudMP CCMHOSTNAME=$CloudCCMHOSTNAME SMSSITECODE=$SiteCode SMSMP=$SMSMP AADTENANTID=$AADTenantID AADCLIENTAPPID=$AADClientAppID AADRESOURCEURI=$AADResourceURI" -Wait
} else {
    Start-Process -FilePath 'c:windowsccmsetupccmsetup.exe' -ArgumentList "/forceinstall /mp:$SMSMP SMSSITECODE=$SiteCode" -Wait
}
Next, open your ConfigMgr console and navigate to Administration < Cloud Services < Cloud Attach and then open the properties for CoMgmtSettingsProd and view the Enablement tab.
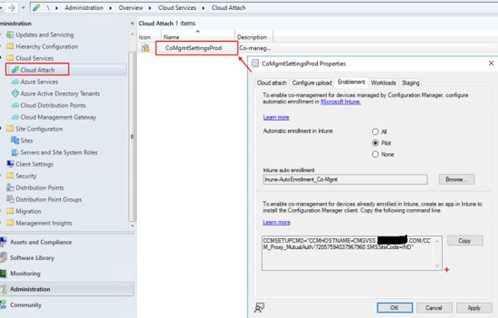
Here you will find the correct server name within the quotations with the value for the $CloudMP and $CloudCCMHOSTNAME; these are the same values. You will use this in your PowerShell script.
Log into the Entra Admin Portal and retrieve the following values for the enterprise application for your ConfigMgr CMG service:
- AAD Tenant ID
- AAD Application ID (Client ID)
- AAD Resource ID
as shown in the example PowerShell script.
In the PowerShell script, replace out the variable values as specified in the script:
- $CloudMP and $CloudCCMHOSTNAME = Value retrieved from CoMgmtSettings in Step 2
- $SiteCode = your site code
- $SMSMP = your on-prem management point
- $AADTenantID = Your Entra Admin Tenant value
- $AADClientAppID = The client ID for your ConfigMgr CMG Service Enterprise App
- $AADResourceURI = The uri for your ConfigMgr CMG Service Enterprise App
Create Recast Builder Action
The next step is to create that action in the Recast Builder. From within the ConfigMgr Console, Navigate to Assets and Compliance < Overview < Devices and right-click on any device and then choose Recast Automation < Recast Builder.
Click the Plus sign for a New Action.

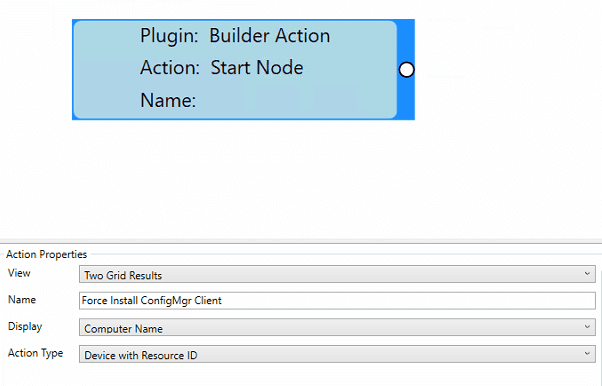
Click the Start Node in the Builder Window and in the area below. Give it a name that you will recognize.
In the right-hand pane, expand out the PowerShell area and drag in the “Run PowerShell Script Block” Building block.
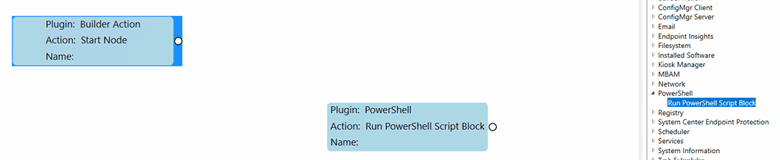
To draw the arrow, click and drag from the circle on the starting node and point to the new node that you added for the PowerShell script block.

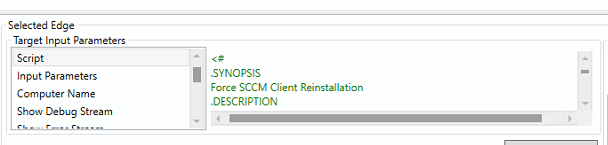
While the arrow is highlighted, look down in the box in the bottom left and you will see some parameters. Select the Script parameters and copy and paste your code into this box.
Save your new action.
Time to Test Automation of ConfigMgr Client Force Reinstall
- Select a device from within your ConfigMgr Console and then right-click on it and then click Recast Automation < Recast Runner.
- Select your newly created Action and click Next.
- From here you can Run Immediately or you can Schedule it and then Click Finish.
Please test this Action and let us know the results.
Final Thoughts on Automating ConfigMgr Client Reinstallation
Automating the force reinstall of ConfigMgr clients is not just about saving time; it’s about enhancing your IT infrastructure’s resilience and reliability. By leveraging the steps outlined, you can ensure that your ConfigMgr clients are always running optimally.
Note: The ability to automate the force reinstall of ConfigMgr clients using Recast Builder is just the beginning. Explore Builder and Runner further to unlock the full potential of your endpoint management capabilities.