Application Management and Patching
How to Automatically Update Apps in Intune with Dynamic Win32 App Deployment
Greetings, fellow IT admins! Have you ever deployed Win32 applications through Intune, only to discover a week later that a new version has been released? Repackaging setup files and editing your Win32 app again can be tedious and time-consuming. I bring you good news! There is a way to deploy a Win32 app and have it always install the latest version of the app on the computer.
To achieve this, we will deploy a PowerShell script as a Win32 app. This script will grab the latest version from the vendor’s site, download it, and then install it on the end computer. IT admins will not have to repackage the same app over and over again, edit their Win32 apps with every patch, and all your new devices/users will always get the latest version of the application.
Step by Step Guide
How to Automatically Update Apps in Intune with Dynamic Win32 App Deployment
Finding the Permalink
The hardest and most important step is finding the permanent download link (aka permalink) for the target application, which will enable the download of the latest version of the application. Find the permalink by either exploring the vendor’s website, reading documentation and release notes, or simply reaching out to the vendor and asking them for it.
For this example, we will deploy Zoom. See the appendix section below to see a few common apps and their permalinks.
Building the Script
Once you find the permalink, it’s time to build the script. You can copy the full script from my GitHub here. I have added comments in the script to assist you in understanding it.
<#
.SYNOPSIS
    Script to install or uninstall latest version of Zoom via PowerShell. This script can be packaged as win32 app and then deployed via intune.

.DESCRIPTION
    This script allows you to install or uninstall Zoom on a Windows system.

.NOTES
    Author: Lovepreet Singh (Recast Software)
    Date: March 13, 2024
    Version: 3.0

    This script is provided as-is and without warranty. Use it at your own risk.

.Usage
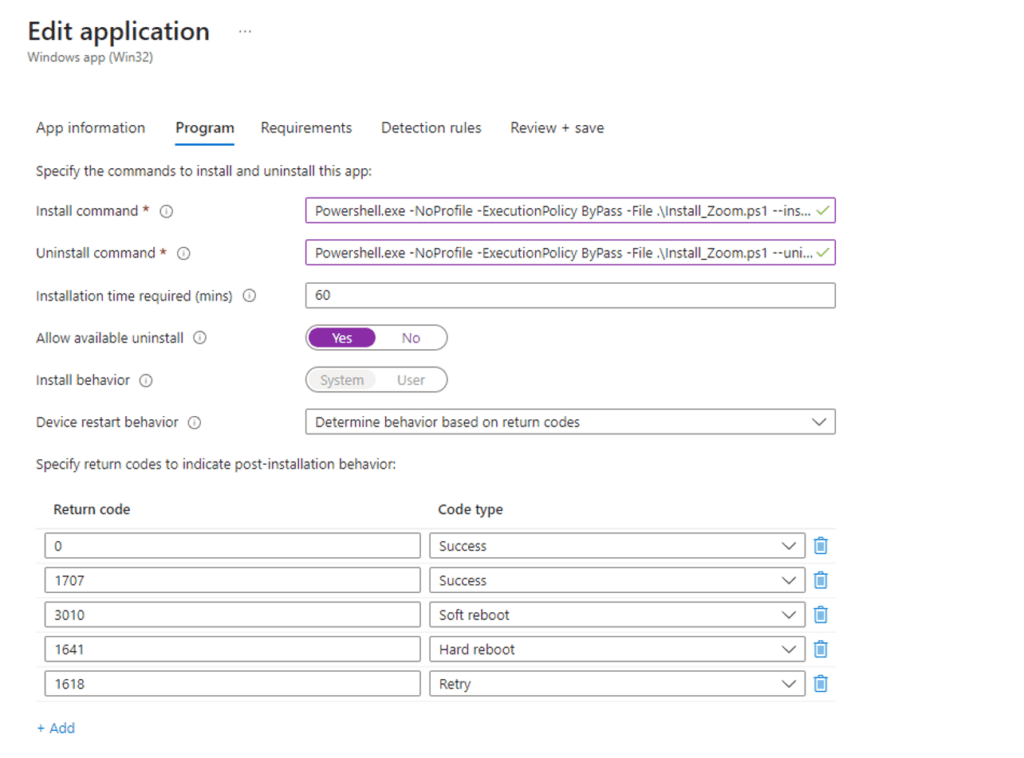
    Copy and paste the below commands in Command prompt (run as admin), Or in Intune install/unisntall command section.

    For Install:> Powershell.exe -NoProfile -ExecutionPolicy ByPass -File .Install_Zoom.ps1 --install
    For Uninstall:> Powershell.exe -NoProfile -ExecutionPolicy ByPass -File .Install_Zoom.ps1 --uninstall

#>

param (
    [switch]$Install,
    [switch]$Uninstall
)

#Give a app name and specify the permalink
$AppName = "Zoom"
$DownloadURL = "https://zoom.us/client/latest/ZoomInstallerFull.msi?archType=x64"

# Specify the full path to the MSI file. In my case i am storing this in the Temp folder.
$MSIFilePath = "$env:TEMP$AppName.msi"

if ($Install) {
    $InstallCommand = "msiexec /i '$MSIFilePath' /qn"


    # Suppress progress reporting                           #By suppressing the progress bar, the download speed increases 10x. This is a global variable used by powershell itself.
    $ProgressPreference = 'SilentlyContinue'

    # Download the MSI file
    Invoke-WebRequest -Uri $DownloadURL -OutFile $MSIFilePath

    # Install Zoom silently and enable Zoom auto updates
    Start-Process -FilePath "msiexec" -ArgumentList "/i `"$MSIFilePath`" /qn /lex zoommsi.log ZoomAutoUpdate=1" -Wait

    # Remove the downloaded MSI file
    Remove-Item -Path $MSIFilePath -Force
}

#Below is the Uninstall parameter of this script. At first i wanted to copy the Install parameter and just replace the /i with /x to uninstall. But this is a bad idea. Why?
# Maybe the user will uninstall after 6 months, by then Zoom might have a new version with new MSI, with a differnt msi product code, so the uninstall can fail, instead we will below mentioned method

elseif ($Uninstall) {

    $Query = "SELECT * FROM Win32_Product WHERE Name LIKE '%$AppName%'"

    # Query for products that match the criteria
    $Product = Get-WmiObject -Query $Query | Select-Object -ExpandProperty IdentifyingNumber

    # Un-Install Zoom silently
    Start-Process -FilePath "msiexec" -ArgumentList "/x $Product /qn" -Wait

}
Packaging the Script
Now that you have the .ps1 script file downloaded and edited (if needed), it’s time to package it. Use the Microsoft Win32 Content Prep Tool, which you can download here.
For more information on this tool visit https://learn.microsoft.com/en-us/mem/intune/apps/apps-win32-prepare.
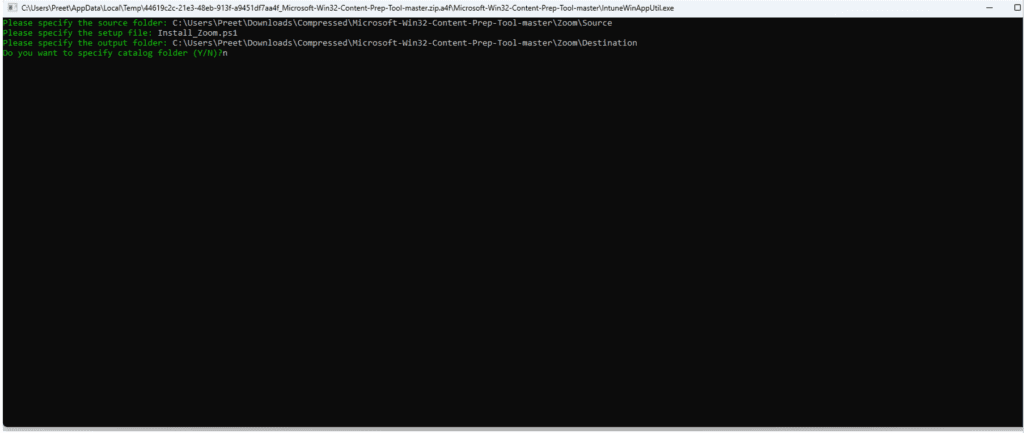
Using the Win32 Content Prep Tool
Refer to this previous post to learn how to package using the Win32 content prep tool. There are three major differences for us in this scenario compared to the post:
- We will use “Install_Zoom.ps1” as the setup file instead of “Zoom.msi”.

- We will use our custom Install and Uninstall commands in Intune win32 application setup.

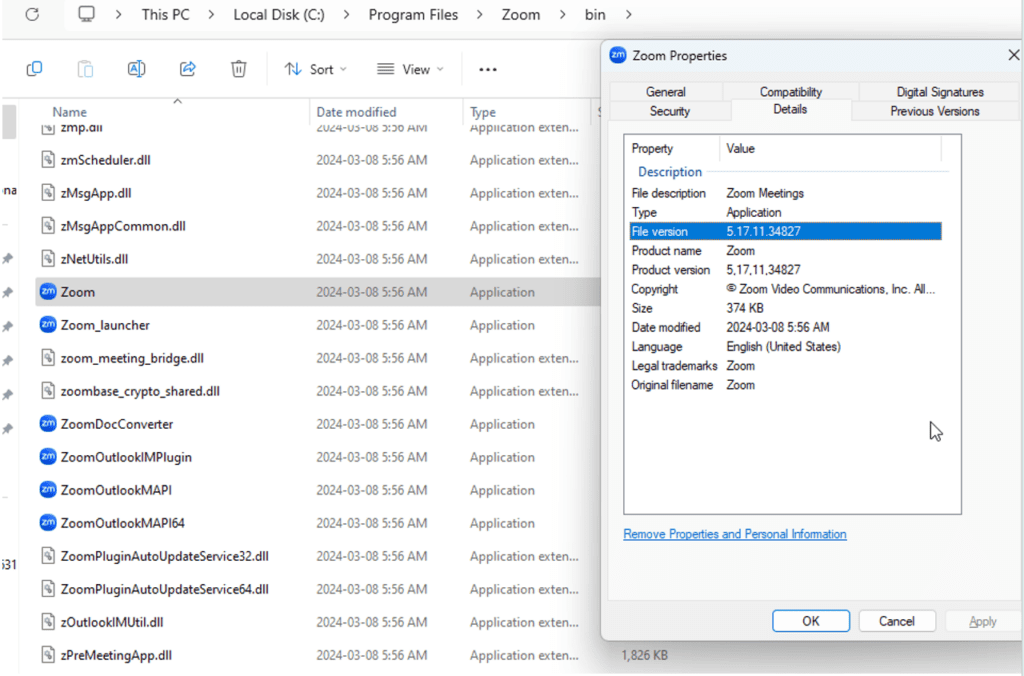
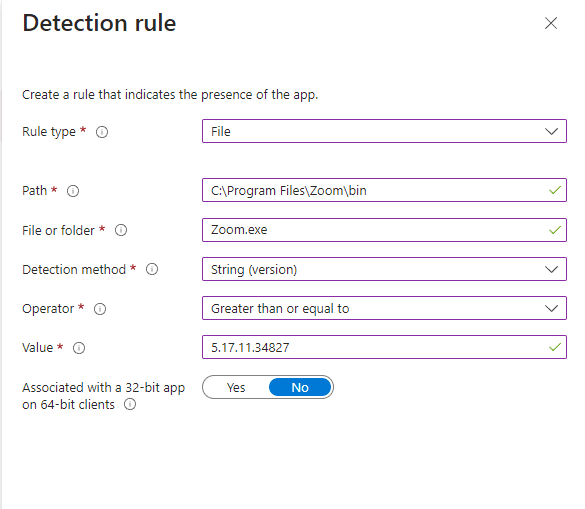
- For Detection Rule, we will use the file version.


Note: While this method is great for ensuring that new users and devices will always get the latest version available, it is not perfect. For example, when a newer version of Zoom is released after 5.17.11.34827, the detection rule will read it as already installed because “Greater than or equal to 5.17.11.34827” will be true for all new versions.
Thankfully, Zoom has a prebuilt MSI switch (ZoomAutoUpdate=1) as shown in the script, which will always keep Zoom updated. However, this switch may not be available for other applications.
Beyond Updating Apps with Win32 App Deployment
If you are looking for a more complete and comprehensive third-party application lifecycle management tool, which will create, deploy, update, retire, and delete your applications automatically, check out Application Manager by Recast.
This eBook also gives some good perspective on the challenges and risks of manually patching apps.
Appendix
- Slack Permalink: https://slack.com/ssb/download-win64-msi
- Chrome Permalink: https://dl.google.com/chrome/install/googlechromestandaloneenterprise64.msi
- Firefox Permalink: https://download.mozilla.org/?product=firefox-msi-latest-ssl&os=win64&lang=en-US


