


SysAdmins have to deal with many repetitive tasks on their daily to-do list. They are often stuck doing the same tasks over and over again, while more pressing projects go cold on the back burner. The drudgery of endless manual tasks also introduces room for human error, creating more work and increasing security risks.
Automating repetitive tasks allows SysAdmins to get back to the vital work on their plates. Make life easier with the Right Click Tools automation platform, Builder. Builder enables you to create custom actions that automate an endless combination of tasks.
Custom Workflow Automation at your Fingertips
Right Click Tools includes a complete workflow automation suite that lives right within your ConfigMgr console. The Builder tool, for one, is a framework for creating your own Right Click Tools. It has all the Right Click Tools actions available at your fingertips. While learning scripting languages can be a long and painful journey, Builder eases the burden of learning syntax or keeping code perfectly tidy. Builder enables this by functioning as a visual automation creation tool. You can see your full flow graphically and customize all of the parameters.
However, if you have some scripting knowledge under your belt, you can also merge the Right Click Tools actions with custom PowerShell scripts.
What can be customized with Builder? You can fully customize everything from input parameters, conditional responses, loopback steps, and more — over 450+ Right Click Tools actions across dozens of categories. Any of the automations that you build can be saved and shared with other Right Click Tools users, or you can even import them into other environments that you manage (looking at you, Managed Service Providers). Whether you need to run the automation right now or on a schedule, Recast Software has you covered.
Where to Start your Automation Journey
The sheer number of actions that you can utilize to create automations in Builder can be intimidating at first. That is why we created templates to help you get started on your automation journey. The pre-built templates take care of some common issues you may be looking to automate away, like decommissioning old user accounts or restarting a device with a reboot pending. You can also build off of the templates.
Templates also help you understand how the flows work, as you can visualize the entire flow when viewing the template. Check out and download automation templates to get a head start in your automation journey.
Right Click Tools Runner
Now that you have created your shiny new workflow automation in Builder, how do you run it? That is where Runner comes into play. You build your automation in Builder and run it with Runner.
Once your automation is set up to your liking, you can run Runner against the appropriate object—whether it be a device, user, or collection—and kick off your action.
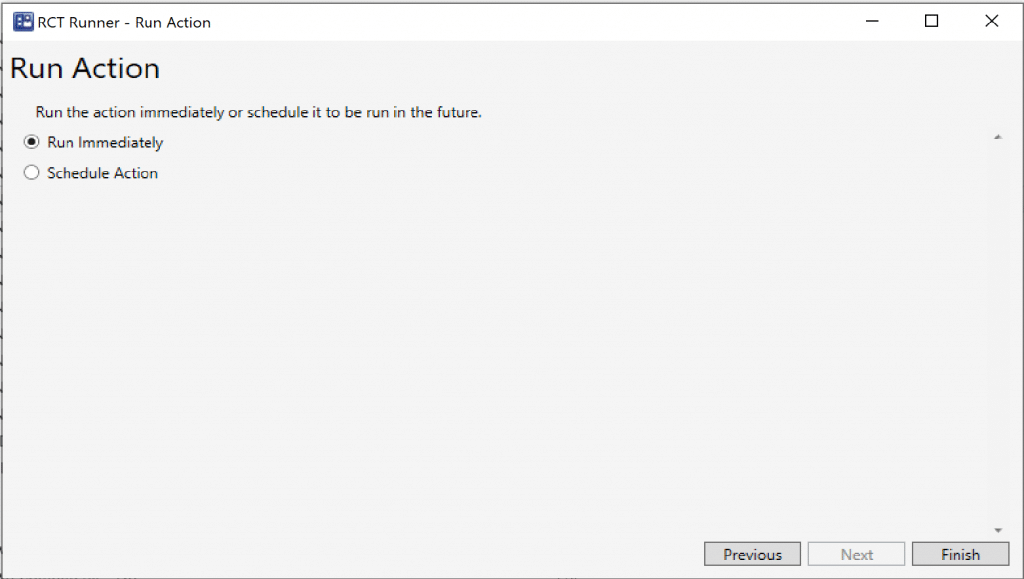
You will also get the option to schedule the action if needed. This can be a great way to run certain automations that should only be run after hours. Perhaps you need to restart all devices that are pending a reboot. You could run that action against a collection and schedule it to run after hours so that any devices that are currently pending a reboot will restart without any downtime for your end users.
Runner and Builder in Action
Now let’s dive into a quick example of how we can build our own custom automation to add or remove an account from the local administrator group. Luckily, we can use these actions at scale just like the other Right Click Tools so if we need to mass remove an account, we can knock it out across multiple devices at a time.
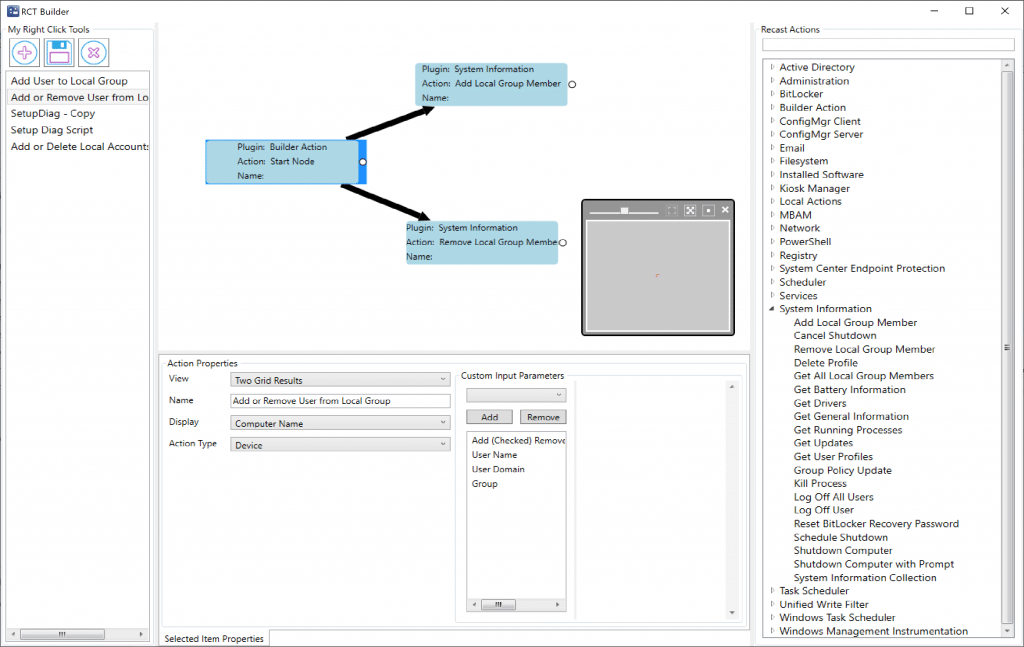
On the left you have a list of the Custom Actions you’ve created. The Middle area is your “Work Board”. You start with a single “Starting Point”, where you can create parameters, and pick the output you want to display. The Right side contains the list of actions you can choose from. Find the one you’re looking for, drag it from the options pane to the work board, draw your arrow and apply the parameters. No code needed. If you’re familiar with the Right Click Tools, then you’re already part way there.
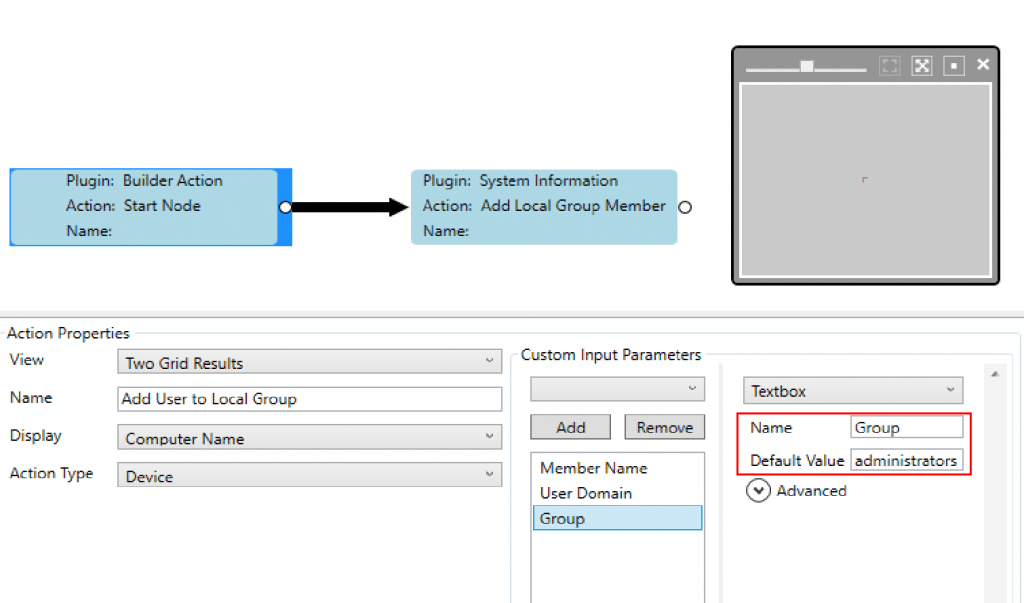
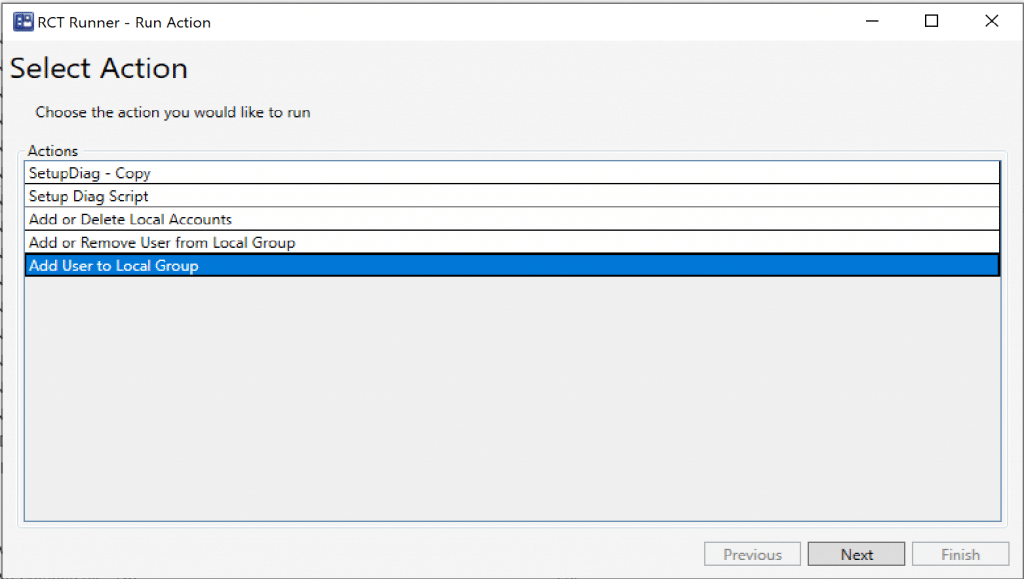
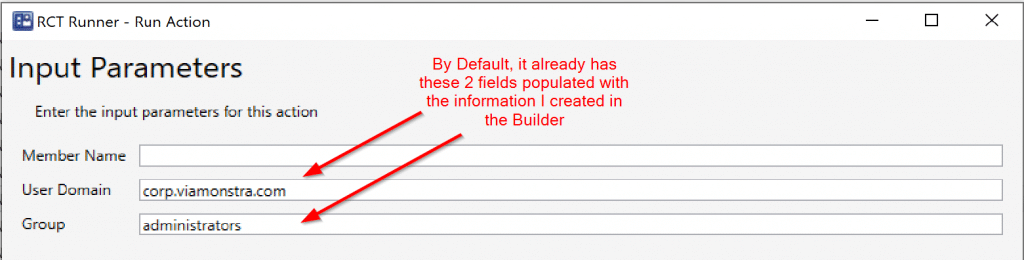
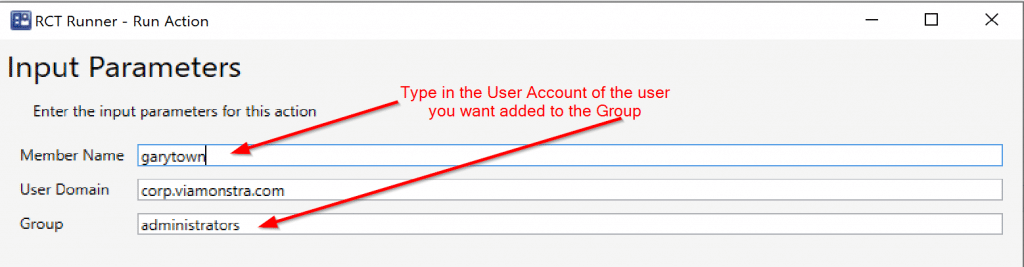
Here are a couple examples. While these are simple, it does give you a glimpse of the possibilities. Example 1 is a tool that will Add a user to a local group or Remove a user from a local group. We’ve set the default local group as administrators. Scenario, you need to grant someone local admin rights on a workstation (or group of), for a manual software install. Then when they are done, you want to remove them again.
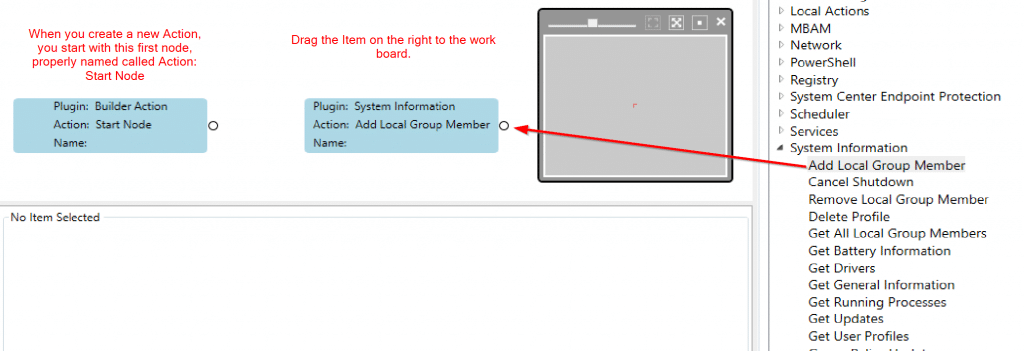
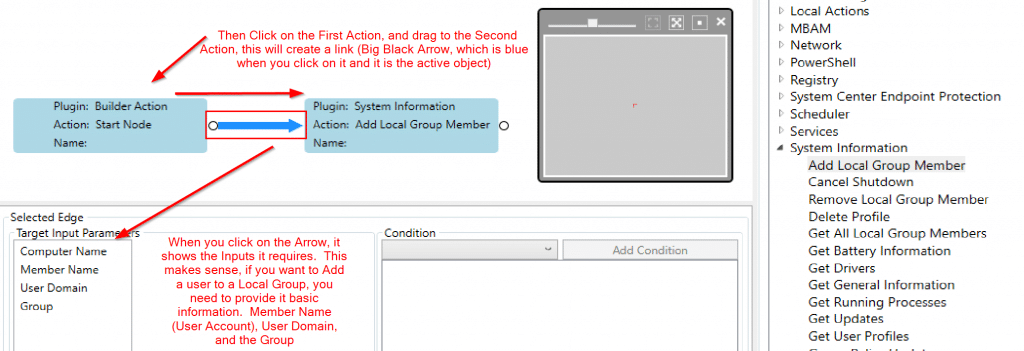
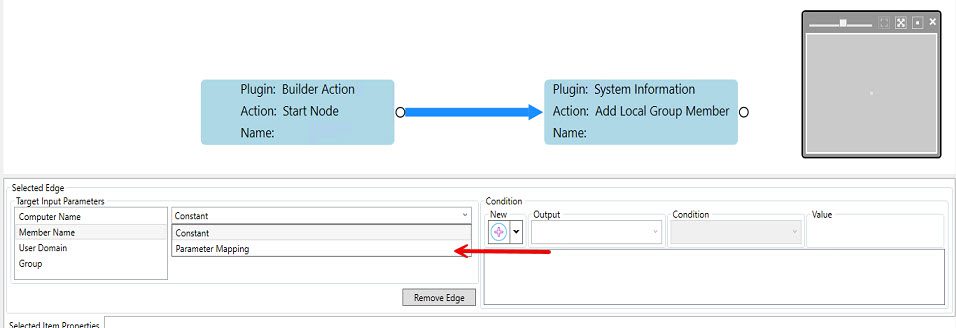
We created a new Builder Template, drag the “Add Local Group Member” Action onto the board, then drag an arrow from the Start Node to the Add Local Group Member action. When you click on the Arrow, it turns blue, so you know it’s the active object and shows you the required information that needs to be provided. This means this information will need to be created on the Start Node. Let’s create Parameters that the Right Click Tool Admin User will provide as input.
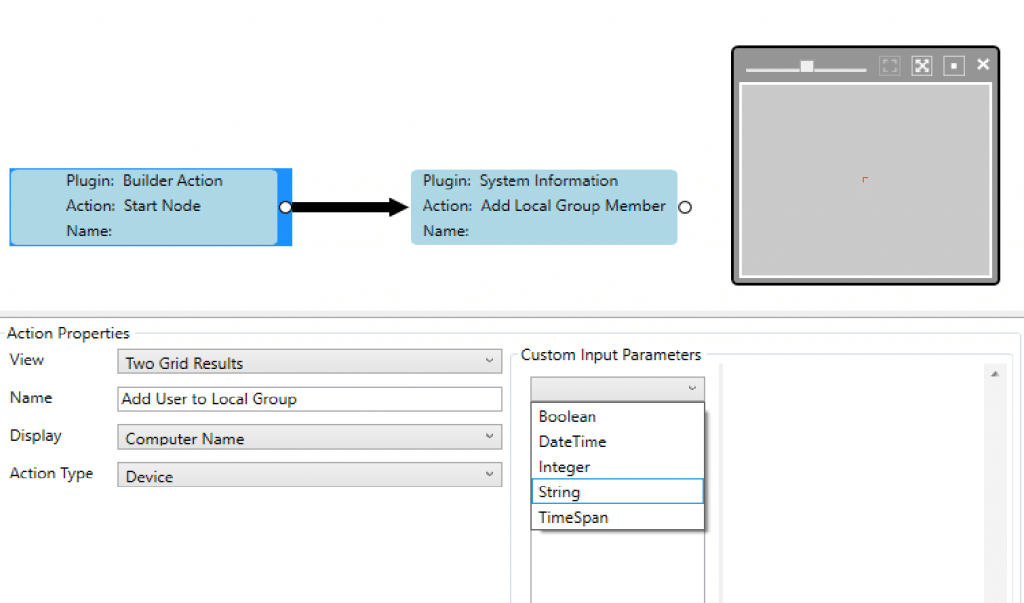
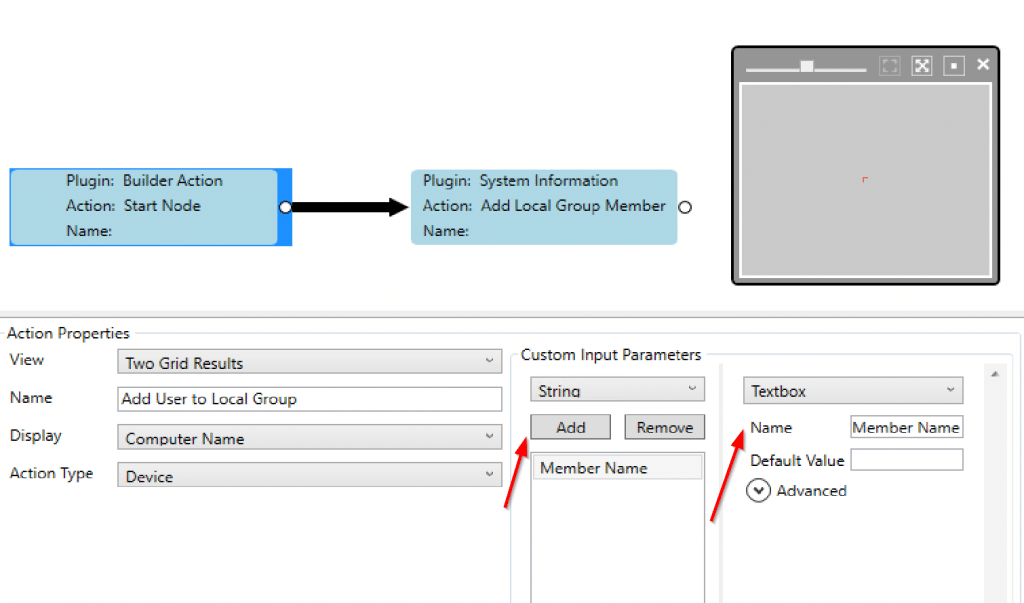
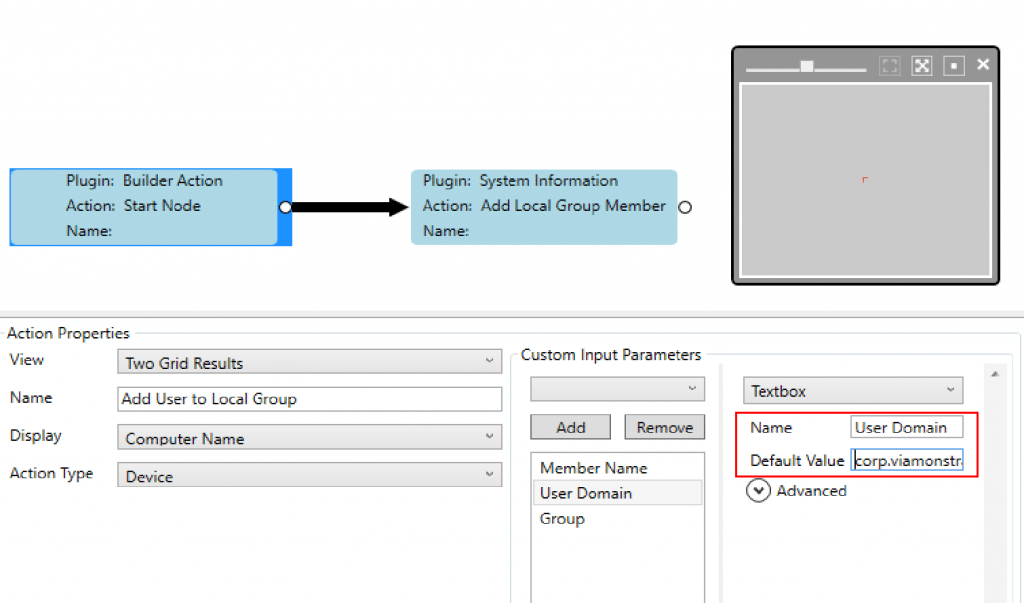
So we’ve added an Input Parameter, type string and called it Member Name, we’ll repeat this process for the other required fields. For the next two fields, I’ll also add default values, since most of the time, they will probably be what you want to input anyway.
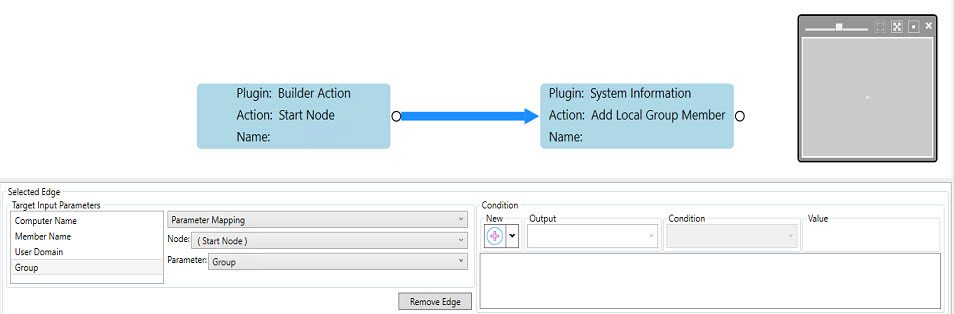
Ok, now that we’ve made our input parameters, it’s time to map them.
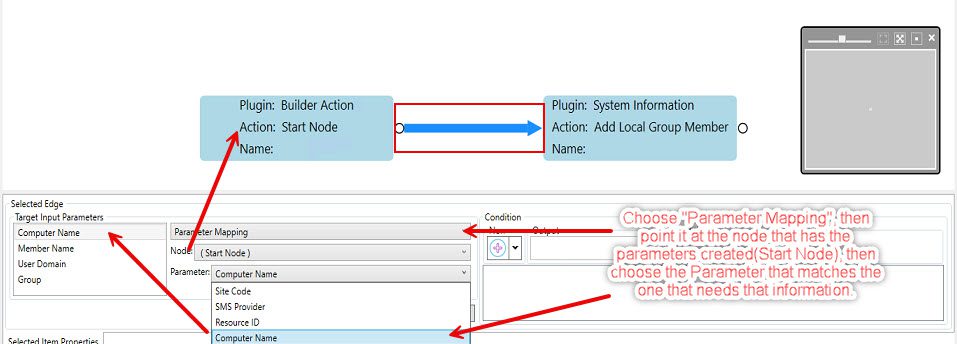
Once you click on the Arrow, it will turn blue and show the list of Required Input Parameters. Click the Required Parameter (in this case Computer Name) and match it to the Available Parameters. Now that we have that done, lets finish connecting the Parameters.
Alright, at this point, we have our parameters all mapped and this tool Should work… so let’s try it out!
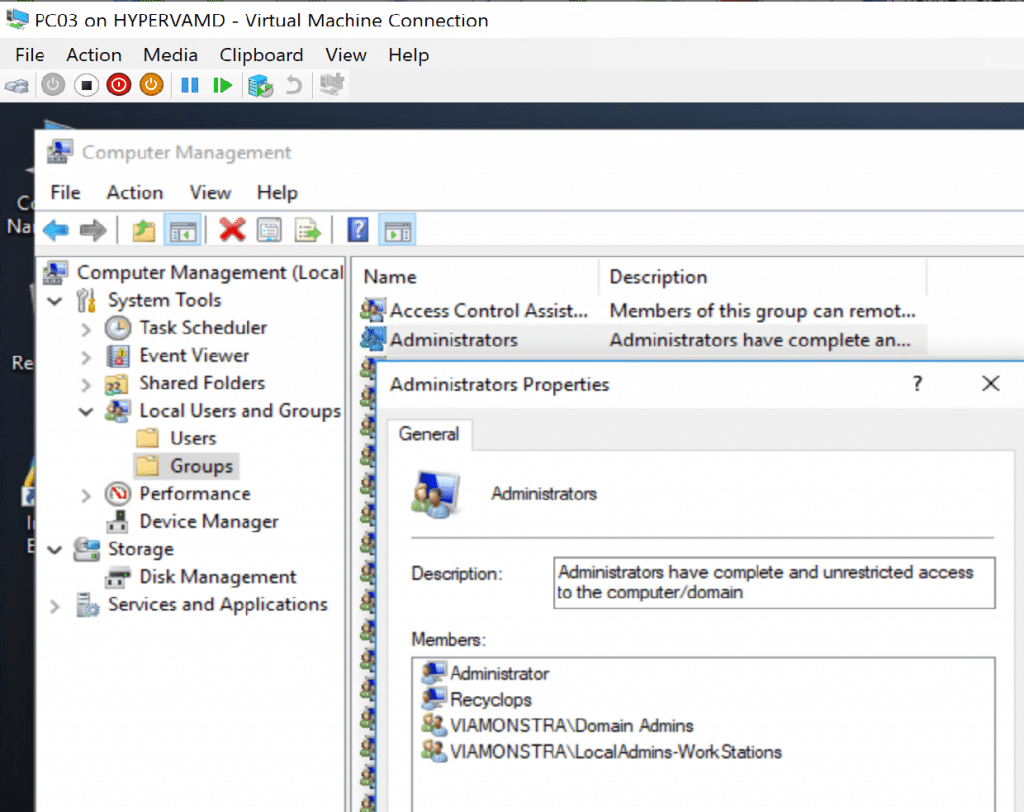
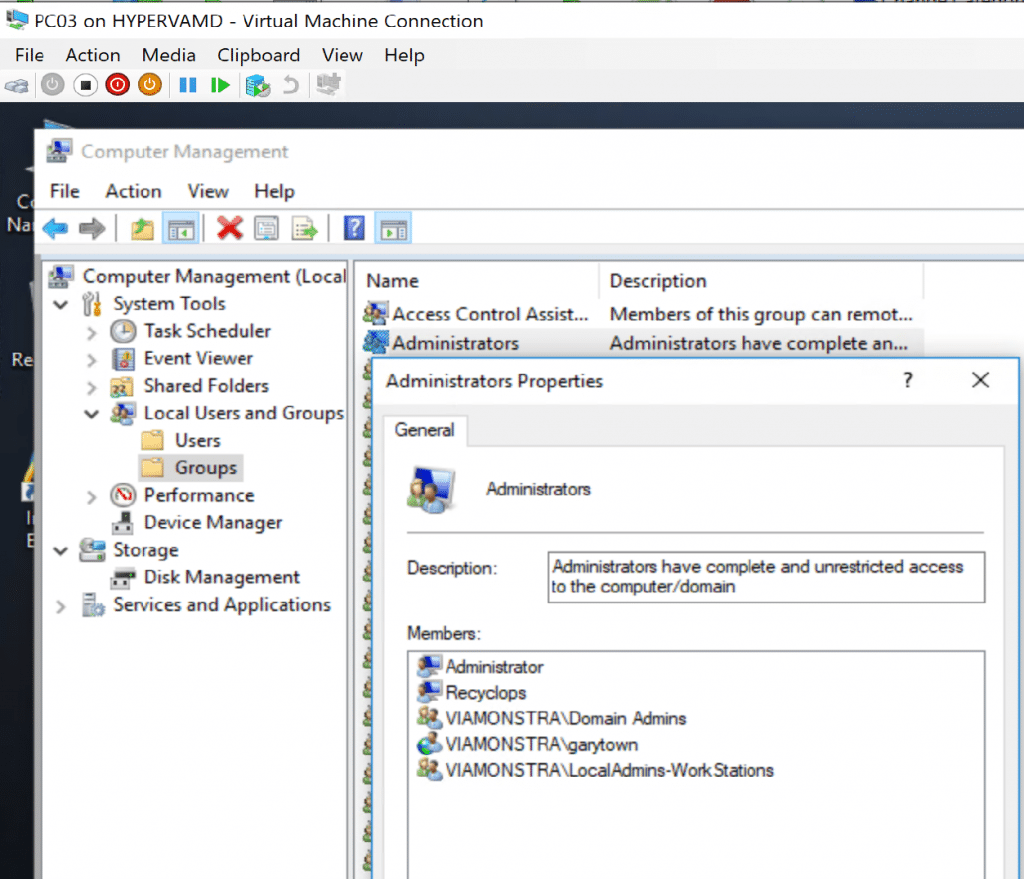
On our test machine PC03, let’s see who is in the Local Admin Group:
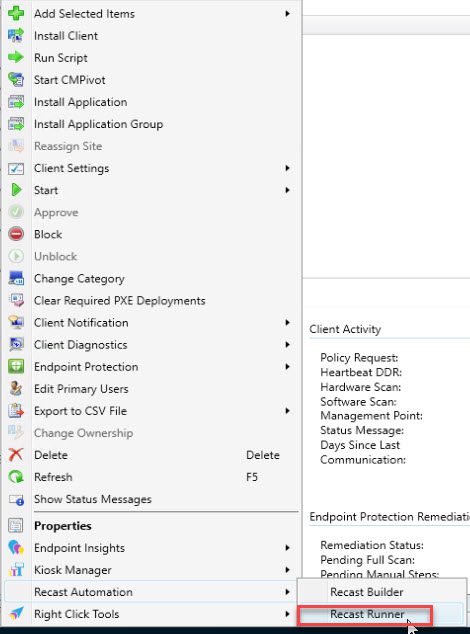
From the Console, Right Click -> RCT Runner
Then click Finish and see what happens. Looks like it worked!

And guess what, the Dialog didn’t lie. The Machine shows the account was added to the Administrators Group:
Ok, so now we confirm that part work, let’s go back and add the “Remove” feature.
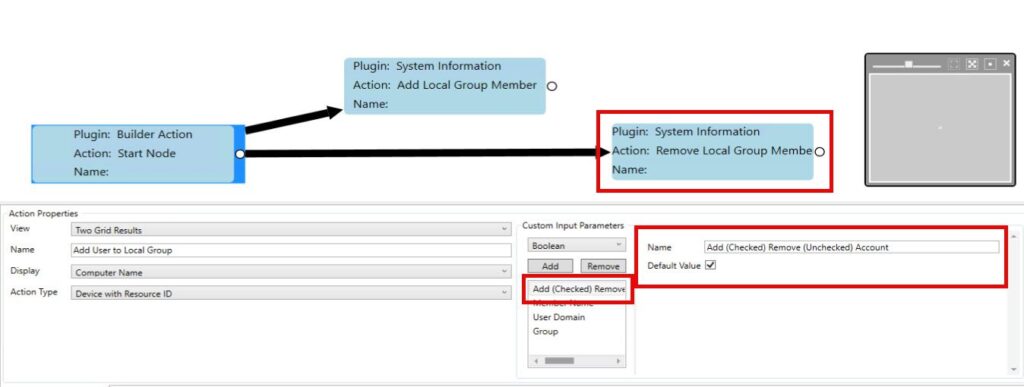
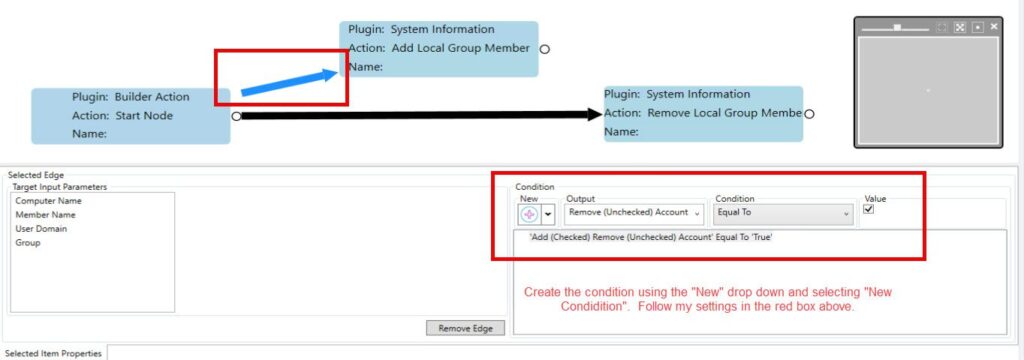
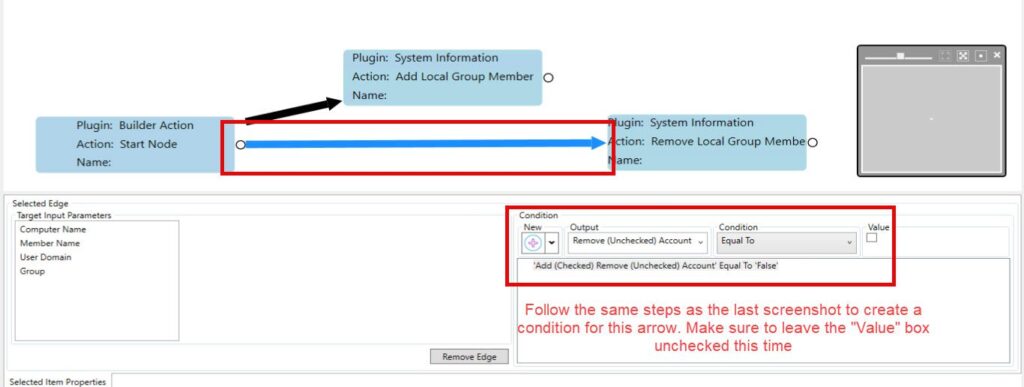
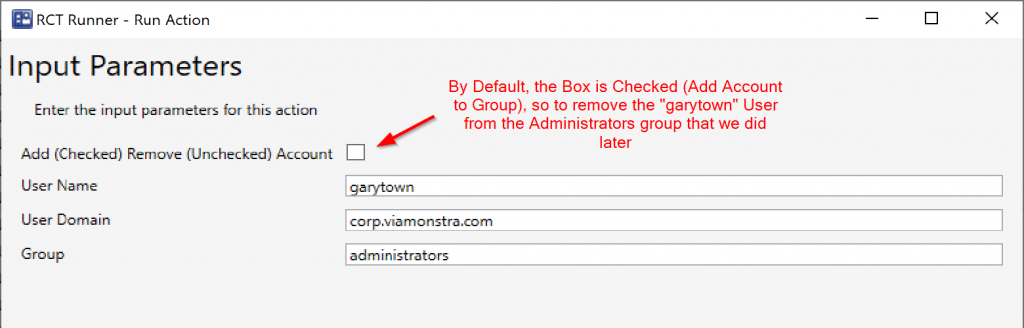
We added the “Remove Local Group Member” and added the “Arrow” to connect the Start Action to the Remove action. The setup is the same as the “Add Local Group Member”, it requires the same parameters. But now we need a way to let the Runner know which “Path” to take, Add or Remove. So we’ve added a Boolean (Check Box) to the form and named it accordingly. Then we just have to set the conditions on each action. Run “Add” if Checked, Run “Remove” if UnChecked.
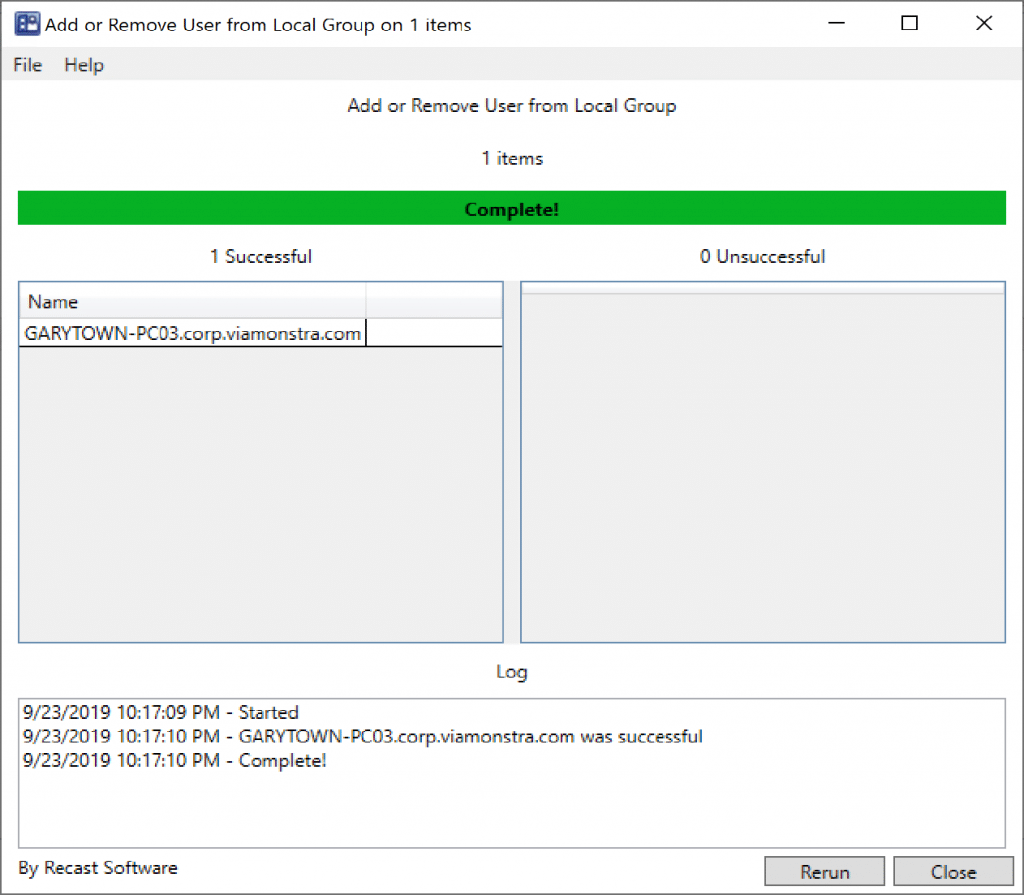
Ok, now let’s run it again, but this time we use it to remove the account.
Oh good. It worked.
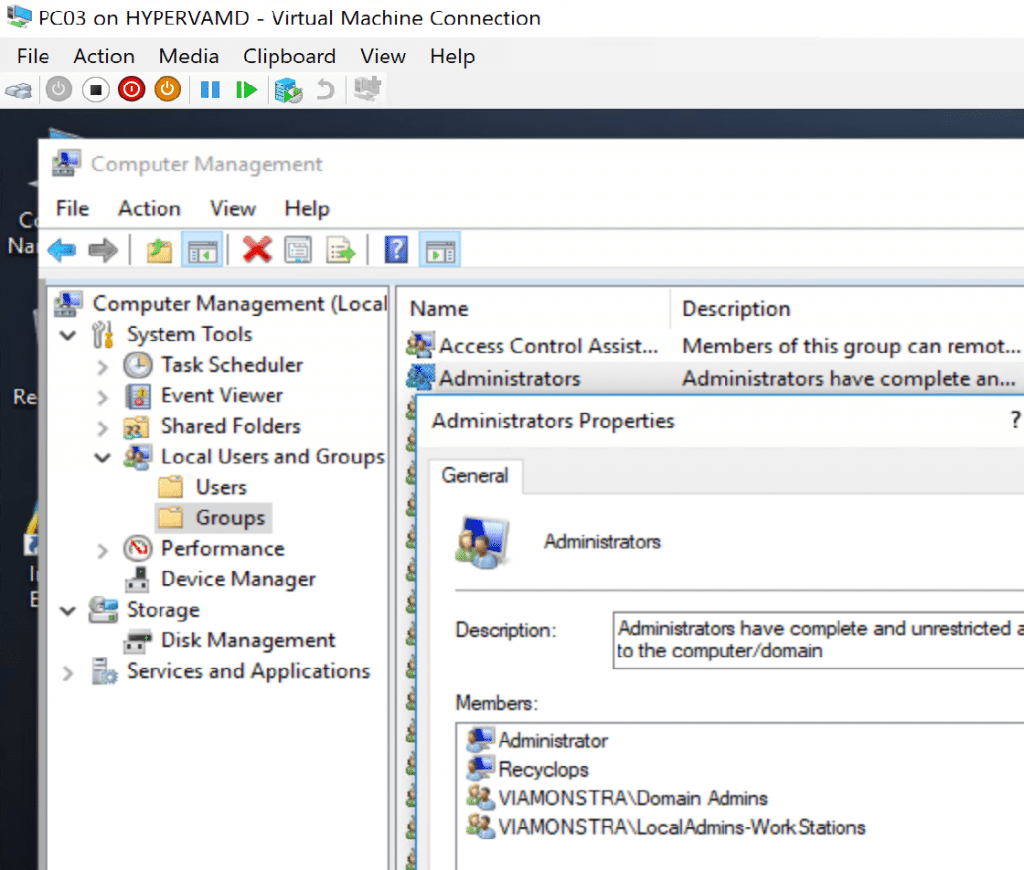
Double checking the computer. Yep, garytown is now removed from administrators:
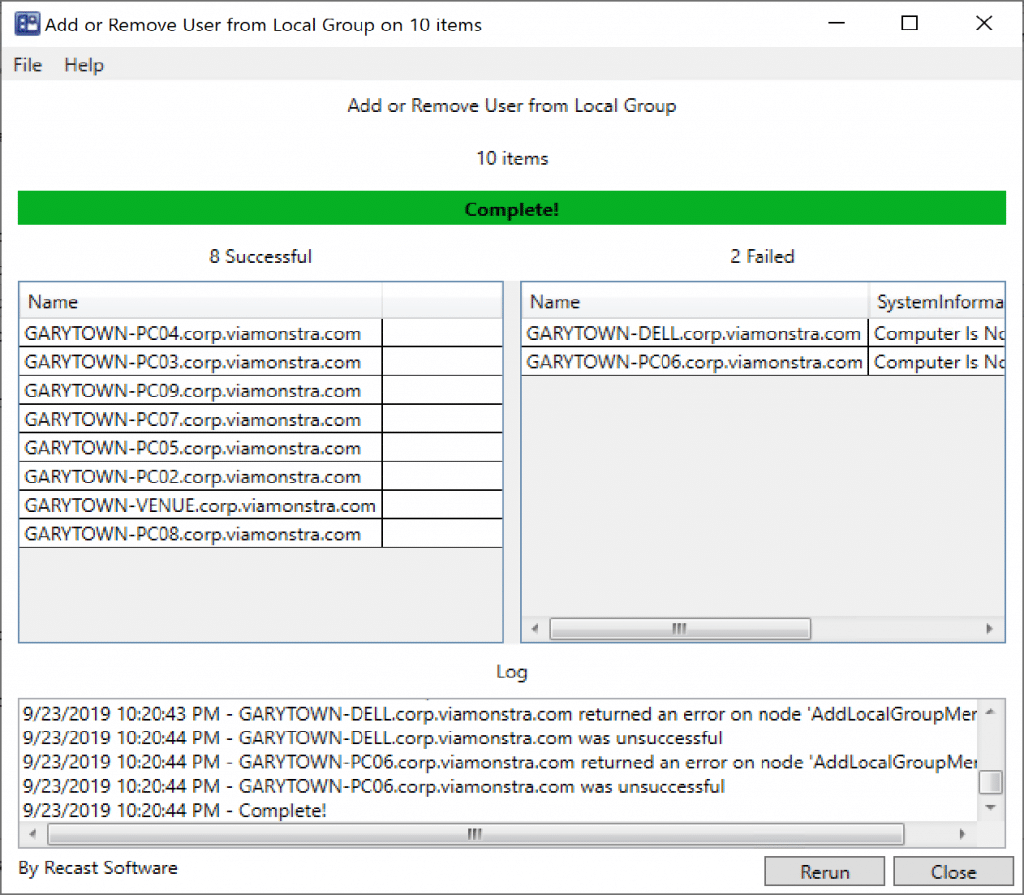
And Confirmed it works on entire collection, as long as the machines are on:
As we just demonstrated, RCT Builder has potential for you to automate tasks, or create new actions that might be unique to your environment.
Learn more about endpoint management software and Right Click Tools automation.