


Hello, Intune aficionados! Today, we’re diving into dynamic groups in Microsoft Intune covering how to create dynamic groups based on the user’s licenses.
For SysAdmins and IT teams broadly, one of the most pressing challenges is ensuring uninterrupted access to necessary applications and services, especially during hardware replacements. This scenario becomes particularly complex when managing a distributed workforce where hardware issues can lead to significant downtime. The ability to dynamically adjust user access based on license assignments not only streamlines operations but also significantly reduces the administrative burden on IT teams.
In this post, we’ll explore a practical solution to this challenge: creating dynamic groups in Intune based on license assignments, ensuring that your workforce remains productive, no matter where they are or what device they’re using.
The Conundrum
While I was working for a previous employer, our InfoSec team made a significant move and decided to block RDP (Remote Desktop Protocol) access to all computers. They created configuration profiles to enforce this policy.
However, the IT team overlooked one significant issue. Whenever an employee had hardware issues with their laptop, the org would ship a replacement. Since all the employees were remote and some lived in distant lands, shipping could take about a week. During this period, the IT team would spin up a Windows 365 Cloud PC for the user, which they could access from their personal computer. With RDP blocked on all computers, this inadvertently affected Cloud PCs, an oversight no one foresaw.
Users started experiencing errors every time they tried to access their cloud PCs. The InfoSec team wouldn’t back down, and managers kept pressing IT on why their employees were going offline for almost a week. We began manually removing users from the RDP block configuration profiles and then re-adding them manually once they received their laptops. It was a tedious process, prompting me to look for ways to automate this.
I aimed to create a dynamic group that could be listed in the ‘exclude’ section of the RDP block configuration profile. This setup would ensure that as soon as a user is assigned a Windows 365 Business license, they could log in without any issues. However, Intune lacks a built-in feature for creating dynamic groups based on licenses.
The Creative Workaround: Dynamic Groups in Intune
After researching Microsoft’s documentation and several other resources, I found a way to make the dynamic group work, while excluding from the RDP block configuration profile.
Identify the Service Plan ID
The most crucial step to create this type of dynamic group is to find the service plan ID of the specific license/app.
- Navigate to the official Microsoft documentation page where service plan IDs are listed.
- Locate the “Service Plans Included” section. If the details seem small, use the zoom feature on the bottom right of the page for a clearer view.
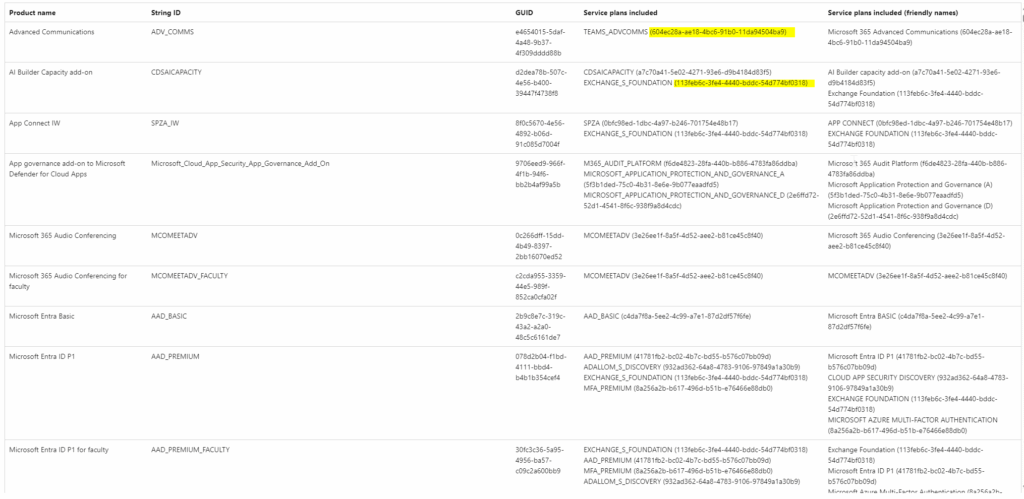
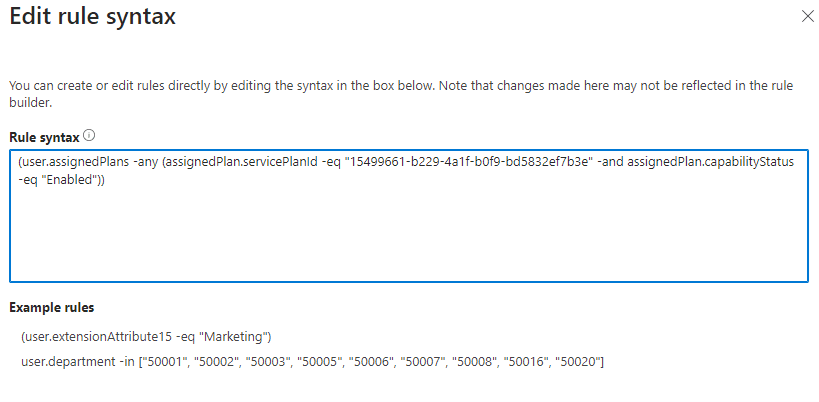
- Note the service plan ID relevant to your needs, such as the ID for Windows 365 Business (15499661-b229-4a1f-b0f9-bd5832ef7b3e).

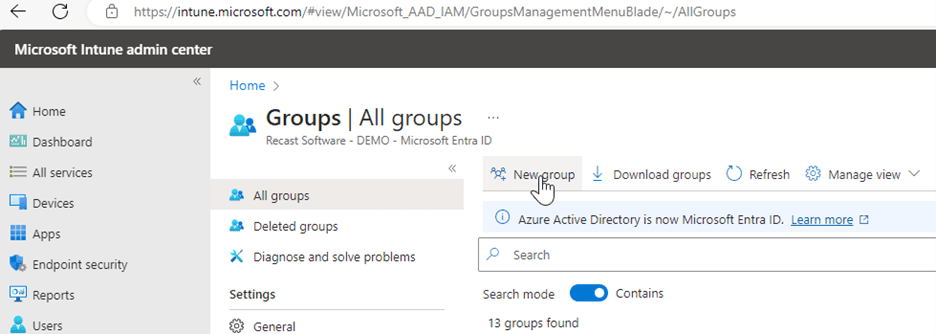
Create a New Dynamic Group in Intune
- Go to the Intune management portal and select “Groups” from the left navigation pane.
- Click on the “New Group” option.
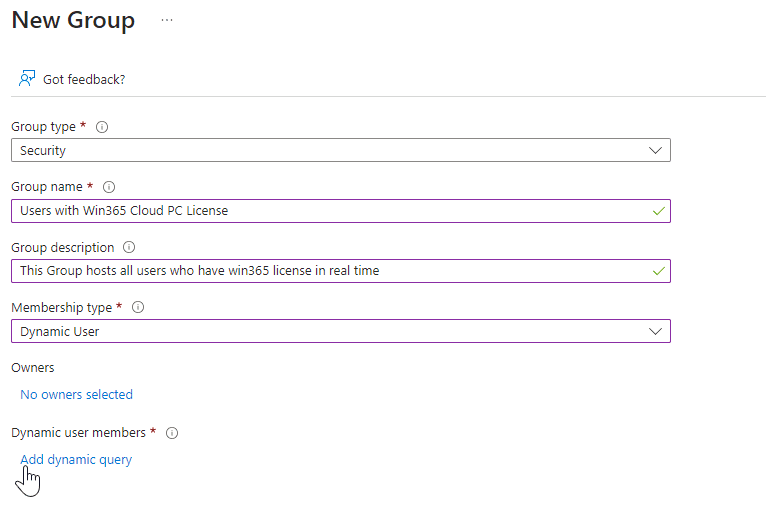
- Fill in the group creation form:
- Name: Choose a descriptive name for your group.
- Description: Provide a clear description for future reference.
- Membership type: Select “Dynamic User.”
- Optionally, add yourself as an owner for easier management.
Configure the Dynamic Membership Rule
- Within the group settings, click on the “Edit” button next to the “Membership rule” section.
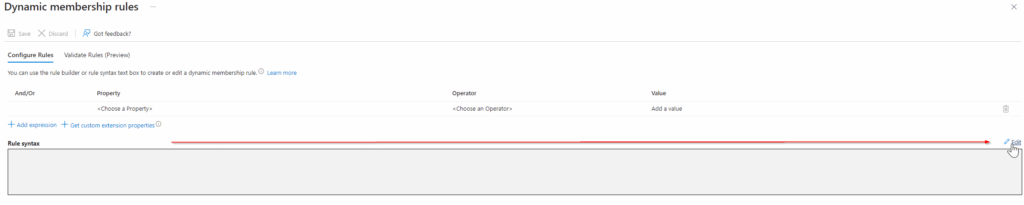
- In the “Rule syntax” box, input the following expression, replacing <servicePlanId> with the actual service plan ID you noted earlier:
(user.assignedPlans -any (assignedPlan.servicePlanId -eq “<servicePlanId>” -and assignedPlan.capabilityStatus -eq “Enabled”))
- So, for me, it would look like this:
- Within minutes, Intune will process the rule and update the members.

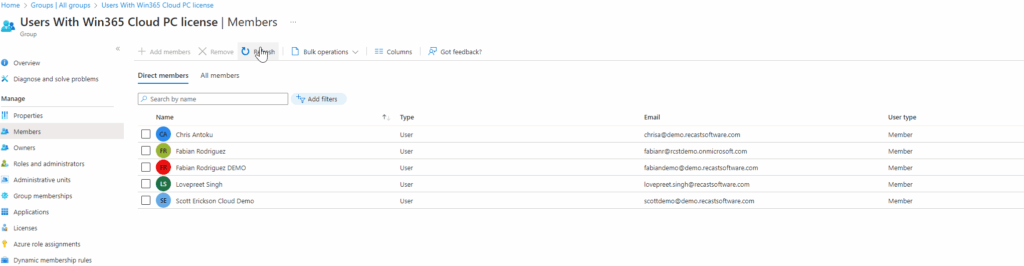
After setting up the rule, Intune will automatically process it and update the group members accordingly. This setup ensures that users with specific license assignments are dynamically managed, allowing for seamless access adjustments as needed.
Wrapping Up
And there we have it—a streamlined approach to harnessing the power of dynamic groups in Microsoft Intune, tailored to tackle the complexities of license management efficiently. This method not only simplifies the process but also elevates the efficiency of your IT operations, ensuring that your team can focus on more strategic tasks rather than getting bogged down by manual adjustments.
So, next time you’re dreading the license management dance, remember this little trick. It’s all about making technology work for you, not the other way around. Happy Intuning!
Additional Intune Posts
Mobile Application Management (MAM)
- Mobile Application Management for Android Devices with Intune
- How to Set Up Mobile App Management with Intune
Local Administrator Password Solution (LAPS) & Security
- How to Set Up Windows LAPS with Microsoft Intune
- Step-by-Step Guide: Enabling Windows LAPS in Entra ID
- Configure BitLocker on Windows Devices with Intune
- How to Configure Bitlocker with Intune
Policy Management & Migration
- How to Migrate Group Policy Objects to Microsoft Intune
- How to Set Up Free Microsoft 365 Developer Program
Application Deployment
Inventory Management & Custom Reporting
Windows Management & Upgrade